Safe Step by Saif
Saif Shariff-Ramji
Fatima Shariff
Grade 7
Presentation
No video provided
Problem
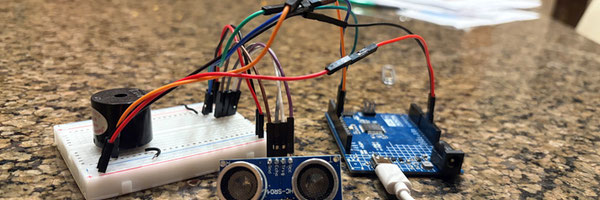
I want to design and build a sensor that detects objects that can help to warn visually impaired people about obstacles in their path by detecting mobile objects. I want to do this by using an Arduino R4 minima and an ultrasonic distance sensor. The way my project will work is that as a visually impaired person moves closer to the object, the sensor will give a queue to the Arduino which will queue the buzzer to beep making an early warning system and reducing the chance of bumping into obstacles that a traditional device like a walking cane might miss. The device I will build can be hooked up to any personal item like a hat, vest, purse or even a walking cane. I think that using a device with a distance sensor and an alert mechanism such as a buzzer or vibration motor will allow a visually impaired person to detect obstacles before collision. This project explores technology that can improve safety and independent mobility.
Method
To build the device, I needed the following materials: Materials
- Arduino Uno R4 Minima
- HC-SR04 Ultrasonic Sensor
- Breadboard
- Jumper wires
- Electromagnetic beeper
- USBC cable
- personal object
- Tape or zip ties
- Laptop with Arduino IDE software
- Power source (battery pack)
Variables Independent Variable (What I change) Distance between the sensor and the obstacle. Dependent Variable (What I measure) The alert response Controlled Variables (What stays the same)
- Same Arduino code
- Same environment
- Same object type during testing
Procedure
- Connect the ultrasonic sensor to the Arduino. Plug in the GND to Bread board pin G24. Plug in ECHO pin to G25. Plug In TRIG pin to G26 and VCC pin to G27.
- +→ 5V Arduino pin
- - → GND Arduino pin
- A5→ Arduino pin 8
- i25→ Arduino pin 7
- i26→ Arduino pin -6
-
- +→ -
- - → +
- Connect the buzzer or vibration motor to E5 and E10 pin.
- Upload Arduino code that:
- measures distance
- activates alerts based on how close objects are.
- Attach the device securely to a personal item like a hat vest purse or even a walking stick.
- Connect the device to a power source such as a power bank.
- Walk towards an object at different distances:
- Record:
- When the beeps become more frequent
Arduino Code - this code is directly copied from science buddies. /* Code to make a buzzer beep faster as an object gets closer to an ultrasonic distance sensor For instructions and circuit diagram see: https://www.sciencebuddies.org/science-fair-projects/project-ideas/Elec_p107/electricity-electronics/obstacle-detecting-walking-stick */ // constant variables for pins const int trigPin = 6; const int echoPin = 7; const int buzzerPin = 8; int threshold = 20; // threshold distance to activate buzzer // buzzer delay variables int buzzerDelay; int buzzerDelayMin = 10; int buzzerDelayMax = 250; long duration; // ultrasonic return pulse duration long cm; // distance in centimeters void setup() { // setup code that only runs once // set pin modes pinMode(trigPin,OUTPUT); pinMode(echoPin,INPUT); pinMode(buzzerPin,OUTPUT); // uncomment the next line to user serial print for debugging // Serial.begin(9600); } void loop() { // send trigger pulse digitalWrite(trigPin, LOW); delayMicroseconds(2); digitalWrite(trigPin, HIGH); delayMicroseconds(5); digitalWrite(trigPin, LOW); // read echo pulse duration = pulseIn(echoPin, HIGH); // convert the time into a distance cm = microsecondsToCentimeters(duration); // control the buzzer if(cm<threshold){ // if an object is closer than the threshold // map the distance to the buzzer delay time buzzerDelay = map(cm,0,threshold,buzzerDelayMin,buzzerDelayMax); // beep the buzzer digitalWrite(buzzerPin,HIGH); delay(buzzerDelay); digitalWrite(buzzerPin,LOW); delay(buzzerDelay); } else{ // if an ob ject is farther away than the threshold digitalWrite(buzzerPin,LOW); // turn buzzer off } // uncomment the next line for debugging // Serial.println(cm); } long microsecondsToCentimeters(long microseconds) { // The speed of sound is 340 m/s or 29 microseconds per centimeter. // The ping travels out and back, so to find the distance of the object we // take half of the distance travelled. return microseconds / 29 / 2; }
Analysis
Research
1. Arduino Code
What is Arduino code: Arduino is a coding platform where you can code a microcontroller also referred to as the "brain". Just like the brain tells our body what to do, the Arduino tells the buzzer and senser what to do. For my experiment, I used the code from the Science Buddies website because that is where I bought the science kit for beginner coders.
How to use Arduino code: Arduino code is in a coding language called c++. Every c++ program must have a function. A function is one of the most important pieces of code. A function can do pretty much anything in coding. All you have to do is type in code then send it to your micro controller. Your micro controller will then interpret the code as 0s and 1s.
2. Ultrasonic Distance Sensor
What an ultrasonic distance sensor is and how does it work: An ultra sonic distance senser is a device that has two sides: the transmitter and the receiver. It fires waves out of the transmitter and receives waves from the receiver side. The waves then hit an object and travel back to the receiver. The sensor then sends the results on how far away the object is back to the device that told the sensor to do its job. In my case, the Arduino r4 minima is the device that instructed the sensor on what to do.
3. Breadboards
How to use a breadboard: A bread board is a piece of plastic with a metal bottom and holes that let you easily input wires to your prototype. You use a breadboard to connect wires in a more organized way. You also have to connect a power source to the breadboard for it to work. You have to plug in inputs and outputs to make your circuit using the breadboard. This is a good alternative to welding.
4. Circuit
How does the full circuit come together: First the Arduino has to get programmed using the code. Then the ultrasonic distance sensor and the other output device have to be connected to each other using a breadboard. Once that is done, then the Arduino can send the code to the ultrasonic distance sensor. The ultrasonic distance sensor will then get the results and send it back to the Arduino. The Arduino, also called the micro controller, can now send the results to another output which, in my case, is the buzzer.


Testing
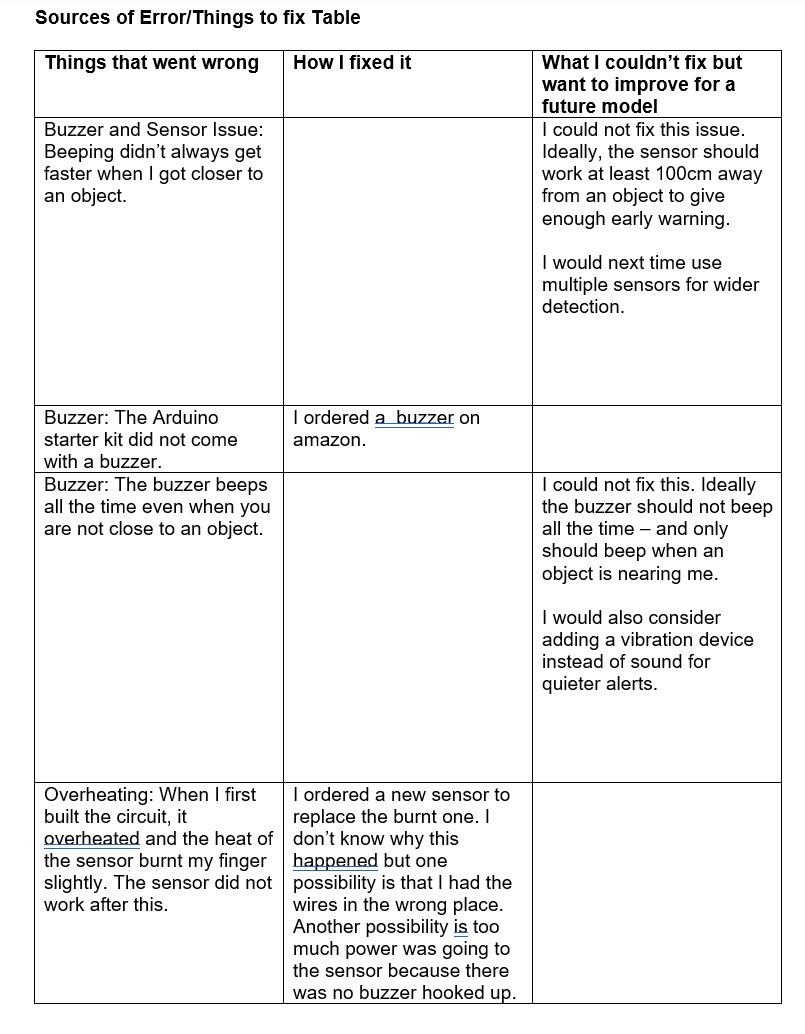
To test my sensor device, I tested difference distances between myself and an object to see if the sensor beeped. I tried walking towards a wall, towards my mom and towards a chair. The sensor beeped faster as I got closer to these objects but was not consistent in when the beeping got faster. I think this is a source of error in the sensor or the Arduino.
Conclusion
The device successfully detected objects before physical contact. As the object moved closer, the alert increased in speed, creating an early warning system. The ultrasonic sensor and alert system allowed obstacles to be detected at all levels before collision. This shows that technology can improve mobility and safety for visually impaired individuals by adding an early warning system.
Citations
Websites: Science Buddies (sciencebuddies.org) Learn.sparkfun.com Arduino project hub (projecthub.arduino.cc) Arduino coding program (software)
Acknowledgement
I acknowledge one of the students in my school who is blind and comes to school with a white cane. She inspired me to think of this invention. I also want to thank my aunt Dr. Shairoz Fazal who is an Optometrist in Chicago Illinois. My science buddy kit was delivered to her house, and I got it when I went to visit her. She talked to me about how visually impaired people manage and made me realize how hard it is for them. She also explained that my sensor would have to detect objects much further away for this device to be useful. While I was in Chicago, I also went to the Museum of Science and Industry and got lots of ideas for my project. I want to thank Science Buddies and the Arduino Project Hub for the information they provided on coding and how to build the device. I watched their videos and they were helpful.