
AI Enabled Smart Walking Stick
Yugam Bansal
Louis Riel School
Grade 7
Presentation
Problem
Everyday, visually impaired people have to manage difficulties regarding navigation. Visually impaired people have to navigate around obstacles, uneven surfaces, stairs and more. This is where traditional walking sticks come in use. They allow the user to move around as the user can tap the stick in front of them allowing them to gain information on their surroundings.
Though, multiple problems arise. A traditional walking stick can not give the user more detailed information, and it can not detect everything. For instance, a traditional walking stick can not tell the user about oncoming people, animals or other objects. This poses a significant risk to the visually impaired user and can be a threat to their life. This is why I have created a model that can fix most of these problems.
Method
Method for building AI Enabled Smart Walking Stick
Building the Walking Stick
Dec 29, 2025
Today, I started building my walking stick by getting the AI portion of the build done. I started by connecting the AI camera to the Pi 5 and booting it up. First I made sure that all my packages were downloaded and installed before I started putting in the commands. One of these installations was the imx500 one. IMX500 is basically the software needed to run the camera. After this, I ran the command to start the camera with the built-in AI recognition model on it. A preview window popped up and boxes started appearing around objects with their names written beneath them. Now I had to integrate the speakers. For this I needed to code. So I searched for the parts I needed to install and I installed espeak and pyttsx3. The code was available online, and I tried to transplant the code into the Pi 5. I also created a virtual environment so the packages and code wouldn’t interfere with my Pi 5 and so that the code for the camera system remains in the preview window open while accessing the script. But there was a problem: espeak and pyttsx3, the speaking packages, were clashing with the imx500 packages as they could not be integrated together. - I will fix this problem hopefully by tomorrow. - I will research other ways to do this project without dependency clashes.
Building the Walking Stick pt. 2
Dec 30, 2025
Today I researched about ways to use object recognition without IMX500 and found something called a YOLO model. In a YOLO model, the Raspberry Pi did all the processing unlike right now where the AI camera is doing the processing. So I didn’t need the AI camera anymore and I could just get a cheap 20–30 dollar Pi 2 camera. Luckily I had the camera. So I installed the YOLO11n packages and also some data the packages also needed. I git‑cloned the source code so I can run it. I then repeated the process from the public GitHub repository by the person who made the YOLO11 packages. I integrated the code and both packages by putting it in the separate virtual environment and ran it. A preview window opened with the camera feed in it, detecting everything it saw and classifying it. Though the frames per second were slower, but this didn’t affect anything. Now I have to integrate the camera. For this I installed the pyttsx3 and espeak packages on my virtual environment. Then I copy‑pasted my previous and old code into my new script. I made sure to add lines so my speaker was on and I turned on the script. This time, whatever the camera detected, it spoke. It spoke at a good rate and I didn’t need to change the settings. Tomorrow I’ll add the ultrasonic sensor. I’ll make sure it works on a power bank, and I’ll make sure it works without a monitor.
Making the Walking Stick Part 3
Dec 31, 2025
Today, I needed to connect my ultrasonic sensor to the Raspberry Pi 5 so the camera’s AI recognition only works when there is something in front of it. The first thing to do first in the code is to define the pins. This means making a variable for the pins, adding if‑statements in the code while the loop and some delays. Then I used Pinout: the Vcc pin is pin 2 and the trigger pin is pin 23 and the receiving pin is pin 24. Then I ran the script but it gave me a warning: “Echo pin is too high.” I researched what that meant and I discovered that I need a voltage divider. A voltage divider reduces the voltage of the Echo signal so it goes to the Raspberry Pi. So I used a breadboard and two resistors: one 1k ohm resistor and one 2k ohm resistor. I connected one to the Echo end and one to the receiving end. The second I did that I tried the script again and saw that it worked this time. If something was within a meter, it would turn on the speaker and the recognition part. Now I needed it to work on a power bank, and this was all hope. I connected the Raspberry Pi to the power bank and it turned on. I then tried running the script and surprisingly, on the power bank it stayed on. The power bank could power the Pi 5 with the script for about 45 mins before turning off. I then replaced the cable I was using—a slow one—to one that can power computers. Now the script can stay on for much longer. I had to now make it so that it turned on the script without a monitor, and when it just becomes powered on. For this, I needed systemd service, which is a Linux provided service. I created a certain folder on my Pi called YOLO and I made it as a systemd service. I put my code in there (like my script basically) and told it to get packages from all my system including my virtual environment. Now when I tested it without a monitor and with just a power bank, it worked. I will make the Arduino part in two days as this should be quick.
Making my walking stick Part 4
Jan 2 2024
Today, I made my Arduino Nano part of the project. I’m adding this so that there is a closer-level sensor and instant object detection feedback. I first made a very simple code on Arduino IDE. I added the variables and functions which define the pins and repeat stuff. And then I added a simple if statement with sensor values and greater/less than symbols with a separate buzzer that I can attach to them. I also made it so that the buzzer buzzes on/off so the noise isn’t as annoying. I downloaded this code to the Arduino Nano and I started connecting the pins through wires. I used a breadboard to make it easier to connect and connect the pins. The buzzer connected to GND and pin 7. The ultrasonic sensor to GND, 5V, D9 and D10. And the water level sensor to GND and to A0. I used a power supply module connected to the 9V battery and turned it on. The first thing I did was to connect it to the ultrasonic sensor; the buzzer would buzz in a certain period. Then the water level sensor — it detects water then the buzzer will buzz in a separate tone. All the while in the background, buzzing on and off when no sensor detects something. Assembly: I simply put the ultrasonic sensors, both of them in the handle with the Pi system on top and Arduino in the bottom. The camera is at the very top with the power bank, the Pi 5, and the speaker in the middle of the handle. Then the water level sensors at the bottom, the buzzer, power supply module, Arduino Nano, and 9V battery. The module and ultrasonic on the top (Arduino system).
Innovation & Design
I've designed and built an AI-enabled walking stick that:
- Uses multiple sensors like the Ultrasonic sensor and the Raspberry Pi camera 2 to give accurate information
- Uses a pre-built AI model called YOLO to analyze the surroundings and classify objects into different categories
- Gives feedback to the user through buzzers and speakers
- Allows users to give an appropriate reaction to their surroundings
- Isn’t as expensive as many other commercial smart walking sticks
- Detects water on the ground through the water level sensor
- Saves some battery by splitting the components between the Raspberry Pi 5 and the Arduino Nano
Innovation:
- Project is innovative because it goes beyond simple distance detection
- Helps visually impaired users better understand their environment by providing meaningful feedback about what objects are present, tells the user what is there and not just that something is there
- Allows users to react more appropriately to their surroundings
- System uses two main circuit boards - Raspberry Pi 5 & Arduino Nano
- Raspberry Pi 5 with camera for object recognition using AI model
- Arduino Nano for object and water detection
- Raspberry Pi 5 consumes too much power to handle everything alone, power bank cannot support power needs for all attached components
- Arduino handles most components with low power usage
- Arduino Nano cannot run AI recognition models
Components Used:
Components list:
- 2 x Ultrasonic Sensor - ($4): For object detection - one for the Arduino Nano and the other for the Raspberry Pi 5
- Raspberry Pi 5 - ($120): For YOLO AI model processing for object recognition, connects the camera and the ultrasonic sensor
- Raspberry Pi Camera 2 - ($35): To collect visual info
- Mini Speaker - ($12): It will alert the user about what type of object is in front of them
- 2 x Resistors - ($0.18): are used to create a voltage divider for ultrasonic sensor as echo pin outputs 5V while the raspberry pi 5 can only take 3.3V
- Power Bank - ($30): Used to power all of the Raspberry Pi components
- 2 x Breadboard - ($5): Used to complete the circuits - one for Raspberry Pi 5 circuit and the other for Arduino Nano circuit - is used for the voltage divider on Raspberry Pi 5
- Arduino Nano - ($30): For object detection and processing - will control the second ultrasonic sensor, the water level sensor and the passive buzzer
- Passive Buzzer - ($2.5): It will buzz in a certain tone if the ultrasonic sensor detects something and it will buzz in a different tone if the water level sensor detects something
- Water Level Sensor - ($4): Detects if there is water on the ground
- Arduino Power Supply - ($0.5): Used to power all components connected to Arduino
- 9V battery - ($1): Battery to power all Arduino components
- PVC Coated Wires - ($5): To connect all the components together and for completing the circuit
- PVC Pipes and PVC Connectors - ($20): Creates the main physical stick that the user will hold - will carry all the components
Total Cost: $242.68

AI Enabled Smart Walking Stick
Method & Overview
The design of the AI-enabled walking stick focuses on providing timely and meaningful feedback through multiple sensors and AI processing. Before the walking stick can give feedback to the user, it needs to go through a multi-step process on the Raspberry Pi 5. First, the Ultrasonic Sensor stays active trying to detect something. If it detects something within 1.75 meters, it will send a signal to the Raspberry Pi 5. After that, the AI model on the Raspberry Pi 5 will activate, telling the camera to send the visual data down to the Raspberry Pi 5. The Raspberry Pi 5 will classify the object in front of the camera into one of 80 classifications and through the speaker, output it.
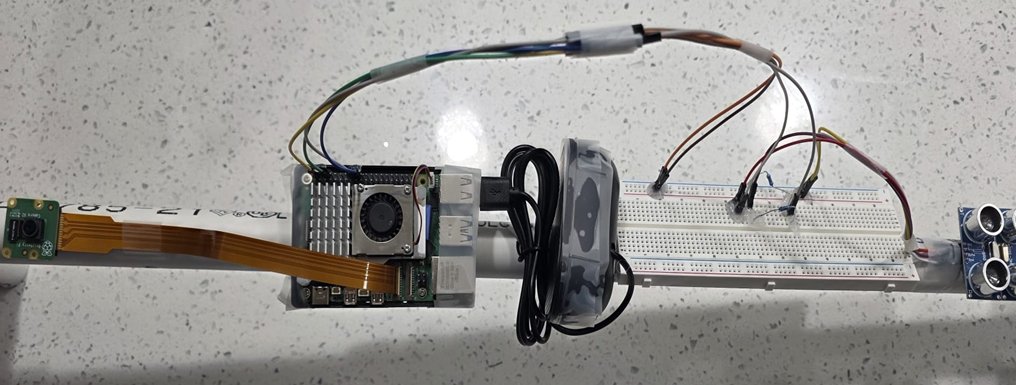
Raspberry Pi Object Recognition Circuit
The Arduino Nano is used to provide instant feedback to the user in case there is possible danger. There are two main sensors, the Ultrasonic Sensor and the Water Level Sensor. If the Ultrasonic Sensor detects something within a meter, it will relay the information to the Arduino Nano which will tell the buzzer to buzz at 520 hertz. But if the Water Level Sensor detects something, it will issue the information to the Arduino Nano, which will then tell the buzzer to buzz at 700 hertz.
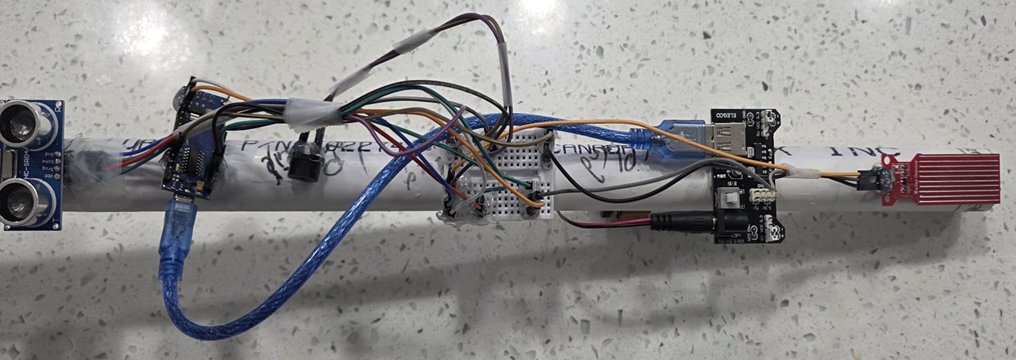
Arduino Nano Object Detection Circuit
These two separate processes sum up to create a semantic experience for the visually impaired person using the walking stick. The user can also choose one individual system based on their needs.
Analysis
Testing
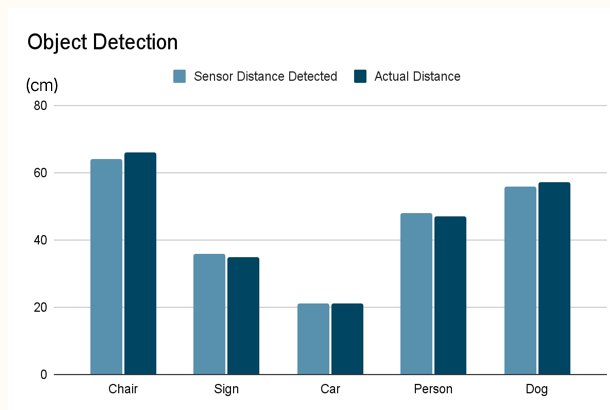

Analysis
I tested my model in my house, a park, and a pathway. House: Aimed at furniture and other miscellaneous objects. Park and Pathway: Aimed at benches, signs, stopped vehicles, and volunteer participants.
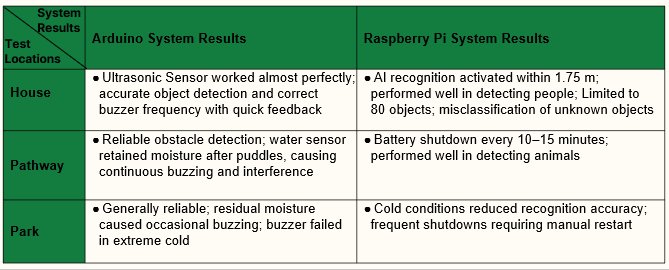
System Results
House:
When tested inside the house, the ultrasonic sensor worked very well and was able to accurately detect furniture and other household objects. The buzzer responded quickly and changed frequency correctly based on how close objects were. This showed that the system could give fast and useful feedback in an indoor environment. The AI recognition system activated when objects were within about 1.75 meters and was good at detecting people. However, the AI could only recognize around 80 objects, so objects that were not included in its training were sometimes identified incorrectly or not recognized at all.
Pathway:
On the pathway, the system was able to reliably detect obstacles such as benches, signs, stopped vehicles, and people. This showed that the ultrasonic sensor could work well in open outdoor spaces. However, after moving through puddles, the water sensor stayed wet and caused continuous buzzing, which interfered with normal operation. The battery also shut down every 10–15 minutes, making it difficult to use the system for long periods. Despite these issues, the AI system performed well at detecting animals, which was useful in this environment.
Park:
In the park, the system generally worked well but was affected by environmental conditions. Wet grass and moisture sometimes triggered the water sensor, causing unwanted buzzing. In very cold conditions, the buzzer stopped working properly, and the AI recognition became less accurate. The system also shut down frequently and needed to be restarted manually. These problems showed that cold and wet weather reduced the system’s reliability outdoors.