
Artificial Pancreas
Manha Ali
Grade 7
Presentation
No video provided
Hypothesis
If a pump controlling the excretion of an acid and a base respectively can be carefully programmed to produce a neutralized solution, then a pump can replace the exocrine function of a pancreas, because the function of a pancreas is to secrete sodium bicarbonate to neutralize stomach acid.
Research
What is a Pancreas?
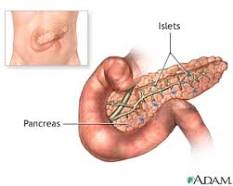
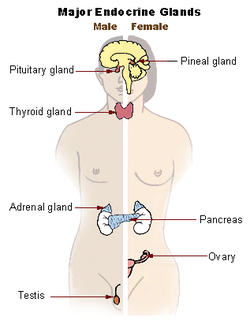
A pancreas is an organ of the body's digestive system and it is found in the abdominal cavity behind the stomach. The pancreas is a mixed gland, having both an endocrine and an exocrine operation. An endocrine system is a
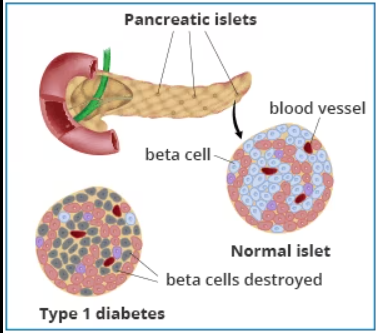
chemical message-barrier made of hormones. The group of glands of an organism that produces discharge those hormones directly into the circulatory system to regulate the function of distant target organs. In us humans, the endocrine glands are the thyroid and adrenal glands. Exocrine are glands that secrete or discharge substances on an epithelial surface (thin layer of flattened cells that lines the inside of some body cavities) by a way of the duct which in anatomy and physiology is a pathway mainly from exocrine gland. An endocrine gland, it secretes into the blood to multiple important hormones, which are, insulin, glucagon, somatostatin, and pancreatic polypeptide. About 3 million cell clusters, known as pancreatic islets, are there in the pancreas. These islets have four main types of cells which are engaged in the regulations of blood sugar levels. Each of the cells secretes an unalike type of hormone. These cells can be alpha cells, secretes glucagon (escalates sugar/glucose in blood), beta cells produce insulin (reduces sugar/glucose in blood), delta cells makes somatostatin (regulates and stops alpha and beta cells) and pancreatic polypeptide cells, or (gamma) cells, produces pancreatic polypeptide. These act to stabilize blood glucose through making glucagon to expand the levels of glucose, and insulin to decrease it.
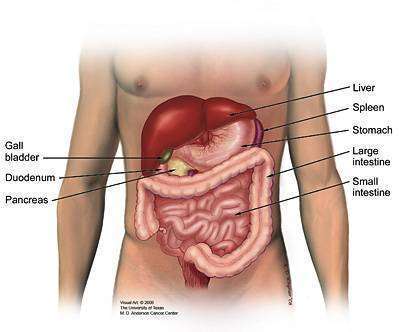
Location of the pancreas:
The pancreas lies behind the stomach. The pancreas is usually 15 centimeters long. Physically, the pancreas is divided, the head of the pancreas, the neck of the pancreas, the body of the pancreas and the tail of it. The head is bordered by duodenum. The head surrounds two blood vessels, the mesenteric artery, and vein. In the back of the head emerges a small uncinate process. That uncinate process is a small part of the pancreas. This uncinate process is the formed lengthened the angle of the joint of the lower and left lateral borders in the head of the pancreas. The neck is about 2.5 cm (1 in) long. It stays between the head and body. Its front higher surface holds up the base of the stomach. The neck appears from the higher left part of the front of the head. Its control is first upward then forward and then upward and to the left to join the body; it's more flat above downward and backward. On the right side it is ribbed by the gastroduodenal artery. It gives blood straight to the distal part of the stomach and nearby part of the duodenum (small intestine). The body’s largest part of the pancreas lies behind the pylorus. Pylorus is the furthest part of the stomach that attaches to the duodenum. It’s divided into two parts the antrum, which connects to the body of the stomach, and the pyloric canal, which connects to the duodenum. The tail ends by touching the spleen.

Diseases that leads to an Artificial Pancreas
As we know now the pancreas uses its exocrine and endocrine obligation in many different ways to help us stay healthy. A poorly functioning pancreas can lead to lots of different diseases, such as cancer or even diabetes. Type one diabetes connects to the pancreas because when a person is diagnosed with it. It means their pancreas stops producing insulin or provides a small amount. People with type one diabetes control their blood sugars by checking it and taking insulin. Pancreatic cancer is a disease in which cancer cells form a tissue of the pancreas. It can happen from obesity, smoking, age, red meat, chemical or heavy metal exposure, chronic pancreatitis, and a few more.
What are artificial pancreas?
Artificial pancreases need three things
- An automatic glucose monitor
- Automatic insulin delivery system
- And a system to link blood glucose levels with insulin delivery
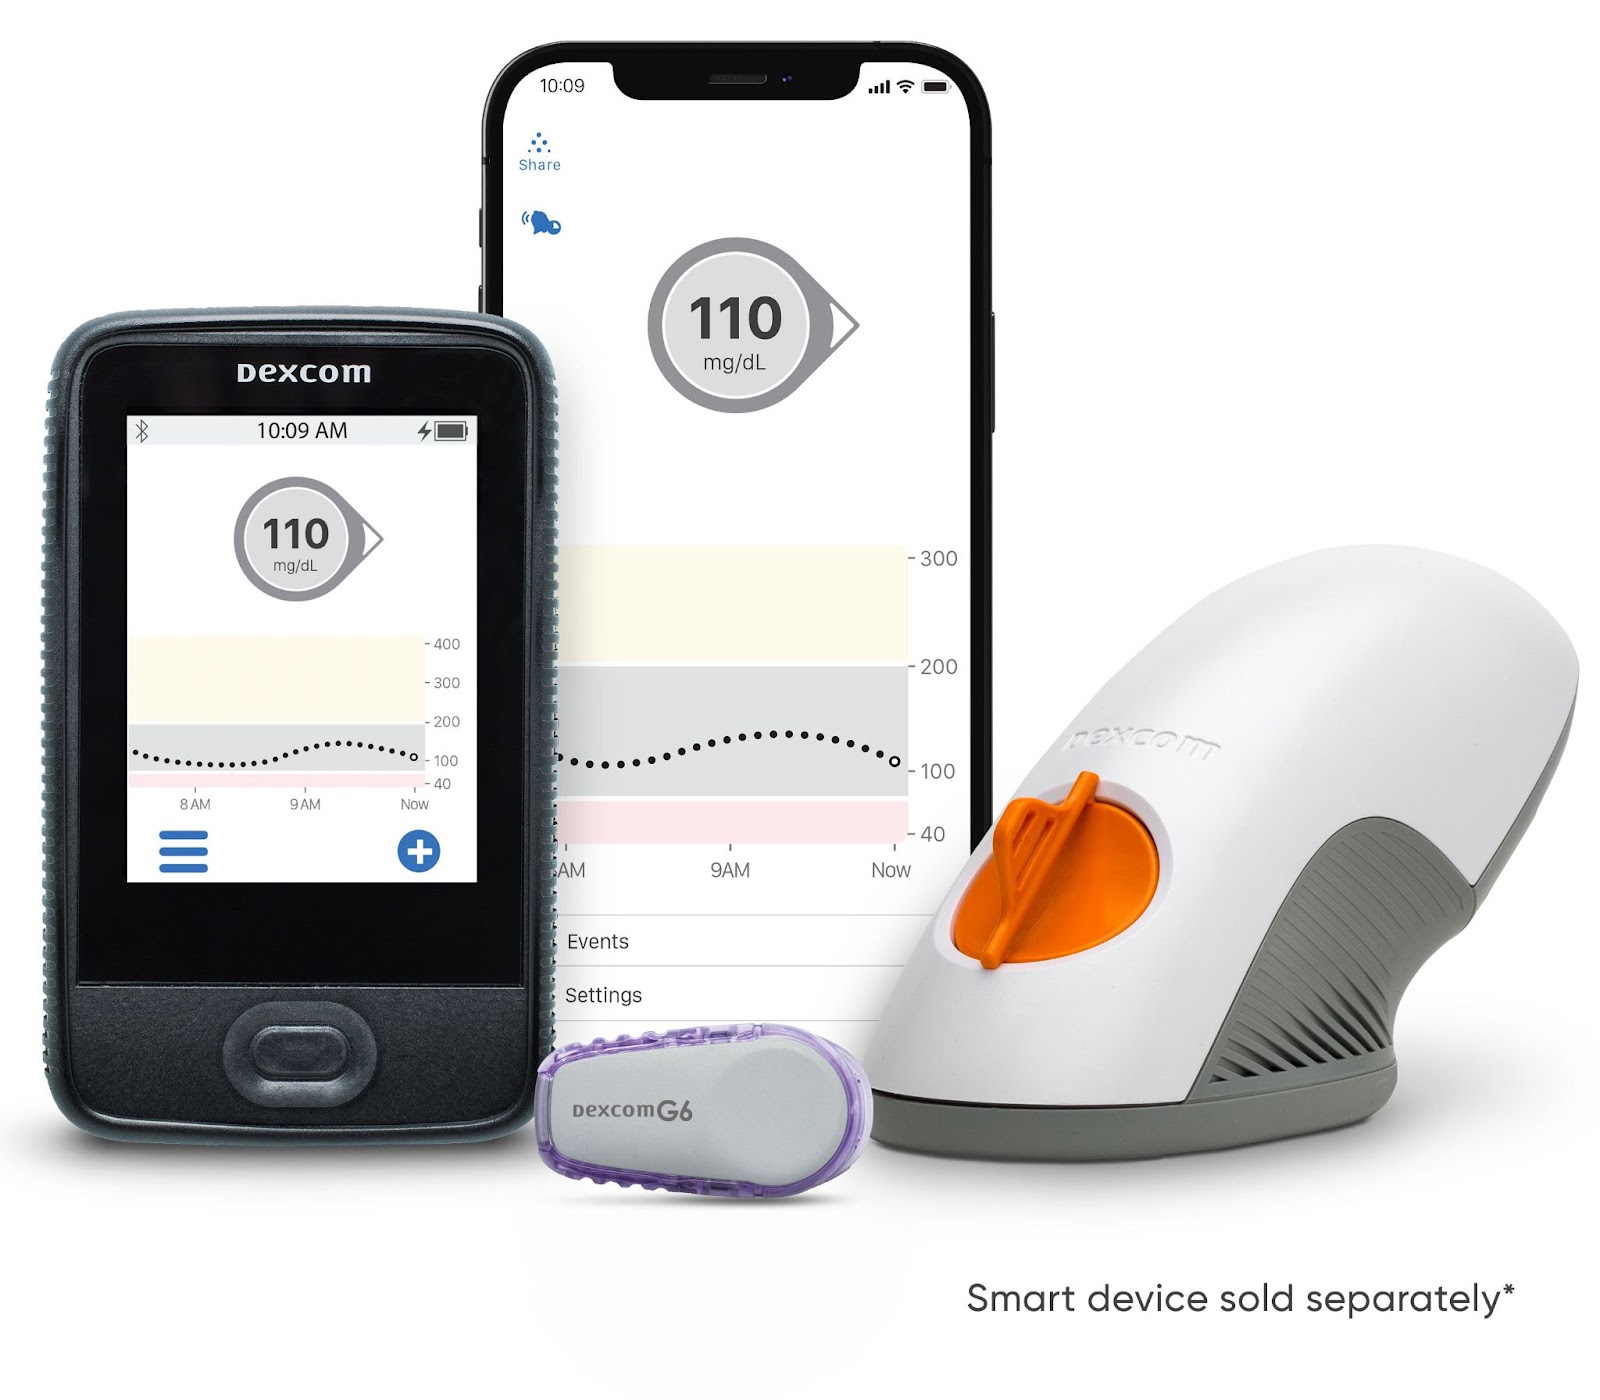
These three factors are usually for people with type one diabetes. If someone has type one diabetes, their pancreas does not provide the insulin they need and that's why they need to do it by hand. They can provide insulin in their bodies by doing two things: one or the other. Putting insulin in them by using injection or an insulin infusion pump. Artificial pancreases remain inside the abdomen. A pancreas controls blood glucose. Artificial pancreases monitor your blood glucose level and add up the amount of insulin you need at certain periods of time and deliver it. A lot of artificial pancreas systems need to count the amount of carbohydrates a person consumes. These are called hybrid artificial pancreas systems, because some of the insulin is given automatically and some insulin is given from what information that is entered. Keeping blood glucose on scale will prevent more health problems and people with type one diabetes improve on their daily life. https://www.niddk.nih.gov/health-information/diabetes/overview/managing-diabetes/artificial-pancreas
How do artificial pancreas systems work?
Artificial pancreases need three things:
- An automatic glucose monitor
- Automatic insulin delivery system
- And a system to link blood glucose levels with insulin delivery
A glucose monitor follows blood levels every couple minutes using a sensor positioned under the skin. The sensor doesn’t have a wire. The sensor supplies information to a program stored on a smartphone or insulin infusion pump. The program evaluates how much insulin is needed and communicates with the infusion pump when the insulin needs to be delivered. The insulin infusion pump gives small amounts of insulin throughout the day when blood glucose levels are not at the target.
Two types of insulin pumps
- A pump that is worn outside of the body on a belt, a pocket, or a pouch.
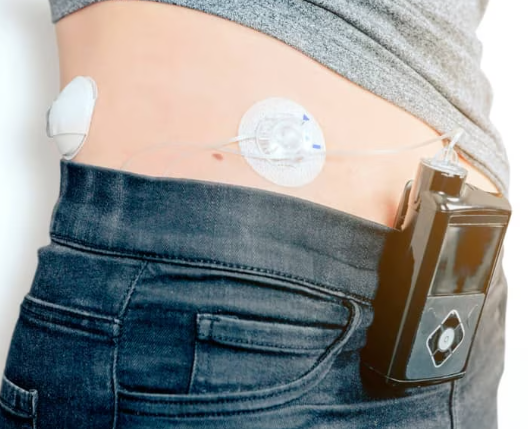
- The other type of insulin pump sticks right to the skin with a clinging pad.
How they work
- Insulin runs from the pump down a plastic tube that attaches to a smaller tube. This is called a catheter, which has a needle that is placed under the skin and remains in its spot for a few days.
- The adhesive attaching pump is replaced every few days.
https://www.niddk.nih.gov/health-information/diabetes/overview/managing-diabetes/artificial-pancreas
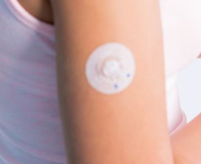
How to attach the insulin pumps
The pump is the size of a regular smartphone. You connect it to your body using an infusion set. There is a small plastic tubing or a needle or a small tapered tube called cannula you put under the skin. The place it is put is on your belly, buttock, and even thigh. Those spots are called the infusion site. Some pumps come with something called an inserter so that it is easier placement even if in hard to reach areas.
https://www.webmd.com/diabetes/insulin-pump#1-1
Are there different types of artificial pancreas systems?
- Threshold suspend and predictive suspend system
Threshold suspend and predictive suspend systems can shortly stop or suspend delivering insulin if the body's blood sugar goes low. Threshold suspend system stops reaching insulin when your body's blood sugar level drops to a preset level.
- Insulin only system
Insulin only systems keep your blood sugar levels within your aim by automatically increasing or decreasing the proportion of insulin reached to your body based on your CGM values. Insulin only systems can increase insulin doses if the blood sugar level is higher than your proportion.
- Dual hormone systems
Researchers are now trying to develop and they are testing systems that use two hormones. Insulin to lower glucose levels and glucagon to raise blood sugar levels. Using two hormones to power blood sugar is close to the way the pancreas works in people that have a regular one.
Important Vocabulary
- Endocrine Gland: Any organ in the body that makes hormones. In us the significant endocrine glands are the thyroid and adrenal glands.
- Exocrine Gland: Is any organ in the body that makes tears, milk, sweat, or saliva a tube or opening to the body's surface.
- Insulin: A hormone in the body that has authority over the amount of glucose in the blood.
- Islets: The pancreas has clusters of cells that secrete hormones.
- Somatostatin: It is a hormone.
- Pancreatic polypeptide: Is an endogenous peptide hormone made by F cells / PP cells of the islets langerhans (Disease that starts in LCH cells) of pancreas.
- Secretes: A gland or organ that produces or discharges a substance.
- Duodenum: The first part of the bowels under the stomach.
- Mesenteric Artery: A surrounding artery in the body's circulatory system.
- Unicate: Bent at the tip (like a hook)
- Pylorus: The base of the stomach.
- Gastroduodenal Artery: A small blood vessel in the abdomen.
- Glucagon: A natural hormone your body works with the other hormones and body type purpose to rule sugar levels in the body.
Variables
Manipulated: The weight of the neutralized solution after the pump secretes sodium bicarbonate into the acetic acid.
Responding: The pump operating time, Colour of the changing sodium bicarbonate solution.
Controlling: Same amount of bromothymol blue, same cups, conductivity sensor, alligator clips, bowls, batteries, and same amount of distilled water.
Procedure
All parts must be assembled on the breadboard.
Conductance Sensor: Cut a piece of a straw about 6 cm long, one end of the straw should be rigid. This will help keep the wire on the sensor.
Take a copper wire and cut them into two pieces 15-16 cm long. Note: Cutting copper with a pair of scissors won’t be too easy so pick a pair that's okay to dent or just use a pair of wire cutters.
Wrap each end of the straw with the copper wire that was just cut. Make sure it's done tightly and loop it four times on both sides. If the wire moves at all, it could change the conductivity detected by the sensor.
Wrap the wires 4 cm apart from each other, and leave the wires with tails that are about 6 cm long (or longer) each. If the wires do move some, this should be fixed when adding the Styrofoam piece next.
Cut a piece of flat styrofoam that is close to 4 cm × 7 cm. Gently poke that copper wire tails from the straw through the Styrofoam piece, keeping the wires the same distance apart that they are on the straw piece. Place the Styrofoam about 1–2 cm above the straw.
On the top side of the Styrofoam (opposite side of the straw), make a sharp bend in each wire, right above the Styrofoam. Be sure the bend is sharp enough to keep the wires from sliding down through the Styrofoam.
The sensor will go into a bowl of liquid, and the amount of copper wire submerged in the liquid can change how much conductivity the sensor detects. So it is important that the amount of wire submerged in the liquid is always the same. Since Styrofoam floats, the Styrofoam piece will help keep the wires plunged at the same depth in the liquid for the tests.
Lastly, fix the unattached alligator clip leads from your circuit to the copper wires on the sensor. It does not matter which clip is connected to which wire.
Testing Artificial Pancreas: Use three mixing bowls and label them "Neutralized," "Vinegar," and "Baking Soda." For labeling, it's better to use masking tape and a permanent marker or small sticky notes and a pen or pencil.
On a scale, place a measuring cup or other small container to weigh baking soda on the scale. Zero out the scale and then weigh out 14.3 grams (g) of baking soda.
Put the 14.3 g of baking soda into the mixing bowl labeled "Baking Soda."
Use the graduated cylinder, or a metric measuring cup, to measure out 200 milliliters (mL) of distilled water. Add the 200 mL of distilled water to the baking soda in the mixing bowl.
Mix the water and baking soda until the baking soda is completely dissolved.
Measure out 100 mL of the baking soda solution and add this to the mixing bowl labeled "Neutralized." Caution: Mixing an acidic solution with a basic solution can cause a powerful chemical reaction . The vinegar must be poured carefully and slowly to give the two solutions some time to react, otherwise a big mess will be created.
After the reaction has slowed, slowly mix the solution to make sure the vinegar and baking soda have completely reacted. The amounts of vinegar and baking soda are the same. Because of this, the acid and base should react and neutralize the solution.
Measure out 200 mL of distilled white vinegar and carefully pour it into the "Vinegar" bowl. Take the tubing from the pump and place both ends in the "Vinegar" bowl.
To find out what the pH of the baking soda solution, the vinegar and the neutralized solution is, add about 1 teaspoon of bromothymol blue indicator solution to each bowl. Each solution will change color according to the color scale. The vinegar should turn yellow, the baking soda solution blue and the neutral solution green.
Gently place the conductivity sensor in the "Neutralized" bowl, letting the straw part be submerged and the Styrofoam piece float on the surface, as shown in.If the Styrofoam piece is not floating evenly, try taping the test leads onto the rim of the mixing bowl to keep things in place.
The pump may start running as soon as the conductivity sensor is in the neutralized solution, but do not worry if the pump is not running yet. (When the pump runs, vinegar should simply be pumped out of, and then back into, the "vinegar" bowl). In this step, the artificial pancreas model will be normalized so that the pump does not run in a neutralized solution, but still runs in a solution that is slightly more acidic (which will be more conductive). This can be done by adjusting the three potentiometers (the blue components with the white knob that you put in holes
B12–14, B16–18, and B20–22).
A potentiometer is a variable resistor; the resistance can be changed by turning the white knob. The circuit has three potentiometers with different values: 1 MΩ (1,000,000 ohms), 100 kΩ (100,000 ohms), and 10 kΩ (10,000 ohms).
When the total resistance of the potentiometers changes, it affects how much voltage is sent to the transistor, which controls whether the pump is turned on or not.
If the pump is not running, slowly and gently turn the white knob on the 1 MΩ potentiometer until the pump turns on. Try turning it all the way clockwise and all the way counter-clockwise to find out which way turns the pump on (which way you need to turn it will depend on which way you put the potentiometer into the breadboard).
Once the pump is running, very slowly turn the potentiometer’s knob in the opposite direction to turn the pump off. Stop turning the knob when it reaches the point that makes the pump very slow and almost turn off. Then move on to the 100 kΩ potentiometer and turn the knob until the pump just switches off.
While adjusting the potentiometers, identify which pump tube has liquid flowing out of it. When the pump is not running, dry the end of this tube and mark it with a small dot using a permanent marker. This will help n the next step when it is needed to pump a liquid into a different bowl.
Note: If the pump does not turn on, no matter how much you turn the potentiometer's knob, check the following:
Make sure all of the jumper wires and components are pushed firmly into the breadboard's holes. A single loose wire can prevent the circuit from not working.
Make sure no exposed metal parts (like the leads of the resistors) are touching each other, as this will create a short circuit.
Be especially careful to avoid creating a short circuit by having wires from the red and blue bus strips touch each other. This can make the circuit get dangerously hot and can even melt some of the plastic components.
Once the artificial pancreas model is normalized, make sure that the pump does not run when the conductivity sensor is in a neutralized solution, carefully remove the conductivity sensor from the neutralized solution (leaving the pump's tubes in the "Vinegar" bowl), and rinse the sensor briefly with some baking soda solution (over a sink or a different bowl). This will help remove the neutralized solution from the sensor.
Now leave the unmarked pump tube (inlet tube) in the "Vinegar" bowl. Take the pump tube that was marked red. (the outlet tube), wipe the outside down with a paper towel or clean rag, and then place it in the "Baking Soda" bowl.
Next, place the conductivity sensor in the "Baking soda" bowl. The pump should start running, pumping vinegar (a drop or a few drops at a time) into the bowl with baking soda solution, and there should be bubbles being made as the acid-base reaction takes place.
Note: Make sure the sensor is floating the same way that it was in the neutralized solution. If needed, tape the alligator clip test leads to the side of the bowl to hold them in place so that the Styrofoam piece is floating evenly. It is very important to make sure that the sensor is submerged in the liquid to the same depth that it was in the neutralized solution or the results may be inaccurate.
While the pump is running, carefully and continually move the end of the pump tube in the "Baking Soda" bowl so that the vinegar mixes well with the baking soda solution throughout the bowl (including under and around the sensor). It is very important to have all of the vinegar and baking soda mixed well together to neutralize the baking soda solution.
There will be a spot where vinegar drips into the baking soda solution, the color of the indicator will change from blue to yellow. The color change of the solution gives an indication of what the pH of the solution in the "Baking Soda" bowl is during neutralization.
Eventually, the pump should slow down and then stop running. It might turn on and off as the last bits of vinegar that is pumped
Observations
Artificial Pancreas Testing Two Second Interval (Cumulative)
|
Number of Sample |
Pump Operating Time (Sec) |
Name of Sample |
Colour of Sample |
|
1 |
0 Seconds |
Sodium Bicarbonate |
Midnight Blue |
|
2 |
2.1 seconds |
Sodium Bicarbonate + Acetic Acid |
Navy Blue |
|
3 |
4.3 seconds |
Sodium Bicarbonate + Acetic Acid |
Blue-Green |
|
4 |
6.0 seconds |
Sodium Bicarbonate + Acetic Acid |
Dark Teal |
|
5 |
8.1 seconds |
Sodium Bicarbonate + Acetic Acid |
Cadet Blue |
|
6 |
10.3 seconds |
Sodium Bicarbonate + Acetic Acid |
Ultra Blue |
|
7 |
12.3 seconds |
Sodium Bicarbonate + Acetic Acid |
Teal |
|
8 |
14.3 Seconds |
Sodium Bicarbonate + Acetic Acid |
Dark Jungle Green |
|
9 |
16.8 seconds |
Sodium Bicarbonate + Acetic Acid |
Forest Green |
|
10 |
18.8 seconds |
Sodium Bicarbonate + Acetic Acid |
Green |
Analysis
This paired with Smarter Pumps and Loops could create a revolutionary product. One that makes people feel like they don’t have diabetes at all. My experiment shows how that can be done. There are also special potentiometers on my project which controls how much resistance there is from the substance.The artificial pancreas is still going through testing stages however once it’s complete and priced at an affordable price this will absolutely eliminate diabetes. The best cure to the disease affecting approximately 371 million people is coming soon. Such a system has the potential to reduce the risk of severe low blood glucose, help diabetics achieve better overall blood glucose control, and ease the burden of constantly making insulin-based adjustments and decisions. A system that can do these things is often referred to as an "artificial pancreas" or a "closed loop" system.
Conclusion
There is lots of research on the artificial pancreas. At the moment people with Type 1 Diabetes require insulin by injection or infusion from an insulin pump on an around-the-clock basis. Insulin pumps continuously deliver background (or "basal") insulin throughout the day and deliver additional insulin (a "bolus") when the person with diabetes indicates he or she is eating or has elevated blood glucose. An insulin pump follows a set of directions, specific to the individual, that tells it how much insulin should be delivered based on the time of day and how all other insulin needs should be calculated. This paired with Smarter Pumps and Loops
could create a revolutionary product. One that makes people feel like they don’t have diabetes at all. My experiment shows how that can be done. There are also special potentiometers on my project which controls how much resistance there is from the substance.The artificial pancreas is still going through testing stages however once it’s complete and priced at an affordable price this will absolutely eliminate diabetes. The best cure to the disease affecting approximately 371 million people is coming soon.
For people who use an insulin pump, a smarter pump that monitors blood glucose and automatically makes decisions about insulin needs to keep blood glucose in a safe range would be a huge improvement in diabetes management. Such a system has the potential to reduce the risk of severe low blood glucose, help diabetics achieve better overall blood glucose control, and ease the burden of constantly making insulin-based adjustments and decisions. A system that can do these things is often referred to as an "artificial pancreas" or a "closed loop" system.
Application
How this can be used is....
This can be used to look over your blood sugar if its an emergency and you have an artificial pancreas. Lets say your insulin pump broke and you need you check your blood sugars, NOW. You can use them method I used. Also having the knowledge on the pancreas can help you in many different ways.
Sources Of Error
Where I went a little wrong was I don't think I followed the scientific method all the way through. I am thinkingf this becuase I wrote the hypothesis after giving a diagram of what the expiriment looks like. I also don't have a clear analysis. Now that I am looking over it, I have found some gramatical errors. Some places should be written as plural and the other way around too. I was repetitive in a couple places.
Citations
- https://www.niddk.nih.gov/health-information/diabetes/overview/ma
- https://www.cancer.gov/types/pancreatic/patient/pancreatic-treatment-pdq#:~:text=Pancreatic%20cancer%20is%20a%20disease,is%20difficult%20to%20diagnose%20early
. - https://www.webmd.com/diabetes/insulin-pump#1-1
- https://my.clevelandclinic.org/health/articles/21532-enzymes
- https://dictionary.cambridge.org/dictionary/english/exocrine
- https://www.mayoclinic.org/diseases-conditions/pancreatitis/symptoms-causes/syc-20360227
Acknowledgement
I like to thank my teachers for their support and help. I would also thank my parents for being able to supply the things I need.
Attachments
No Log Book Provided
View Extra Attachment: report/data/exhibit/etc(may download a file)