Smart LEGO Train Control: Automating Two Trains with ESP32 and Sensors
Grade 7
Presentation
Problem
Can we control and stop two LEGO trains using an ESP32 microcontroller and photo sensors? This will help us to coordinate the movements of two LEGO trains.
The project shows how accurately we can automate two devices simultaneously using a programmable IoT (Internet of Things) device. Here, ESP32 is the IoT device.
Method
Materials/software we used:
- Microcontroller - ESP32 - Duino-D-32 - This is a development board based on the ESP32 microcontroller by Espressif Systems. It is commonly used for IoT projects due to its powerful dual-core processor, built-in Wi-Fi, and Bluetooth capabilities. The ESP32 communicates with the BLE(Bluetooth Low Energy) devices in the LEGO Powered-Up hubs.
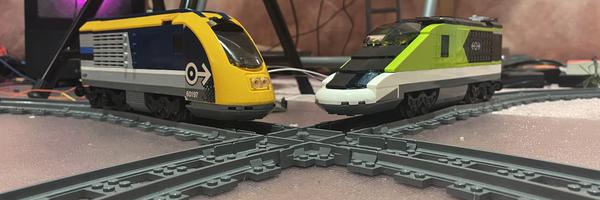
- Two Lego trains yellow and green (models - LEGO City Passenger Train 60197 and 60337 )- I got these trains as Christmas presents in two different years.
- Lego Powered Up Hubs(inside the trains) - It has Bluetooth Low Energy (BLE), which can be used to connect to ESP32.
- Lego train tracks made of plastic(not metal) - for running the trains
- Digital LDR Photosensitive Light Sensor Module - LDR means Light Dependent Resistor. The light value of the sensor changes based on the light detected. My parents bought it from the Amazon website manufactured by DIYables.
- Laptop/Desktop – to code the Arduino program
- Arduino IDE 1.8.19 – to write, compile, execute and upload Arduino programs. It is a free software.
- ESP32 Arduino Library - This is to support the ESP32 functions.
- Legoino Arduino Library - This is for controlling all kinds of LEGO Powered UP devices. It is a free library that we can get from GitHub.
- NimBLE Arduino Library - This is a dependent library for the Legoino package. It is a free library that we can get from GitHub.
Download and Installation of Arduino IDE:
I downloaded Arduino IDE from the Arduino website. I downloaded the ESP32 library, Legoino library, and NimBLE library from GitHub. I wrote and tested the program in Arduino IDE.
Hardware Setup and Connections:
I connected the ESP32 to the desktop computer using USB. I uploaded the program to ESP32 using the ArduinoIDE upload button. I connected the ESP32 to the photo sensor directly. ESP32 communicates with the BLE devices inside the trains wirelessly via Bluetooth technology. I built two connected tracks for the trains with an intersection to show the STOP and GO. Things to note are that the trains should be within the Bluetooth range ( approx. ½ meter) to communicate with ESP32 constantly. Otherwise, it will get disconnected. The logic in the program will control the trains.
Logic of STOP and GO of the train:
I placed the sensors in specific places on the tracks for both trains. When the train goes over the sensor, the light value changes.
The program needs a threshold value to make the train stop and go. I printed the sensor light (LDR) values to the Arduino IDE console using code. By observing the light values in good and low lights, we decide on a threshold value for the program. We tried various threshold values before reaching our final threshold value of 540. The logic is if the current value is less than the threshold value, the train is detected on top of the sensor. The train stops. If the current value is greater than the threshold value, that means the train is not on top of the sensor. The train moves. The same logic is used to detect the trains in the final two-train logic.
Track Building:
Two loops are connected by two crossings. Each train will go on it’s own loop. The sensors are placed near the junction along with each track loop.
The logic for automating the movements of two trains:
We extended the STOP and GO logic to automate the two trains. Suppose a yellow train comes to the junction and hits the sensor. Two things will happen. The ESP32 will start counting up to 2 seconds for the train to cross the junction completely. In the meantime, if the green train’s LDR sensor detects that the green train comes to the junction within those 2 seconds, then the green train will stop and wait. No train would stop if it didn’t come in those 2 seconds. The same logic is used when the green train goes through the junction and the yellow train has to stop and wait. If no train has hit a sensor, keep both trains running.
Running and Testing:
First, I tested whether the program can connect to the trains using a simple connection program.
Once I successfully connected both trains, I tested the STOP and GO logic program with each train engine and the photo sensor. I was using an Arduino four-pin lm393 mh sensor series photoresistor at first. The program was working but I realized that the photo sensor was not powerful enough to detect the light in my basement. I had to use a flashlight to get some consistent light values. So, I have decided to change the photo sensor to a more powerful one.
This time, the program worked without a flashlight. However, the train glitched a little after stopping at the sensors. I resolved the glitching after adding the cool-down values for the sensor. Every sensor has a response time. The response time is the time it will take to detect the increase or decrease in light. So, to make the STOP and GO logic work better, we had to add a cool-down of 1 second after the train stopped at the sensor. Cool-down means the sensor will not detect the train for that 1 second. That means the train will keep running without interruption.
Once I figured out the logic of controlling one train with one sensor, I moved on to the two-train logic. I had to use two ESP32 pins to connect two sensors and read those LDR values. After printing the LDR values, I realized that the values changed when I connected two trains to the ESP32. So I had to change the threshold value to 3500 for the sensors to detect the trains correctly. When the train goes over the sensors, the LDR value changes, meaning the train is detected near the unction. So if other train is coming, it has to stop and wait for 2 seconds for the intersection to clear. During the testing, I discovered that one of the sensors was malfunctioning. It gave me ghost LDR values even after I shut down the program. So I had to replace it with a new sensor. After this fix, the program started working successfully.
Analysis
Results:
I successfully executed the STOP and GO logic for each train separately. I tested a program which can move the two trains simultaneously. Finally, I successfully extended the STOP and GO logic to simultaneously control and automate the Lego two trains.
Analysis:
I noticed that the position of the train stops varies based on the speed of the train or the no of compartments added. With more speed, it stops further away from the sensor. Same with more compartments added. When I tested the project, I used only the engine, mainly to ensure the program was running as expected.
However, the range of connection between ESP32 and BLE devices in trains is around 0.5 meters. To get a consistent connection, I had to place the ESP32 on an elevated place. Also, the accuracy of the train's stopping varies since I was using plastic tracks, ie. no steady DC current through the tracks. I can get a lot of noise values for light in the photo sensors. So, I had to add cool-down time for the photo sensors in the one-train program. We got the results we wanted for the two-train program without adding a cool-down value.
I also noticed that sometimes the sensors give me ghost values even after I shut down the program. In that case, I had to change the sensor. I went through 4 sensors during the testing of this project.
Conclusion
We concluded that we can control and automate two LEGO trains using an ESP32 microcontroller and two photo sensors. However, to increase the accuracy of the STOP and GO, we have to provide consistent power and light. To extend this project, we could add switches and maybe more trains.
Citations
https://en.wikipedia.org/wiki/ESP32 <---- information about ESP32
https://www.youtube.com/watch?v=y4T_EzDyKNI <---- For photoresistor stop and go code
https://www.youtube.com/watch?v=YqTgpuXnWeI <---- For two train junction with photoresistor.
https://github.com/corneliusmunz/legoino <---- To make Arduino software compatible with Lego Trains
https://github.com/h2zero/NimBLE-Arduino <---- NimBLE library is needed. as a dependency for the Legoino library
https://chatgpt.com/ ---- used chat GPT to troubleshoot errors in the code.
Garmmarly <---- To check and correct spelling and sentence structure during content creation for the project.
Acknowledgement
I acknowledge the amount of help I got from my mom (Deepthi Kannanayakal) for troubleshooting my programs. I also acknowledge Julie Girard (Mme. Girard) for giving me time to work on the project.