Presentation
No video provided
Problem
What dose it take to build a remote control car?
Remote control cars tend to be expensive, and sometimes, making electronics from scratch can make it alot cheaper (for example: this remote control car).In addition lots of electronics you can buy are very uncustomizable. Therefore, if I build one from scratch I can add any modifications I want to it (ex. a claw, a floor cleaning mecanisme, etc).
Method
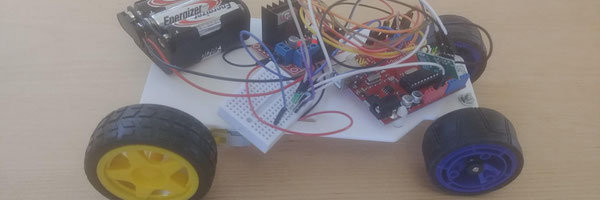
CAR: for the car I used an arduino uno that constently looks for a message from the controler using a receiver. Then, it looks at the message and decides what to do. The car can be told to: go forwards, go backwards, turn left, turn right, or stop. These commands are operated by a motor drive, which can tell the two motors to spin accordingly.
EXTRA CAR INFO: when I send a message to the motor drive, I have four inputs: two for each motor. for each of them, I can put either HIGH or LOW. if I put either HIGH, HIGH or LOW, LOW then the motors don't spin at all. if I put HIGH, LOW then they spin forwards. finaly, if I put LOW, HIGH then they spin backwards. By using these commands I can have the wheels spin in any combination I want.
CONTROLER: for the controler, I used an arduino nano, that constantly sends, through the transmitter, a message to the car telling it not to move. The arduino can detect when the four buttons get pressed, and then it stop sendtng the car the message to not move and instead sends the car a message to move/turn in the desired direction.
Analysis
For my robot to work, you need the transmitter and the receiver not to be obscured by somthing that could stop the message, as well as a battery. To find a working receiver and transmitter, I coded the receiver to turn on an LED if it got a message from the transmitter, then I went one by one, and tested every receiver and transmitter.
In conclusion, if you were to recerate this vehicle, I would suggest to watch out for short circuits. While making the car, I got a few short circuits which made this project a lot harder to do. For example, one of my battery cases partly got melted so I needed to replace it. Luckly, I had 3 extra cases, so it was fine. Therefore, my suggestion is to always have some extra materials handy, in case somthing goes wrong (and somthing will always go wrong!).
Conclusion
I did it! I built a remote controlled car!
It took lots of time, coding, asking for help, working hard, and some failures.
But at the end - you can see the car and use it at your leisure.
Citations
While reserching, I used arduino project hub and instructables to learn how to do wiring and coding for the robot. this article on digikey taught me how to use the radiohead library to send and receve data. Eng. David Labushevsky taught me alot with how to wire and code the robot, as well as teaching me how to plan, which i could not have finished this project without. Rea Mitelman taught me how to focus on the project and not get stuck on something unnecessary.
Acknowledgement
thank you to Eng. David Labushevsky, for helping me alot with designing, building, and coding the robot, as well as 3D printing the body of the car. thank you to my dad, Rea Mitelman, for helping me with getting the materials, coding, debugging, and encuregement with the project. thank you to arduino project hub and instructables for help with wiring and coding the robot, and arduino forums for help with debugging. last, but not least, thank you to this article on digikey, and the radiohead library for making it possible to make the controler wireless.