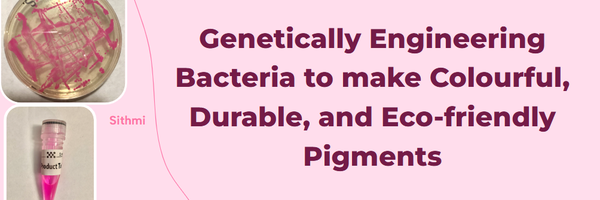
Genetically Engineering Bacteria to make Colourful, Durable, and Eco-friendly Pigments
Grade 9
Presentation
No video provided
Hypothesis
Problem/Question:
Can pigments made from genetically engineered bacteria be a viable alternative to pigments used in commercial paint?
Hypothesis:
If acrylic paint, paint made from tempera paint powder, and pigments extracted from genetically engineered bacteria are exposed to various environmental conditions, then the RGB colour values of the bacterial pigments will remain stable and comparable to that of the commercial paints because of their chemical properties that make them stable under environmental conditions like heat, cold, moisture, and UV light.
Research
How are bacteria genetically engineered to produce proteins they wouldn’t normally produce?
Genetic engineering of bacteria is mainly done with the use of plasmids. Plasmids are circular pieces of DNA inside bacteria cells, and they can be modified for the bacteria to produce proteins they wouldn’t normally produce. Scientists do this by inserting a gene that codes for that protein.
To do this, special enzymes called restriction enzymes are added to the plasmid to recognize, bind to, and cut specific DNA sequences. This is used to open up and prepare the plasmid for the insertion of the gene. When these restriction enzymes are added, some of them leave the DNA with uneven ends. If the plasmid and the gene they wish to insert are cut with the same enzyme, the uneven ends of both will be able to bond with each other.
After this step, gene fragments, cut plasmids, and an enzyme that connects DNA fragments are put together in a solution. The enzyme, called a ligase enzyme, attaches the uneven ends of the desired gene and the cut plasmids. This makes full circular plasmids that carry the desired gene. This process was done to make the plasmids that I used in my experiment.
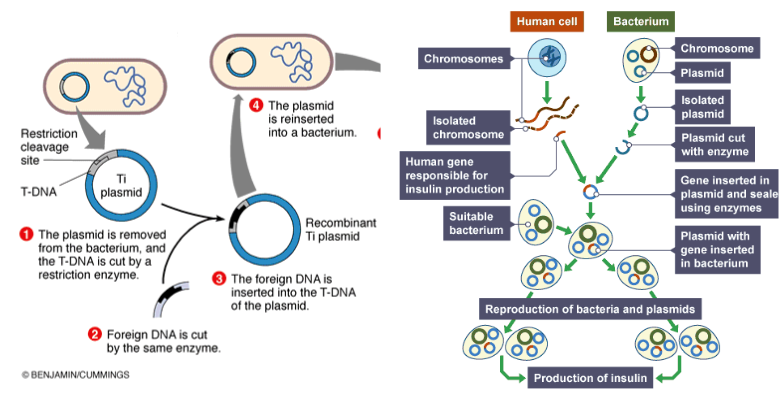
( Image from: Genetic engineering. (n.d.). BBC. https://www.bbc.co.uk/bitesize/guides/zqqs2nb/revision/1 )
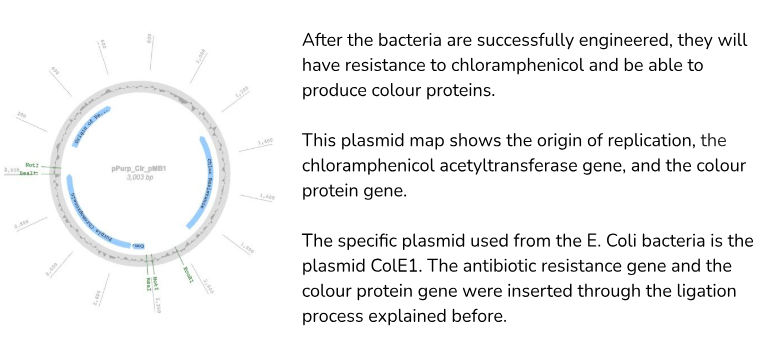
The plasmid used in my experiment consists of the chloramphenicol acetyltransferase gene and the gene that produces Red Fluorescent Protein. (DsRed)
Chloramphenicol acetyltransferase is a bacterial enzyme that gives the bacteria resistance to the antibiotic chloramphenicol, and this gene acts as a selection marker. This makes it so that on the petri dishes with the antibiotic chloramphenicol added, only the bacteria that take the plasmids in will grow, since the regular blank K12 E. Coli cells won’t have antibiotic resistance.
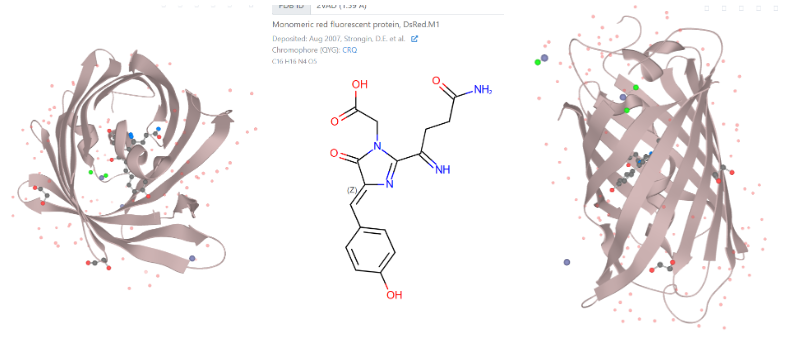
The fluorescent magenta proteins that the E. Coli cells produced in my project were derived from a protein called DsRed, which comes from the sea anemone species Discosoma. The magenta colour instead of a red colour is caused by mutations/slight differences in the sequence of amino acids. The gene that produces the protein was extracted from Discosoma sp., and inserted into the plasmid through the process explained previously.
Protein structure of Monomeric red fluorescent protein, DsRed.M1:
( Images from: DsRed.M1 :: Fluorescent Protein Database. (n.d.). FPbase.
https://www.fpbase.org/protein/dsredm1/ )
Plasmid map of the plasmid used in my experiment:
What is the process of inserting the plasmids into the E. Coli bacteria?
Following the modification of the plasmid, it is reinserted back into the bacterium, which can now produce proteins that the new gene codes for.
In my procedure, this was done by mixing the blank E. Coli cells in the transformation buffer, then mixing the plasmids in this solution.
Why the transformation buffer is used:
The transformation buffer is mostly made up of sterile water and positively charged calcium ions. (Ca2+) The DNA plasmids and the bacterial cells’ outer membrane are both negatively charged, so they’ll be attracted to the positively charged calcium ions. Because of this, the calcium ions can cause the DNA plasmids and bacterial cells to move closer together, and there will be a greater chance of the DNA plasmids getting into the cells during the heat shock.
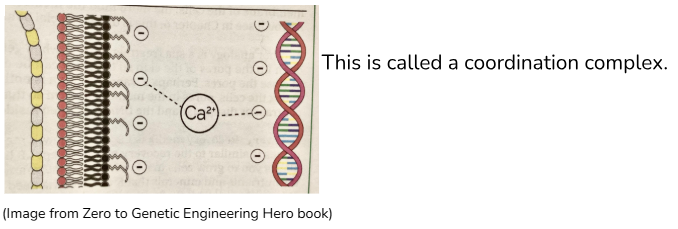
After the DNA plasmids, E. Coli cells, and the transformation buffer are mixed together and left at 4°C for 5 minutes, they are heat shocked at 42°C. This heat shock is done to make the cell membranes of the E. Coli bacteria more permeable, so that there is a greater chance of the DNA plasmids entering the bacteria. (The bacteria with the DNA plasmids inside will be successfully engineered and able to make the magenta colour protein used in the rest of the experiment.)
After this step, recovery media is added to the cells. The recovery media consists of nutrients and minerals similar to the LB agar used in petri dishes, except that it contains no agar. It’s used so that the bacteria can recover after the process of becoming engineered and taking in new DNA. Now, the bacteria are transformed and have antibiotic resistance to chloramphenicol, while also being able to able to make colour proteins.
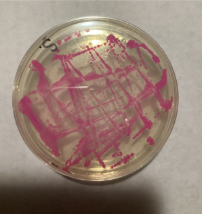
When they’re grown on selective petri dishes containing chloramphenicol, they will be producing colourful pigments while being the only bacteria growing.
How do you get the colour proteins/colourful pigments out of the bacteria?
In order to get the colour proteins out of the bacteria, the cells need to be lysed. (so the cell membrane breaks down.)
In my experiment, surfactants Triton X-100 and Hen Egg White Lysozyme (HEWL) were used to do this. Triton X-100 is able to break down cell membranes while not destroying the proteins that the cells were engineered to produce. HEWL is a protein enzyme that is able to bind to and break apart the peptidoglycan in the intermembrane space of E. Coli cells.
By using both of these surfactants, the membranes of the cells will break down and the colour protiens/pigments will come out from the bacteria.
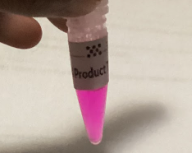
Afterwards, the solution is centrifuged, which separates cell debris from the pigments, and sterilized through a 0.22μm filter, which makes sure no bacteria is in the final solution.
How do bacterial pigments have resistance to environmental conditions?
DsRed, the colour protein that the bacteria in my experiment produced, has been tested and shown to have better photostability than other similar pigments. DsRed’s protein structure contains a beta-barrel structure, which creates a protective environment for the chromophore. A chromophore is the part of the protein that reflects colour. (causes the colour)
In colour proteins similar to DsRed, like Green Fluorescent Protein, this beta-barrel structure has been shown to contribute to the overall stability of the protein. It acts as a shield, protecting the chromophore from environmental damage and preventing photobleaching of the pigment.

What are the potential negative health effects that acrylic paint (and paint powder for kids) can have?
Some acrylic paints and pigments used in paint contain harmful additives that are carcinogenic and toxic to human health. For example, pigments used in paint may contain heavy metals, which can cause respiratory irritation, kidney disease, and many other health problems if there’s exposure over long periods of time. Also, some acrylic paints contain additives like phthalates and formaldehyde, which have been associated with causing cancer, disrupting hormones, and liver toxicity. These ingredients specifically become more harmful when they’re on skin.
Chemicals in paint can release into the air while drying, and can also enter the bloodstream within 60 seconds of being on skin.
Additionally, powdered paints, like the tempera paint powder used in my project, have a greater inhalation risk. Therefore, there’s also a greater risk of respiratory irritation, and a greater risk of toxicity from ingredients in the pigment and paint fillers/additives.
The production of pigments used in commercial paints is also very harmful to the environment. The process of mining, milling, extraction, and grinding releases toxic substances into the air, water, and soil. This negatively affects ecosystems, and aquatic life are particularly vulnerable to these harmful effluents.
How has engineering of bacteria been used commercially?
To be used commercially, there has to be a way for proteins made by bacteria to be produced in large quantities. This has been done before in many biotechnological applications, like the creation of insulin from genetically engineered E. Coli bacteria. The engineered bacteria, containing a plasmid with a human insulin gene added, are put into large fermentation tanks. In the fermentation tanks, the bacteria mass-produce insulin that can be harvested and used.
This method using fermentation tanks has also been successfully used for the production of pigments. For example, scientists at Amgen, Inc. have been able to engineer E. Coli to produce large amounts of indigo pigment in fermentation tanks.
By using fermentation tanks, the cost of large amounts of petri dishes and large incubators is removed.
Variables
Manipulated variable:
The type of pigment. (bacterial pigments, tempera paint powder, acrylic paint)
Responding variable:
The change in the RGB colour values of the pigments after being exposed to heat, cold, and UV light.
Controlled variables:
- The type of bacteria producing the bacterial pigments (K12 E. Coli)
- The amount of time the pigments are tested against each environmental condition for
- The area that the pictures of the pigments are taken at after the testing (to check the colour values)
- The incubator used for testing the pigments against heat
- The fridge used for testing the pigments against cold temperatures
- The temperature that the pigments are incubated at to test against heat (30°C)
- The temperature that the fridge is at to test the pigments against cold (3°C)
Procedure
To grow bacteria expressing magenta pigment: (Amino Labs Engineer-it Kit)
- Label petri dishes: 1 N.S, (non-selective) and 3 S. (selective).
- Label one of the selective petri dishes with a “+”, (positive control) one with a “-”, (negative control) and one with an “e” (experimental sample)
- Make molten LB agar and pour it into the N.S plate to cover the bottom half.
- Add the antibiotic pill into the rest of the molten LB agar, and after it dissolves, pour it into the selective petri dishes.
- Let the agar in the petri dishes harden.
- Turn on incubator to 37 degrees celsius.
- Streak the blank K12 E. Coli cells onto the N.S petri dish using the template.
- Streak the blank cells onto the negative control petri dish. (to see if the antibiotics are effective in preventing the growth of cells that don’t have the plasmid that gives them resistance.)
- Flip the two petri dishes upside down and put them into the incubator with a humidity chamber on top.
- Incubate the two petri dishes for 12-24 hours.
- If the negative control plate successfully didn’t show any growth of cells after incubation, discard it.
- Turn on the “Ice 4°C” setting on the DNA playground’s cold station.
- Make sure the transformation buffer tube has all the liquid at the bottom. Place it in the cold station on the DNA playground.
- Take a blue inoculating loop and collect 10-20 colonies of bacteria from the N.S plate.
- Put the loop with the bacteria in the cold transformation buffer without touching the sides of the tube.
- Twist the loop like a blender to mix and suspend the cells in the liquid while keeping the tube in the cold station.
- Dip a new blue inoculating loop into the tube with the DNA plasmids (these have the genes for antibiotic resistance and pigment production.) Make sure there’s liquid in the loop.
- Dip and spin the inoculating loop into the competent cells made in step 14. Do this for 10 seconds.
- Turn on the “Shock 42°C” on the hot station in the DNA playground.
- Leave the tube with the competent cells on the cold station for 6 minutes, or until the hot station reaches 42°C.
- Heat shock the cells, transformation buffer, and DNA solution in the tube by moving it onto the hot station for 90 seconds.
- After 90 seconds, move the tube with the transformed cells back into the cold station and leave it for 2 minutes.
- Adjust the temperature of the hot station to “Heat 37°C”.
- Pour the tube of recovery media into the tube with the transformed cells.
- Move that tube into the hot station after making sure it’s at 37°C. Leave it for 24 hours to recover.
- After 24 hours, turn on the incubator to 37°C.
- On the selective LB agar plate labeled "e", pour half of the transformed and recovered cells.
- Leave the plate with the lid partially off until all the liquid evaporates.
- Leave the rest of the transformed cells in the fridge in case this test doesn’t work.
- Get the stab of "+ cells" and the selective LB agar plate labeled "+". Using a single yellow loop, dip into the + cells stab and spread them across the agar plate in a zig zag.
- Flip both plates upside down, stack them, and put them in the incubator with a humidity chamber over them.
- Incubate for 24-72 hours until the trait is expressed. (after the first 24 hours, change the temperature of the incubator to 30°C to prevent the petri dishes from drying out.)
To extract the pigments from the bacteria that are now expressing the pigment: (Amino Labs Extract-it Kit)
- Mix the antibiotic into the molten LB agar.
- Pour the molten agar into 2 petri dishes and let the agar harden.
- Turn on the incubator to 37°C.
- With the engineered bacteria cells from the previous steps, take one yellow inoculating loop and collect a few colonies of bacteria.
- Trace a double zigzag pattern on the petri dish with the inoculating loop.
- Using the same inoculating loop, repeat steps 4-5 on the second petri dish.
- Incubate the two petri dishes upside down with the humidity chamber over them for 16-24 hours. (These steps were to amplify the amount of colourful bacteria.)
- When the bacteria are expressing their colour traits, take them out of the incubator.
- Turn on the Cold Station on the DNA Playground to Ice (4°C), and set the tubes of lysis buffer and lysis accelerator in the cold station.
- Take a yellow inoculating loop and gently drag it across the surface of one of the petri dishes, collecting some cells.
- Once the loop is full, dip it into the lysis buffer tube and twist it to dislodge and mix in the cells in the buffer. Repeat this until all cells from both petri dishes are in the lysis buffer.
- Mix/blend the cells for another 60 seconds using the same yellow inoculating loop to make sure they’re fully suspended in the lysis buffer.
- Using a pipette, move the lysis buffer and cells mixture into the tube of lysis accelerator that is also on the cold station.
- Firmly close the lid of the lysis accelerator tube and vigorously shake it for 30 seconds to ensure that it’s fully mixed.
- Place the lysis accelerator tube on the cold station to cool for 5 minutes.
- After 5 minutes, use the pipette to move the liquid from the lysis accelerator tube back to the lysis buffer tube.
- Turn off the cold station and leave the mixture to incubate for up to 24 hours at room temperature.
- After 24 hours, put the tube of lysis buffer and cells into the microcentrifuge.
- Balance the tube by placing the similarly weighted balancing tube across from it.
- Spin the microcentrifuge at maximum speed (13,000 x g to 15,000 x g) for 20 minutes.
- Get the final product tube and place it in the hot station of the DNA Playground (in the off setting) to hold it.
- Remove the syringe plunger from the syringe and lay it on a clean surface.
- Open the syringe filter’s container, but don’t touch or contaminate the end where the filtered solution will come out of.
- Screw the syringe filter onto the syringe.
- Place the syringe and filter inside the burst bag, with the tip of the filter poking out of the triangle cut at the bottom of the burst bag
- Once the bacteria pigment sample is done centrifuging, gently pour the liquid into the syringe, making sure to pour only the liquid and not the pellet of cell debris at the bottom.
- Hold the end of the syringe in the final product tube.
- Put the syringe plunger back into the syringe, and gently press down to filter the bacteria pigment solution. (this removes the bacteria from the solution so the pigment isn’t contaminated.)
To test the pigments:
- Use a syringe to put equal amounts of the bacterial pigments into 3 containers (0.5 mL)
- Use a syringe to put equal amounts of acrylic paint into 3 containers (0.5 mL)
- Add one tablespoon of water to one tablespoon of tempera paint powder
- Use a syringe to put equal amounts of tempera paint into 3 containers (0.5 mL)
- Put all containers into the incubator at 30°C for 5 days, taking pictures of each in the same place, every day at the same time. (at 10 pm)
- Put all containers into the fridge at 4°C for 5 days, taking pictures of each in the same place every day at the same time. (at 10 pm)
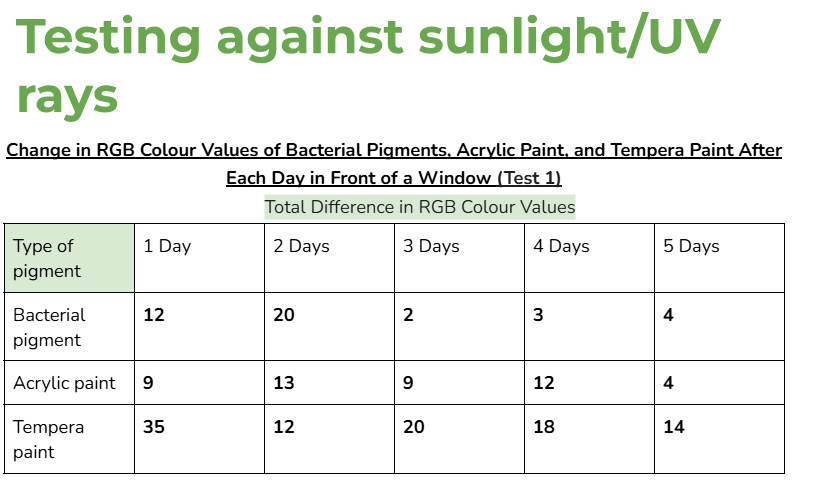
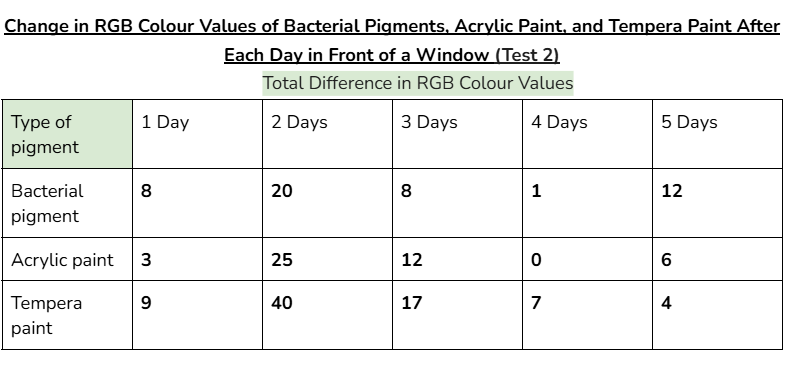
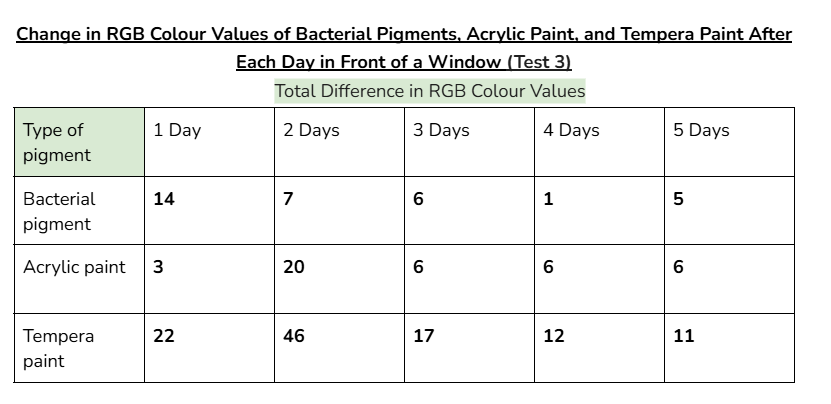
- Put all containers in front of a window for 5 days, taking pictures of each in the same place every day at the same time. (at 10 pm)
- Check the RGB colour values of all the pictures (through a colour picker website) to measure changes over time.
Observations
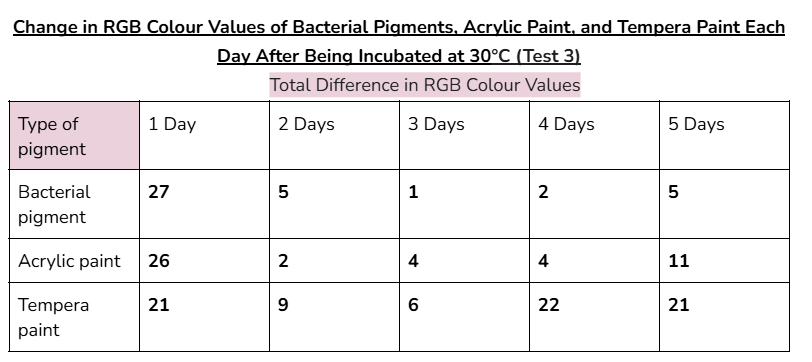
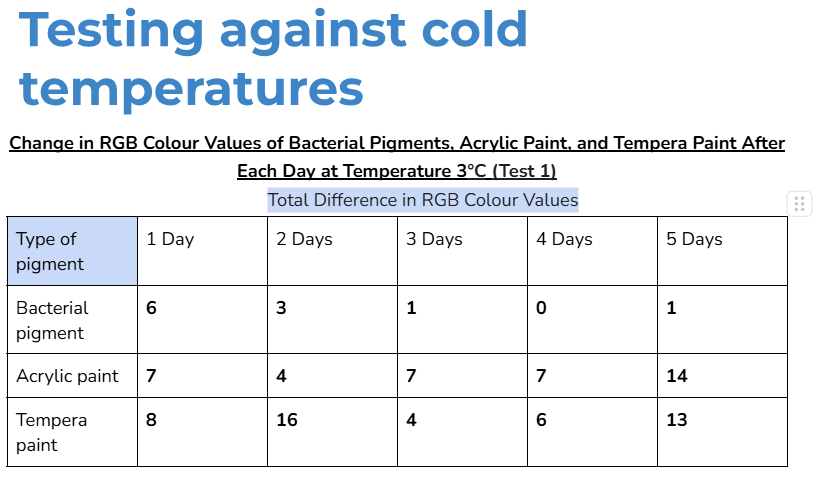
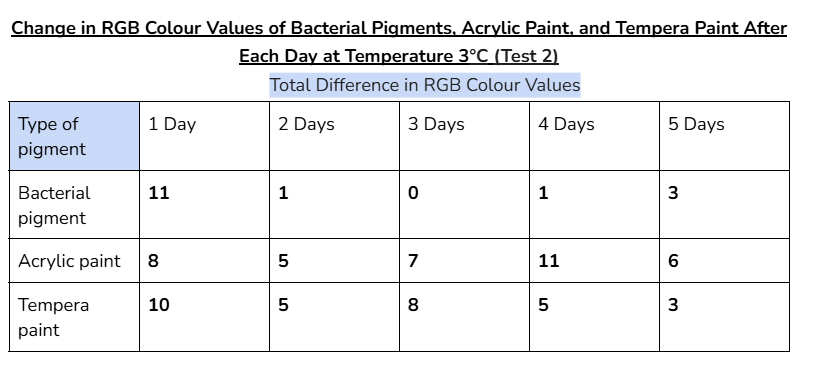
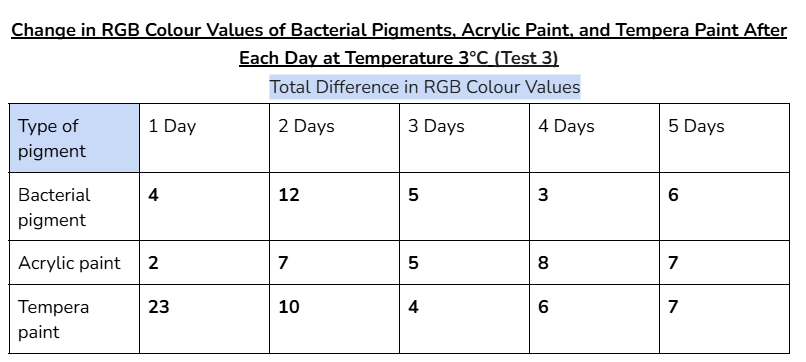
Data tables:

Average/mean changes:

Graphs:
Analysis
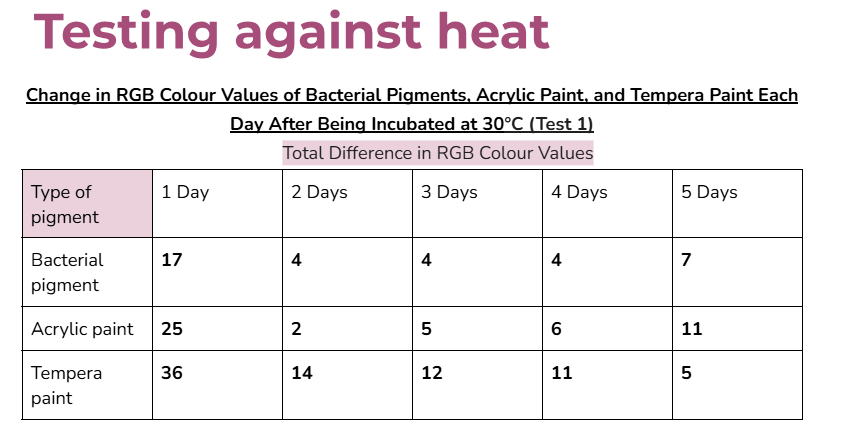
- For the averages of 10 out of 15 days of testing, the bacterial pigment had less change in RGB colour values than the store-bought acrylic paint.
- For the averages of 4 out of 15 days of testing, the bacterial pigment had similar amounts of change in RGB colour values to the store-bought acrylic paint. (a change that’s ≤2 RGB colour values more than the acrylic paint’s change in colour values)
- Therefore, in 14 out of 15 days of testing for the bacterial pigment, there was less change or similar amounts of change in colour values compared to the acrylic paint.
- For the averages of all days of testing, the bacterial pigment had less change in RGB colour values than the tempera paint. (made from store-bought paint powder)
These results show that in almost all days of testing, the bacterial pigment’s ability to maintain its colour properties was similar to or even better than both store-bought paints that were tested.
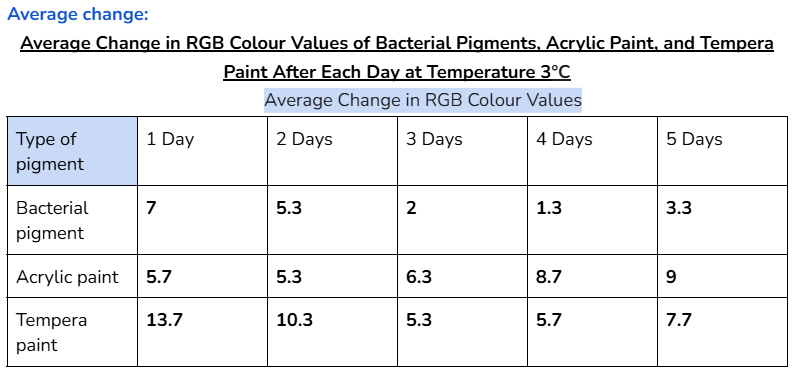
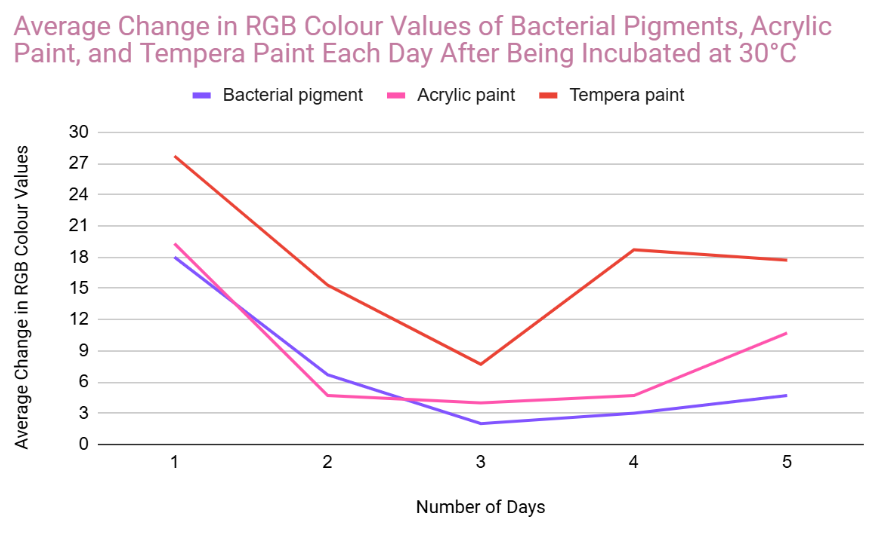
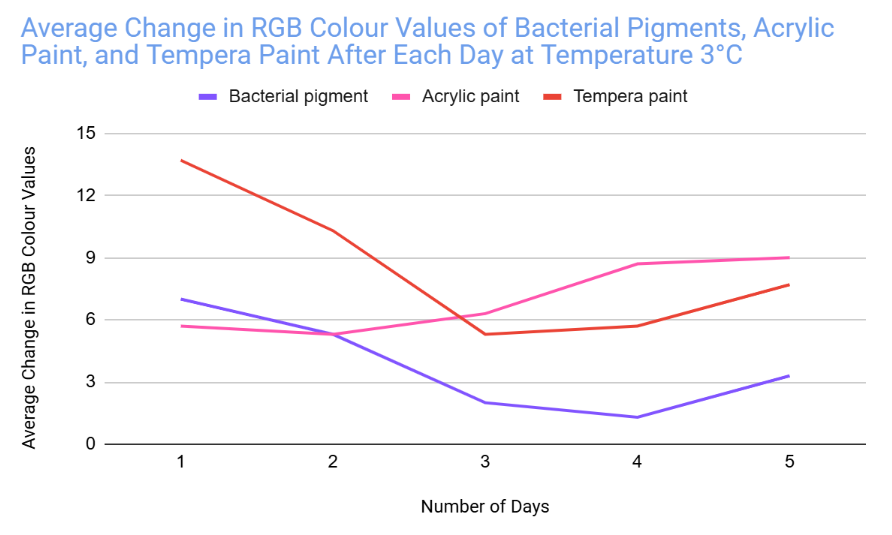
The bacterial pigment’s colour was more stable when tested at the temperatures of 3°C and 30°C, with a total average change in RGB values of 35 and 34.4 respectively.
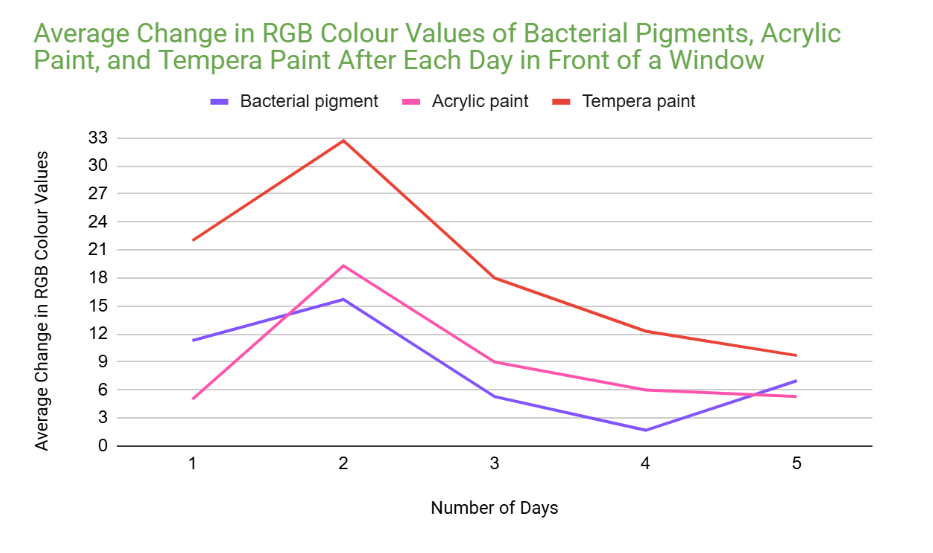
However, when tested in front of a window, (UV light) the RGB values of the bacterial pigments had a greater total change of 41. Acrylic paint and tempera paint also had a greater amount of change in this test. This increased change was expected, since sunlight can damage chromophores in pigments, changing the colour that appears.
In the very first day of testing, (30°C in the incubator, day one) the change in colour values was higher for all the pigments tested. This was likely due to the paints still drying and stabilizing during this day.
- In the other days of testing the different pigments at 30°C, the bacterial pigment stabilized the fastest compared to the other pigments. This is due to the fact that after day three, there wasn’t much change in the colour values, and the changes that did happen were consistent. This was also the case for the testing at 3°C, where the bacterial pigment stabilized after day three.
Outliers:
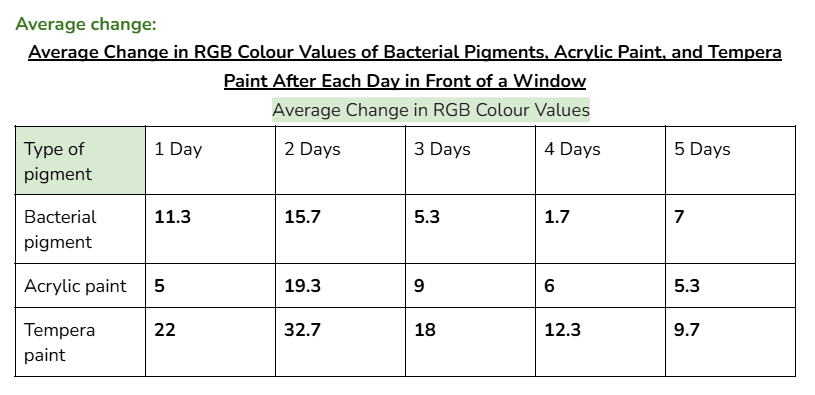
An outlier in my data could be day 2 for acrylic paint when it was tested in front of a window. This is because the average change in colour values for this day was significantly higher than every other day. (19.3 when the other highest value was 9)
Furthermore, for the same reason, another outlier could be tempera paint on day two of testing in front of a window. (32.7 when the other highest value was 22)
This might’ve happened because there was stronger sunlight on that day, and the tests for tempera paint and acrylic paint could’ve been more exposed to sunlight than the bacterial pigments were.
(Even if it wasn’t an outlier, the bacterial pigments also had a slightly higher change in colours for day two compared to the other days. Due to this, it’s likely that day two had more sunlight than the other days.)
Conclusion
My hypothesis was correct because in 14 out of 15 days of testing against different environmental conditions, the bacterial pigments had less change or similar amounts of change in RGB colour values compared to both of the store-bought paints. When tested against heat and cold, the bacterial pigments also stabilized the fastest compared to the other pigments. The highest amounts of change in colour values after day three for the heat and cold tests were only 1.7 and 2, showing how the bacterial pigments can maintain stable conditions in various temperatures.
Application
Application:
Some acrylic paints and pigments used in paint contain harmful additives that are carcinogenic and toxic to human health. For example, pigments used in paint may contain heavy metals, which can cause respiratory irritation, kidney disease, and many other health problems if there’s exposure over long periods of time. Chemicals in the paint can release into the air while drying, and can also enter the bloodstream within 60 seconds of being on skin. These additives in paint can especially affect children, who are more likely to ingest paint or get paint on their skin.
Even though they don’t contain toxic additives to stabilize their properties, the bacterial pigments in my experiment maintain their colour under environmental conditions similar to how store-bought paint with the additives would. Due to this, bacterial pigments could be a non-toxic and effective alternative to store-bought paint.
When used, the bacterial pigments also don’t have health risks related to bacteria, since the solution was filter-sterilized to remove all bacteria.
In a cost-effective industrial setting, making bacterial pigments could be possible by using fermentation tanks, removing the cost of petri dishes and large incubators. Engineering bacteria to produce large amounts of a desired protein has been done before, (insulin made by E. Coli bacteria) so we already have the technology in place to create bacterial bio-paint.
Extension:
If I were to do this project again, I would do it in a real lab so that the bacterial pigment would be less likely to get contaminated by outside sources. I would also use a spectrophotometer to measure the changes in colour every day. With a spectrophotometer, I could get accurate qualitative data for the colour of the different paints without having to worry about controlling lighting conditions. Additionally, I would test the different pigments under more environmental conditions, like pH changes and humidity changes, and I would test them for a longer period of time to assess their durability more effectively.
Also, I could dehydrate the bacterial pigment, make it into a powder, and mix it with natural and non-toxic paint binders like casein. (derived from milk proteins) By doing this, I could test the colour properties of the bacterial pigment in an actual paint, and test other properties like thickness and drying time on different surfaces.
I could also test other colour protein genes that can be used to genetically modify bacteria, and see if they make a more effective pigment.
Sources Of Error
One of the sources of error I could’ve had was the paints not getting equal amounts of sunlight in front of the window. I changed the positions of each paint every day to try and avoid this, but some tests still could’ve gotten more sunlight than others.
Another source of error could have been getting slightly different RGB colour values from each paint because of different lighting conditions. (when I was taking the pictures)
The small sample size could have also affected the averages for the colour values, with outliers skewing the data and pulling it towards extremes.
Additionally, while making the bacterial pigment, outside sources could have contaminated the pigment and affected how it reacts to different environmental conditions.
Citations
Pahara, J., & Legault, J. (2021). Zero to Genetic Engineering Hero (P. Rea & P. Anta, Eds.; 1st ed.). Make: Community LLC.
Protocol - Bacterial Transformation. (2017, November 13). Addgene. https://www.addgene.org/protocols/bacterial-transformation/
Genetic Engineering: Using Plasmids to Induce Cells to Produce Proteins. (n.d.). PBS LearningMedia. https://www.pbslearningmedia.org/resource/biot11.sci.life.gen.genengdna/genetic-engineering-and-working-with-dna/
DsRed :: Fluorescent Protein Database. (n.d.). FPbase.
https://www.fpbase.org/protein/dsred/
Strongin, D.E., Bevis, B., Khuong, N., Downing, M.E., Strack, R.L., Sundaram, K., Glick, B.S., & Keenan, R.J. (2007, November 6). Monomeric red fluorescent protein, DsRed.M1. RCSB Protein Data Bank.
https://www.rcsb.org/structure/2VAD
Mukiri, K., Lau, T., & Alcock, B. (2017, January 25). chloramphenicol acetyltransferase (CAT). The Comprehensive Antibiotic Resistance Database.
https://card.mcmaster.ca/ontology/36261
Matthews, R. (n.d.). Where does the colour go when a material fades in the Sun? BBC Science Focus Magazine. https://www.sciencefocus.com/science/where-does-the-colour-go-when-a-material-fades-in-the-sun
Piston, D. W., Campbell, R. E., Day, R. N., & Davidson, M. W. (n.d.). Introduction to Fluorescent Proteins. Carl Zeiss Microscopy Online Campus. https://zeiss-campus.magnet.fsu.edu/print/probes/fpintroduction-print.html
Yarbrough, D., Wachter, R. M., Kallio, K., Matz, M. V., & Remington, S. J. (2001, January 16). Refined crystal structure of DsRed, a red fluorescent protein from coral, at 2.0-Å resolution. Proceedings of the National Academy of Sciences. https://www.pnas.org/doi/10.1073/pnas.98.2.462
Is Acrylic Paint Really Toxic? – Natural Earth Paint. (2024, June 26). Natural Earth Paint. https://naturalearthpaint.com/blogs/blog/is-acrylic-paint-really-toxic
Duggirala, R., Mikkilineni, P., & Croghan, I. (2024, October). De Novo Synthesis of Biopaint Using Transformed Bacteria: Analysis of Spectral Intensity Trends and Comparison to Commercial Paint. Scientific Research - An Academic Publisher. https://www.scirp.org/journal/paperinformation?paperid=136808
Charkoudian, L. K., Fitzgerald, J. T., Khosla, C., & Champlin, A. (2010, October 5). In Living Color: Bacterial Pigments as an Untapped Resource in the Classroom and Beyond. National Library of Medicine.
https://pmc.ncbi.nlm.nih.gov/articles/PMC2950131/
How did they make insulin from recombinant DNA? (n.d.). National Library of Medicine. https://www.nlm.nih.gov/exhibition/fromdnatobeer/exhibition-interactive/recombinant-DNA/recombinant-dna-technology-alternative.html
Acknowledgement
I'm extremely grateful to my parents for buying all of the materials for my project and providing support to me.
I'm also extremely thankful for Ms. Davis, Ms. Olsen, Ms. Ball, and other teachers at my school for supporting me with my project. Thank you so much!