
EIT: The Future of Non Radiation Imaging
Lauren Robinson
Branton School
Grade 8
Presentation
Hypothesis
I hypothesize that a homemade EIT machine can detect internal structures in fruits without radiation, indicating a safer, low-cost future for internal imaging in the medical field.
Research
About EIT
Electrical impedance tomography (EIT) is a non-invasive way to look into objects or living beings and measure their conductivity. It uses electrodes on the surface of the object and injects electric currents that are measured to find the internal structure. In medical clinical settings, it can be used to monitor the lung for collection, cancer detection and many new evolving ideas. It can be created in expensive ways on greater scales, or smaller scales too. It has also evolved into human thought interactions and gesture settings.
Comparison with Other Imaging Techniques
| Name | How it works | Image quality | Has effects | Cost | Movable |
|---|---|---|---|---|---|
| EIT | Electricity through tissue | Low | No | $ | Yes |
| EEG | Records electrical activity in the brain | Low | No | $ | Yes |
| X-ray | Small x-rays thought object | Medium | Radiation | $$ | No |
| MRI | Pulsing radio waves and a magnetic field | High | Takes lots of time | $$$ | No |
EEG
An electroencephalogram (EEG) is a machine that measures activity in the brain. The machine uses small, metal discs (electrodes) that attach to the head. Brain cells communicate through electrical pulses, and this activity shows up as waves on an EEG paper or recording.
Ct
A narrow beam is pointed at the body and quickly spun around. It's also called computed tomography. Similar to an EIT, it gets each value, and an algorithm turns it into an image. They also collect slices that can be stacked together to create a 3D image.
X-Ray
These are used to take images inside your body using radiation. Now, while radiation is not the best X-Ray can provide very high resolution images that can be used for various reasons: Broken bones, skull fractures, dentists use it to scan your teeth, digestive system, etc.
MRI
It's a medical technique that uses computer radio waves and a magnetic field to penetrate tissue in the body, create slices of objects, and is very time-consuming to use.
Different Types of EIT Algorithms
Analytical method (fast low-res)
- Filtered Back-Projection (FBP): Like CT scans, this method finds the differences in voltages, filters them to remove noise, and projects them across the image. Very fast but produces low-resolution images.
Iterative methods (slower, high-res)
- Gauss-Newton Method: calculates the differences between measured data and improves the image in slow steps
- Newton-Raphson: specific and often used for luge imaging
- Total variation(TV): a skill focused on the sharp edges of objects in pictures/images
Moderen/AI methods
- GREIT: standardizes algorithms for 2D theoretical images. It's great and produces better resolution images that can be changed so they're 3D.
- Deep Learning; errors are used to learn the mapping from data to images, giving high-resolution and de-noised images.
Applications in Brain Imaging
Opening
EIT in the brain imaging world is critical, given the number of deadly brain diseases out there. Most of the issues have a great impact on the life of a human. It can record the resistance changes when ions change. When blood flow has a lower impedance than the brain, the human cortex changes blood volume during activity cell swelling in humans with epilepsy. These changes could be imaged by an EIT. EIT in the brain usage can be greatly used for long-term recurring due to the lack of radiation.
Issues with brain imaging
- poor conductivity of the skull
- skin contact with the electrodes
- low resolution
Epilepsy
David Holder's group first did neural imaging with EIT, successfully localizing epileptic foci using the machine with subdural electrodes. They are routinely used before surgery and do not usually affect the human greatly. It was better than EEG because EiT was used to provide a safer way, because they reduced the need for deep penetration into the brain, atomically reducing risk. Also, due to the partly invasive subduer elecrods, Fabrizi et al created scalp electrodes for a more non invasive was to use EIT. Plus, a better way to find the pre-seizure baseline and recording impedance was developed.
They started to make EIT, which creates repetitive scans similar to an MRI, but it has many fewer limitations than an MRI does, as listed above. It had 32 parallel current sources and 64 voltage recorders. Seizures that came from the intracranial infection of benzylpenicillin in five pigs caused a peak of impedance. This signal could only able to be seen after a first seizure had already occurred. The parallel EIT gave a much better way to find the onset of focal seizers compare to ECoG/SEEG. It can show the spread of a seizure in real time and improve our ability to do this. EIT has a large potential to help create a better undertaking of epilepsy in humans.
A UCL group looked at the use of EIT to wage epilectiform acitiving in a rat's hippocampus using electrodes we used earlier that are non-penetrating, lowering risk factors that were placed on the top of the brain. These were some of the first attempts to recode neural activity with EIT in the subcortical features. These studies are hoping to improve the understanding of connectivity between parts of the brain.
Many studies have focused on epilepsy treatment, prediction, and continus real time imaging. These have developed very fast predictions on epileptic seizures.
Stroke
Stoke is the acute onset of a cerebrovascular event. It can be classified into two main types:
- Ischemic stroke: includes transient ischemic attacks, intracranial embolisms, and thrombosis
- Hemorrhagic stroke: includes cerebral hemorrhage and subarachnoid hemorrhage.
Many techniques have been developed to help with early identification and rapid detection, but all have limits. Most patients with stones often fail to receive timely treatment. One study that overdid showed in a rat brain revealed cerebral ischemia caused an impedance value up to 60%, showing that EIT could be able to detect and monitor patients with strokes and facilitate the earlier identification of strokes to ensure patients receive the proper treatment on time.
One study performed used EIT to monitor the spiral drilling and drainage for the treatment of subdural hematoma. This shows that EIT can be a very important part in the monitoring of human brains in the detection of stroke or during operations.
Brain Edema
One large problem that has a high morditiy rate on mortality rate is cerebral edema. There is a large need for monitoring of brain edema or a techie that identifies different types. This may be possible due to the different impedance between normal cortical tissue and brain edema tissue, so there is a way to detect brain edema. Fu et al reported the use of EIT for real-time monitoring of cerebral edema during a dehydration clinical treatment. Also, more assessments of the use of EIT for the continuous monitoring of brain injuries have been conducted. The progression of EIT to monitor brain edema is similar to that of brain water content. Being able to show changes in water content and different tissues shows EIT use as a non-invasive imaging tool for monitoring the brain and its issues.
Different stages of tissues during the phases of cerebral edema
Normoxic tissue
- well pursued by blood
- well oxenated
- early stages
Ischemics tissue
- reduction of blood flow
- lack of oxygen and nutrients
- breakdown of the blood barrier
Tissue after cell rupture
- cell death
- swelling then rupture
Conclusion
After demands of time, a researcher EIT has spent eleven years in the Nero world. In imaging of epilepsy, Deep stutters non-invasively. Stoke is diagnosing in rabies and a rat. Plus, EIT has been able to detect changes in the brain water content. These skills can provide vital parts in the further development of brain imaging. There are still some issues, like skin to scar connective tissue, but overall, it is a very important part that is continuously developing.
Lung Application and Research
Lung imaging has also evolving rap idling for real time continus monertering of the lungs. EIT uses electric currents to image the current of conductivity in the thoracic cavity, and its non-invasive, bedside use is radiation-free and can be used for continuous monitoring. They have show either can detect overdistention, poorly ventilated lungs, oddly breathing parents, and recruitment/derecruitment.
Here are the different conductivities used while lung imaging:
| Tissue | Resistivity |
|---|---|
| The lung during expiration | 1250 |
| The lung during inspiration | 2500 |
| Blood | 140-170 |
| Cardiac muscle | 200-50 |
| Liver | 830 |
| Fat | 1000-5000 |
| Radial bone | 1600 |
Most lung EITs have 32 electrodes on a flexible belt to ensure the patient has elected to skin contact, and they can still move and breathe. Some EITs take 25 to 50 images per second to ensure proper treatment. monitoring, and diagnosis of issues. Lungs during light breathing change impedance by about 5%, while during deep breathing, they can change up to 300%! The more air inside the lung equals more impedance there is than with no air.
Extra information
Underneath here are some extra resistances of body material. Just showing how EIT can detect differences in these parts shows how revolutionary non-radiation technologies could be in the future.
| Materail | Resistance in ohm-cm |
|---|---|
| Blood | 140-170 |
| Lung | 2000 |
| Fat | 2500 |
| Liver | 830 |
| Heart muscle | 250 and 550 |
| Skeletal muscle | 150 and 2500 |
Coding and Hardware Research
ESP32 Boards
These are very helpful boards that can be used to:
- Read sensors
- Control LEDs and motors
- Connect to Wi-Fi
- Send data to computers
- Run small projects like robots, smart devices, or experiments
All these things made it a great thing to use in my small version of an EIT. First, I downloaded Python and Thorny, which are used to program it. Then I added Micropython onto the free Nova ESP32 board, got it set up and running for Thorny and coded.
Bread Boards
One thing I was confused about at the start was how breadboards fully work. After asking for help from my robotics team mentor, I learned they are EXTREMELY useful for designing stuff. They eventually have many holes for wires that are connected into lines by pieces of metal. When sending energy to one hole in line A, for example, it would send energy to all on line A on one side. This was very helpful since it was a great way to organize all the wires and boards.
Wires
Wires are a very basic thing that help the energy travel to the needed items and are extremely important when building anything that uses electricity.
Coding
To bring in the ESP32 tools, you use a Line to add ADC, which helps read the voltage and pin with consoles the GPOI pins (on and off).
from machine import Pin, ADC
The first line sends the 3.3V single to pin 27, making it the sending electrode. The second line makes pin 35 the receiving pin to get the impedance from the fruit. Without the third line, the readings would stop early. and the fourth line sets the ADC resolution 0-4095
signal_pin = Pin(27, Pin.OUT)
signaladc_pin = ADC(Pin(35))
Reads voltageadc_pin.atten(ADC.ATTN_11DB)
rangeadc_pin.width(ADC.WIDTH_12BIT)
These next lines label each pin as a name and set the resistor to 100 ohms.
output_pin = Pin(16, Pin.OUT)
output_pin2 = Pin(17, Pin.OUT)
output_pin3 = Pin(18, Pin.OUT)
output_pin4 = Pin(19, Pin.OUT)
output_pin5 = Pin(15, Pin.OUT)
KNOWN_RESISTOR = 100
The first line just means that it will run for as long as I want till I stop the code and turns the GPOI27 on to send the signal, also waits 10 ms so the voltage can stabilize.
while True:
    signal_pin.value(1)
    time.sleep(0.01)
This means the ADC reads it 10 times, then averages to reduce noise.
samples = 10
total = 0
This does a loop of reading the ADC, adding to the total, plus a tiny delay at the end. Then this last line takes the 10 samples and divides them by ten to get the average.
for _ in range(samples):
total += adc_pin.read()
time.sleep(0.002)
adc_value = total // samples
The first line converts it to real voltes then the next creates the variable for the fruit impedance, and the last line tells if the voltage is basically 0, then there is nothing connected.
voltage = (adc_value / 4095) * 3.3
fruit_resistance = None
if voltage > 0.01:
Next is the most important line for solving the fruit resistance and printing it onto the screen/part below the code.
fruit_resistance = (KNOWN_RESISTOR * (3.3 - voltage)) / voltage
print("Fruit resistance:", int(fruit_resistance))
These lines are also very important because they help a little light turn on depending on the fruit impedance. Here is an example of the line of code to turn on a light: the numbers between 1000 and 6000 are not the light stays off. In my code a have many of these lines to detect multiple fruits.
output_pin.value(1 if 1000 <= fruit_resistance <= 6000 else 0)
Here is the line if there is 0 impedance to print below the code
else:
    print("No Connection")
This is almost the last line, just turning off any lights that were turned on.
Then:output_pin.value(00
output_pin2.value(0)
output_pin3.value(0)
output_pin4.value(0)
output_pin5.value(0)
Lastly, we have turned the signal off and delaying time before the next reading.
signal_pin.value(0)
time.sleep(1)
Variables
Variables
Independent variable
- Different types of fruits
- If they are frozen, filled with water, syrup, salt water, or lime juice.
Controlled variable
- Same type of electrodes
- A machine to measure the fruit's impedance
- Resistors
- Code/ software
Dependant variable
- The impedance of the fruit
Procedure
Set Up
- Gather all the fruit
- Get my computer set up to run Thorny
- Get the 3d printed CAD box with all the mechanical parts of the machine
- Clean the counter and lay a plastic bag on top of the wooden counter
Testing with Normal Fruits
- Set the house temperature to 20 degrees Celsius
- Wipe the fruit with a damp paper towel
- Get the machine up and running, plugged into the computer
- Weigh the fruit and put the number into the graph on Google Sheets
- Attach the gel pads to the fruit, avoiding air bubbles and making sure it's fully on. Making sure they are on the sides of the fruit.
- Attach the alligator clips to the two electrodes
- Click the run button on the Thorny app
- Gather the numbers from the screen and create an average to put into the graph
- Repeat this process multiple times with the next elections and different fruits.
Testing with Water/Salt water/Lime Juice in Peppers
- Set the house temperature to 20 degrees Celsius
- Wipe the pepper with a damp paper towel
- Create a small cm hole, and two cm below, create a smaller hole for Sir to escape
- Add the funnel to the bigger hole and slowly pour the liquid in air, which should come out the small hole for faster injection
- Add the liquid till the Pepper is full
- (for salt) Add 1 tsp of salt to the pepper already filled with water
- Get the machine up and running, plugged into the computer
- Weigh the fruit and put the number into the graph on Google Sheets
- Attach the gel pads to the fruit, avoiding air bubbles and making sure it's fully on. making sure they are on the sides of the fruit.
- Attach the alligator clips to the two electrodes
- Click the run button on the Thorny app
- Gather the numbers from the screen and create an average to put into the graph
- Repeat steps 6-12, adding another tsp of salt or lime juice till there are four tsp of salt or lime juice.
- Repeat this process multiple times with the next elections and different fruits.
Timeline and Process of Creating the Machine
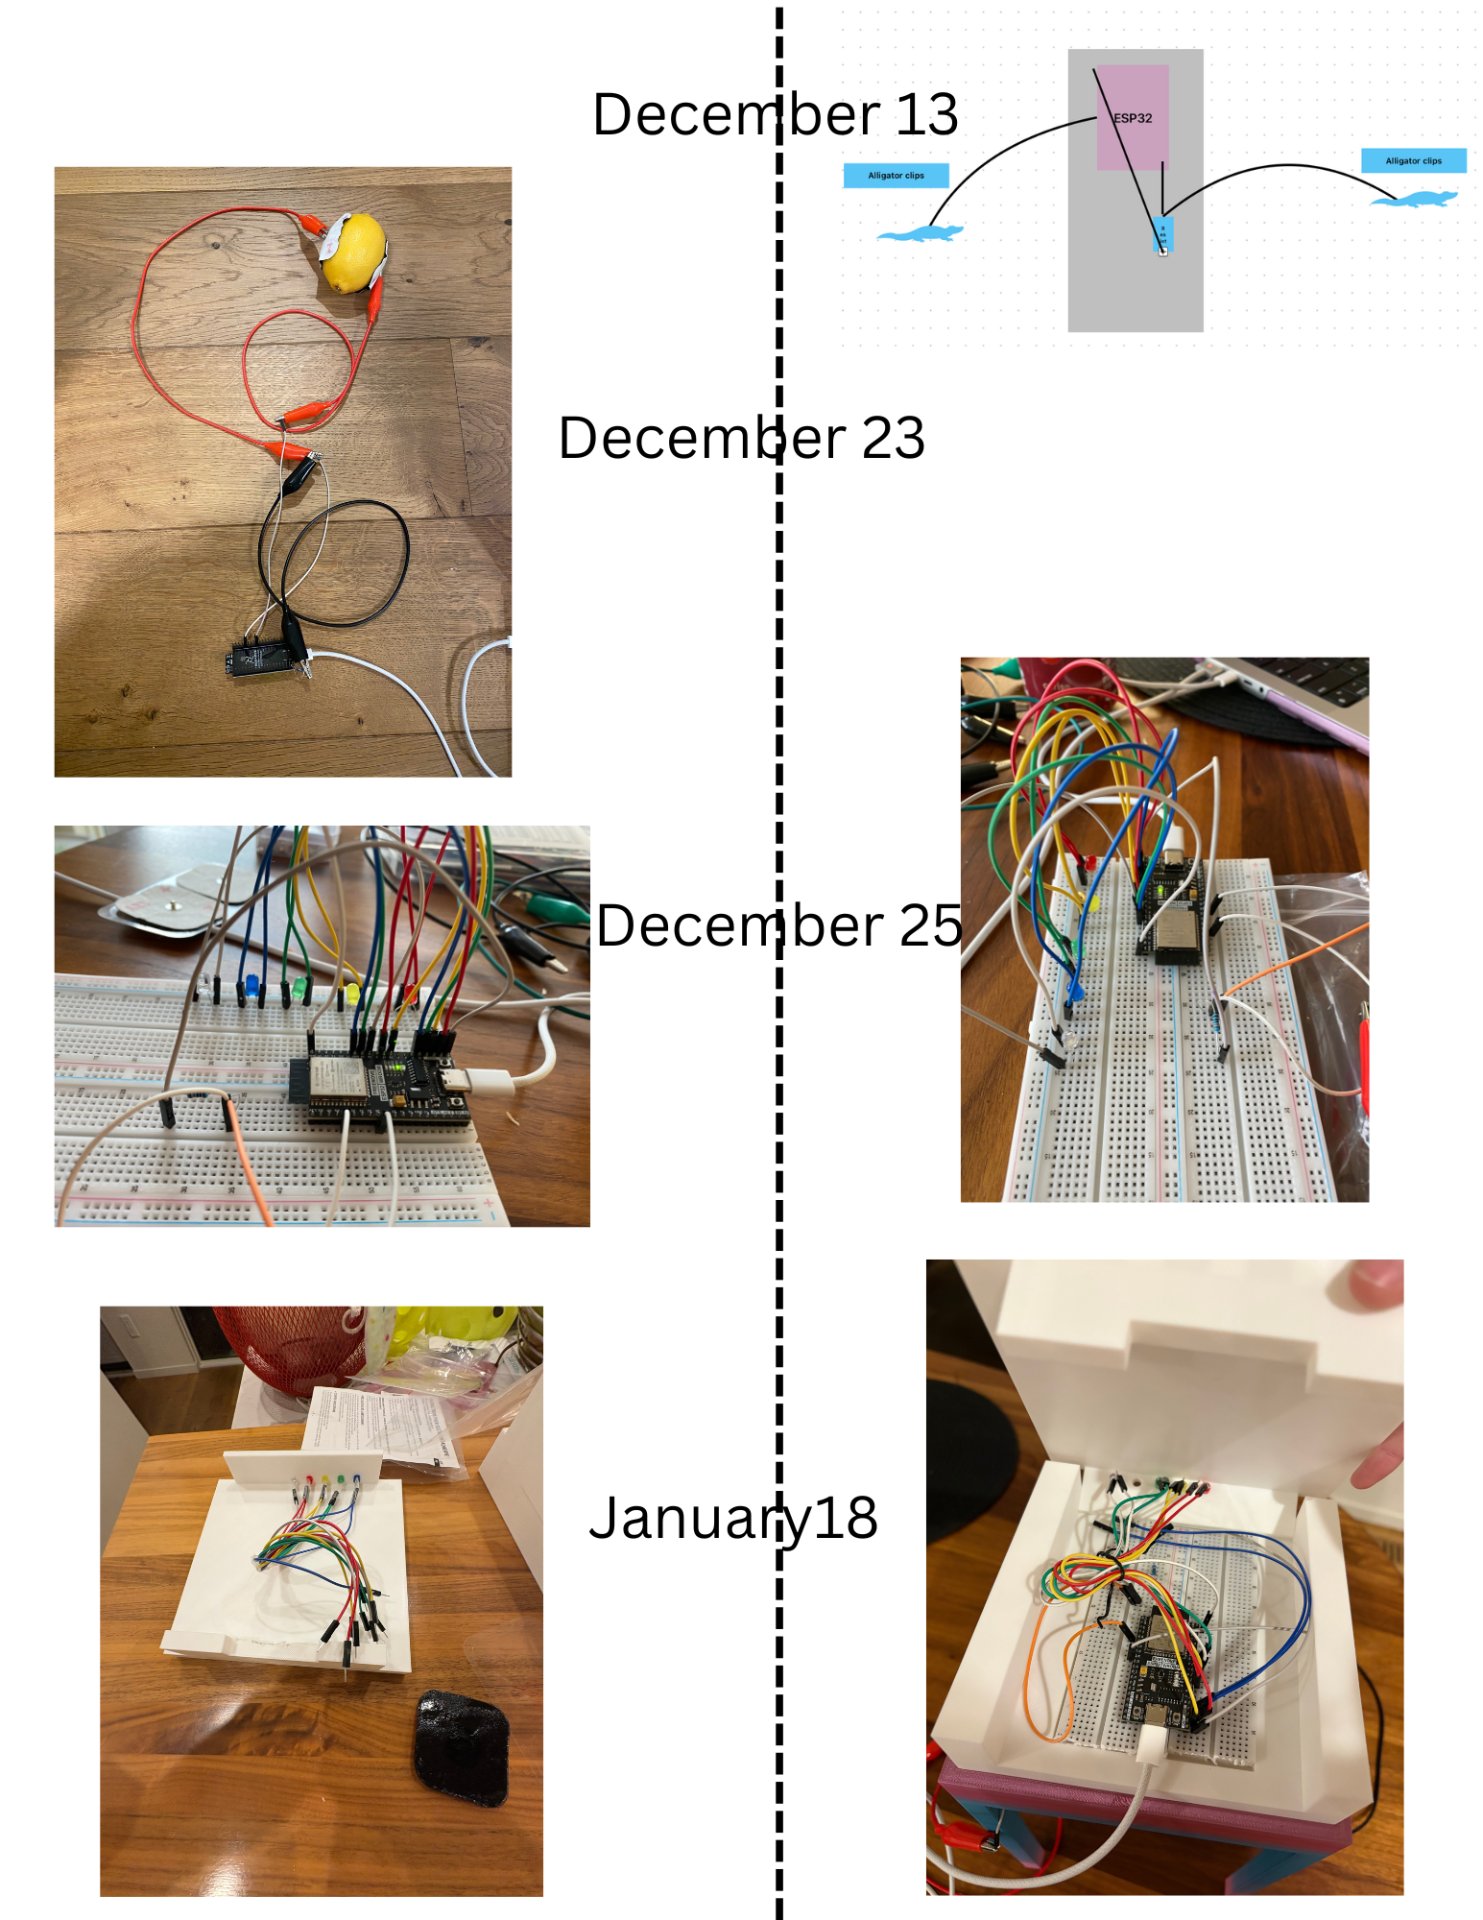
First picture Dec 13
Here is a sketch plan for how I was going to create the machine. It includes:
- ESP32 board
- Wires
- Alligator clips
- Bread board
- 100k resistor
This is when I bought the supplies to build it. Here are the prices and names from Amazon:
| name | Price | Information |
|---|---|---|
| Elegoo 120pcs Multicoloured Dupont Wire 40pin Male to Female, 40pin Male to Male, 40pin Female to Female Breadboard Jumper Wires Ribbon Cables Kit for arduino | $12.99 | 120 piece male and female wires |
| Freenove ESP32 Board (2 Pack), Dual-core 32-bit 240 MHz Microcontroller, Onboard Wireless, Python C Code, Example Projects Tutorial | $25.99 | Two ESP32 boards |
| 850 Pieces 30 Values Resistor Kit, 1% Assorted Resistors 0 Ohm-1M Ohm 1/4W Metal Film Resistors Assortment with Storage Box for DIY Projects and Experiments | $13.99 | The resistors I need, plus a lot more |
| 500PCS 5 Millimeter LED Light Emitting Diode Assortment Kit, Low Voltage Diffused Diode for DIY PCB Circuit, Red, Yellow, Green, Blue and White LED Indicator Lights | $16.59 | All the light to make if more fun |
| Adhesive Electrodes,TENS Unit Pads Electrode Patches, 20 Pcs Adhesive Electrodes for TENS Machine, Replacement Reusable Pads Self Adhesive Electrodes with 3.5 mm Snap-on for Pain Relief (White) | $18.99 | Electrodes to attach to the fruit |
| Total Price | $88.55 |
Building
Now, after getting all the materials, I started to build, as you can see in the photo with the lemon. I started small with a simple test code to make sure it worked, and tested it to get the impedance of a lemon. I used the alligator clips, some wire, a 100k resistor, and the ESP32 board.
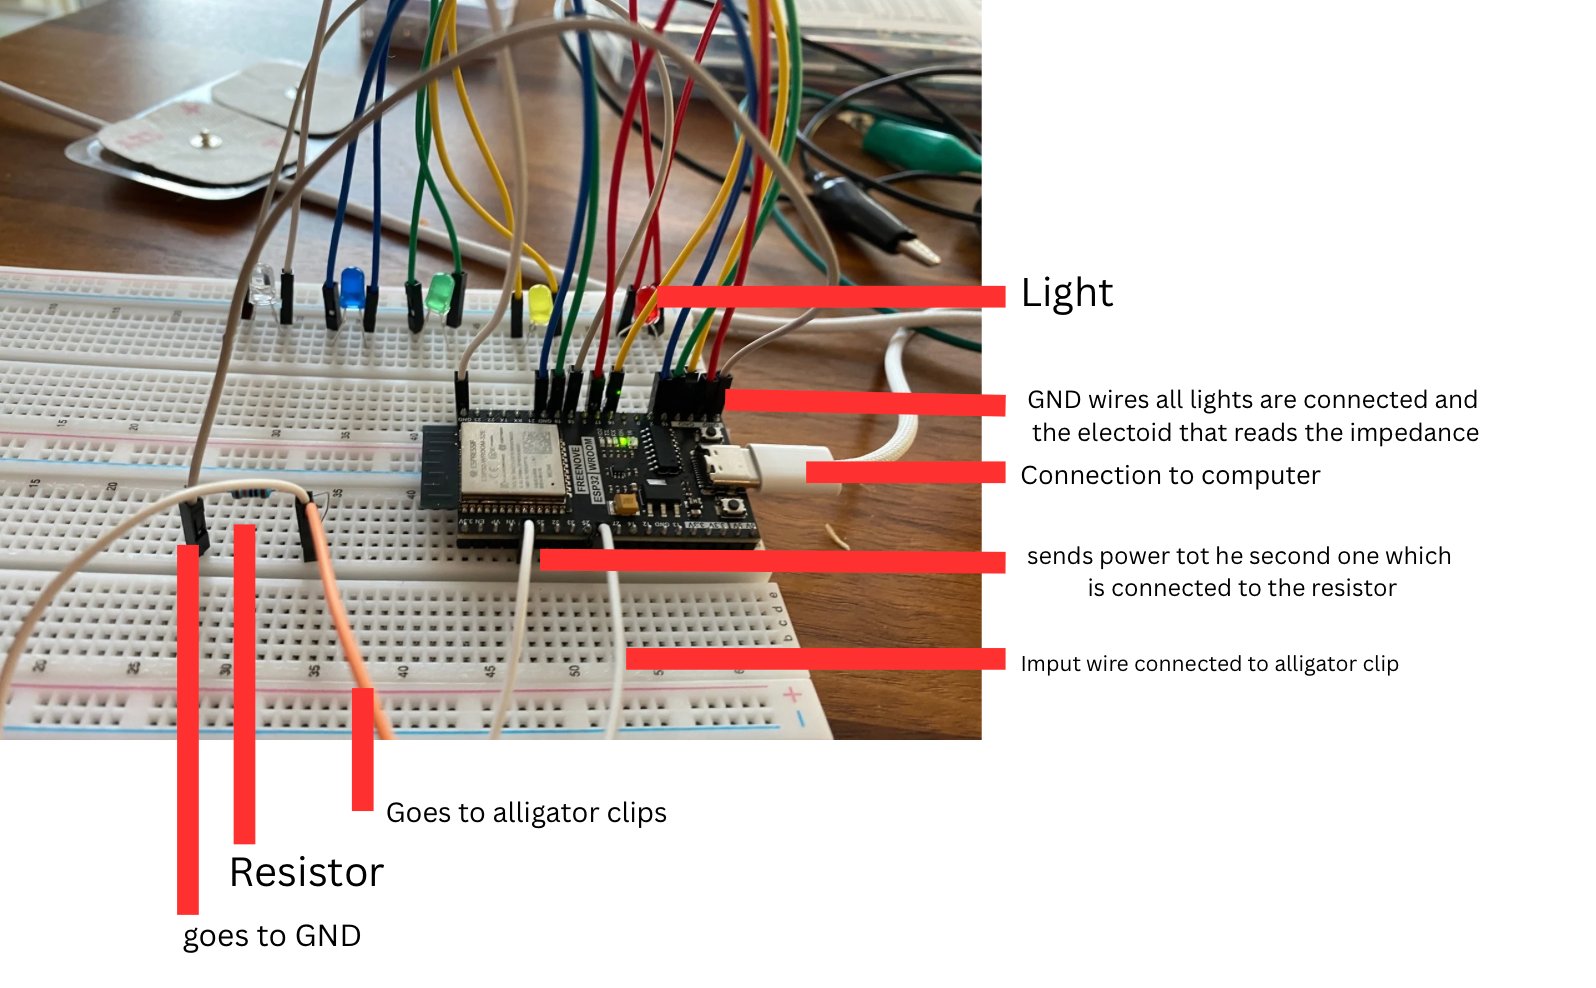
In the next picture, from Dec 25, you can see I attached it to a breadboard and LED lights to light up when different fruits are attached. Also made everything neater and better to see. Underneath here is a labelled image of the board.
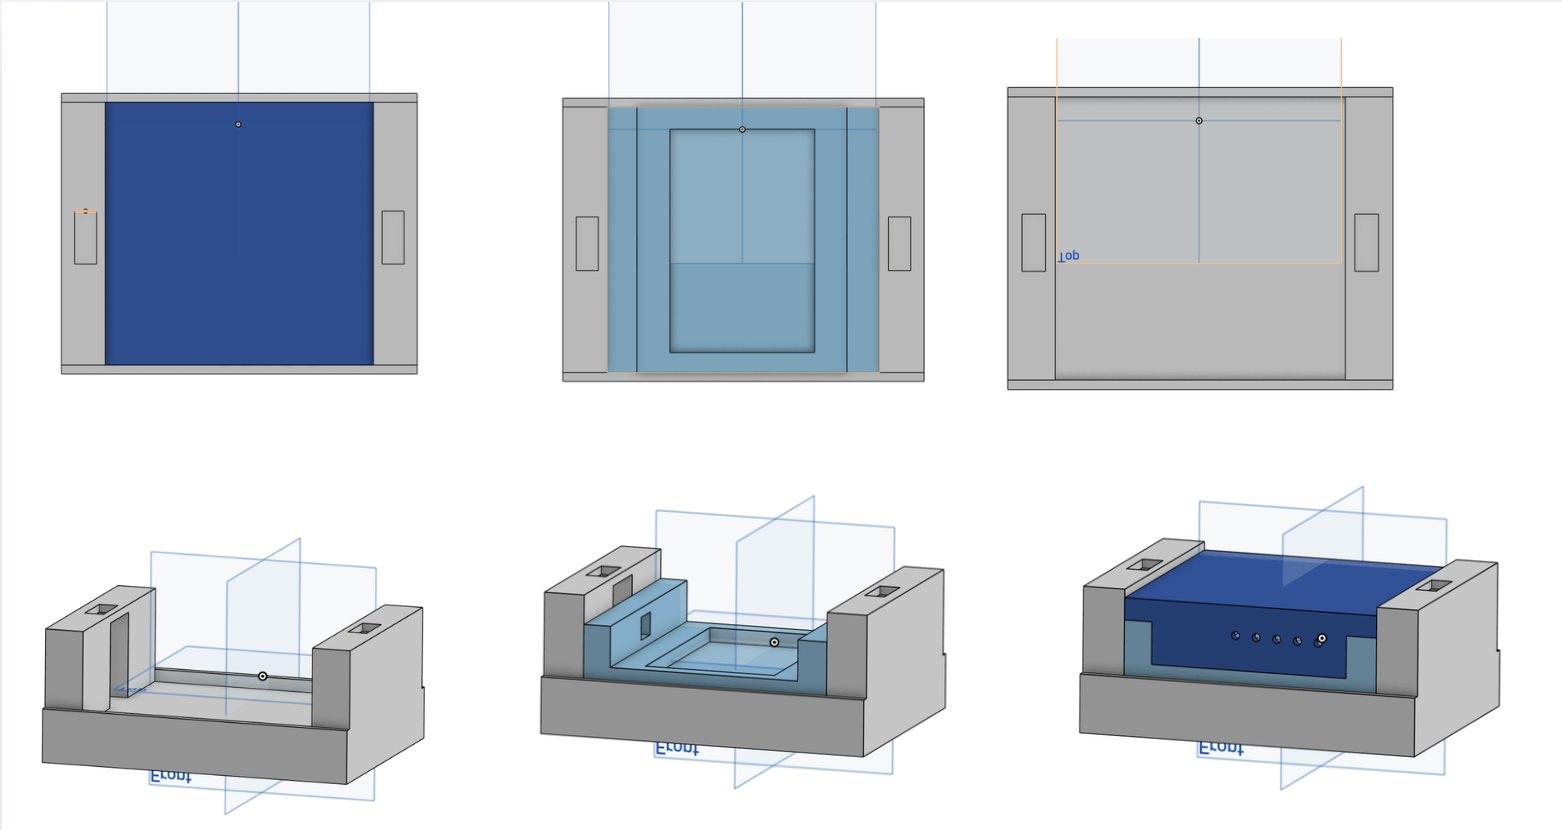
CAD
Underneath here is a CADed 3D printed box to fit all of the parts. I used a program called OnShape, which I use in my robotics team, and 3d printed it with my Bambu Lab X1 carbon through the Bambu Studio software. Here are the three parts I printed that connect. There is an overtop view and a partial side view, too.
Code
This is just all of my code into one full part. Above in the research section, you can see the explanation of each part and line. It is short but simple, and it was nice to do for one of my first times coding a board and using the program (Thorny).
from machine import Pin, ADC
import time

signal_pin = Pin(27, Pin.OUT)
adc_pin = ADC(Pin(35))
adc_pin.atten(ADC.ATTN_11DB)
adc_pin.width(ADC.WIDTH_12BIT)

output_pin = Pin(16, Pin.OUT)
output_pin2 = Pin(17, Pin.OUT)
output_pin3 = Pin(18, Pin.OUT)
output_pin4 = Pin(19, Pin.OUT)
output_pin5 = Pin(15, Pin.OUT)
KNOWN_RESISTOR = 100

while True:

    signal_pin.value(1)
    time.sleep(0.01)


    samples = 10
    total = 0
    for _ in range(samples):
        total += adc_pin.read()
        time.sleep(0.002)

    adc_value = total // samples
    voltage = (adc_value / 4095) * 3.3

    fruit_resistance = None

    if voltage > 0.01:
        fruit_resistance = (KNOWN_RESISTOR * (3.3 - voltage)) / voltage
        print("Fruit resistance:", int(fruit_resistance))


        output_pin.value(1 if 1000 <= fruit_resistance <= 6000 else 0) #for apple
        output_pin2.value(1 if 70 <= fruit_resistance <= 100 else 0) #for lemon
        output_pin3.value(1 if 40 <= fruit_resistance <= 70 else 0) #for onion
        output_pin4.value(1 if 0 <= fruit_resistance <= 40 else 0) #for orange
        output_pin5.value(1 if 100 <= fruit_resistance <= 300 else 0) #for pear


    else:
        print("No Connection")
        output_pin.value(0)
        output_pin2.value(0)
        output_pin3.value(0)
        output_pin4.value(0)
        output_pin5.value(0)

    signal_pin.value(0)
    time.sleep(1)
Observations
Set 1 Dec 22-23
Here are the first sets of numbers when testing the simple version. As you can see, the apple has a higher impedance value than a lemon due to the energy not being able to pass through as well. This is mainly due to the amount of water in them. One issue is that after one day, the electrodes can lose their stickiness and moister so in this test, the numbers change a lot after one day, most likely resulting in issues in the testing, not the fruit.
| Fruit | Numbers 1 | Numbers 2 |
|---|---|---|
| Apple | 2355 | 1935 |
| Orange | 45 | 50 |
| Lemon | 22 | 30 |
| Melon | 32 | 40 |
| Oninon | 70 | 72 |
Set 2 Dec 24-25
These were different fruits tested a day later. They have similar numbers, but on both tests, I used completely new electrodes for each, most likely resulting in more similar numbers. After one day, the apples. Melons, numbers all went down after one day on both sets of tests. While the orange, onion, and lemon went up on both tests after one day, they had gotten harder for energy to pass through them.
| Fruit | Numbers 1 | Numbers 2 |
|---|---|---|
| apple | 2761 | 2533 |
| melon | 49 | 45 |
| orange | 45 | 48 |
| onion | 89 | 92 |
| lemon | 12 | 15 |
Set 3A Jan 25
This is where the main tests start, with all fruit and multiples of the same are tested. Down below, you can see the numbers are similar to the ones before. I included the weight of them and the impedance value. I filled the peppers with water and took their weight too. As you can see, the pepper's values went down when water was added and went way down when acidic liquids were added. The milk in the pepper brings the value down, and the syrup goes up, showing that syrup makes it harder for energy to pass through.
| Fruit | Resistance | Weight | Resistance with Added water | Weight with the water Water | Weight with the extra substance listed below Extra | Extra substance weight |
|---|---|---|---|---|---|---|
| Pear | 150-170 | 7.3 | ||||
| orange 1 | 46-5 | 15.3 | ||||
| orange 2 | 43-5 | 14.9 | ||||
| Lemon 1 | 70-87 | 4.8 | ||||
| Lemon 2 | 88-91 | 5.2 | ||||
| onion | 103 | 11.5 | ||||
| Apple 1 | 265-359 0 | 7.1 | ||||
| Apple 2 | 340-432 0 | 7.3 | ||||
| pepper 1 | 111-120 0 | 7.9 | 903-950 | 14.9 | 15.2 | 310 LIME added |
| pepper 2 | 125-129 0 | 8.3 | 120-130 0 | 14.5 | 14.9 | 284 MILK added |
| pepper 3 | 147-154 0 | 9.7 | 1 000 | 17.5 | 17.8 | 1300 SYRUP added |
Set 3B Jan 26
These are the same fruits from the next day. All numbers are quite similar to the first one and have no drastic changes.
| Fruit | Numbers 1 | Weight | Resistance with Added water | Weight with the water Water | Weight with the extra substance listed below Extra | Extra substance weight |
|---|---|---|---|---|---|---|
| Pear | 172 | 7.2 | ||||
| orange 1 | 46-7 | 15.3 | ||||
| orange 2 | 44-6 | 14.9 | ||||
| Lemon 1 | 70-87 | 4.8 | ||||
| Lemon 2 | 88-91 | 5.2 | ||||
| onion | 96 | 11.5 | ||||
| Apple 1 | 265-362 0 | 7.1 | ||||
| Apple 2 | 340-435 0 | 7.3 | ||||
| pepper 1 | 111-120 0 | 8.1 | 921-960 | 15.3 | 15.8 | 320 LIME added |
| pepper 2 | 125-130 0 | 8.6 | 90-100 0 | 16.2 | 15.9 | 342 MILK added |
| pepper 3 | 147-158 0 | 10.1 | 1 300 | 17.8 | 18 | 1298 SYRUP added |
Set 4A
These numbers are from all the new fruit a week after test 3A and B.
| Fruit | Impedance | Weight | Impedance with water | Resistance plus 1 tsp of salt or lime juice | Resistance plus 2 tsp of salt or lime juice | Resistance plus 3 tsp of salt or lime juice | Resistance plus 4 tsp of salt or lime juice | Weight with salt or lime juice |
|---|---|---|---|---|---|---|---|---|
| Pear 1 | 202 | 4.9 | ||||||
| Pear 2 | 215 | 5.8 | ||||||
| Lemon 1 | 40 | 6 | ||||||
| Lemon 2 | 97 | 5.8 | ||||||
| Orange 1 | 14 | 14.5 | ||||||
| Orange 2 | 32 | 15.7 | ||||||
| Apple 1 | 4893 | 8.3 | ||||||
| Apple 2 | 3523 | 8.6 | ||||||
| Apple 3 | 3150 | 9.1 | ||||||
| onion | 89 | 10.8 | ||||||
| Pepper1 | 140 | 11.1 | 81 | 71 (Salt) | 69 | 62 | 60 | 18.9 |
| pepper 2 | 149 | 8.7 | 86 | 75 (Salt) | 63 | 42 | 41 | 16 |
| Pepper 3 | 221 | 8.3 | 132 | 103 (Lime juice) | 92 | 90 | 87 | 13.8 |
Set 4B
These numbers are from the same fruit, a day later, but with different peppers.
| Fruit | Impedance | Weight | Impedance with water | Resistance plus 1 tsp of salt or lime juice | Resistance plus 2 tsp of salt or lime juice | Resistance plus 3 tsp of salt or lime juice | Resistance plus 4 tsp of salt or lime juice | Weight with salt or lime juice |
|---|---|---|---|---|---|---|---|---|
| Pear 1 | 213 | 4.9 | ||||||
| Pear 2 | 214 | 5.8 | ||||||
| Lemon 1 | 32 | 6 | ||||||
| Lemon 2 | 89 | 5.8 | ||||||
| Orange 1 | 21 | 14.5 | ||||||
| Orange 2 | 31 | 15.7 | ||||||
| Apple 1 | 4948 | 8.3 | ||||||
| Apple 2 | 3432 | 8.6 | ||||||
| Apple 3 | 3209 | 9.1 | ||||||
| onion | 88 | 10.8 | ||||||
| Pepper1 | 163 | 11.3 | 85 | 73 (Salt) | 65 | 60 | 59 | 19.2 |
| pepper 2 | 103 | 9.2 | 93 | 78 (Salt) | 64 | 59 | 57 16.3 | |
| Pepper 3 | 189 | 8.7 | 110 | 97 (Lime juice) | 86 | 84 | 83 | 14.2 |
Analysis
Test of the Fruits
From the two main tests, I did each fruit for around 2 days of testing. Each test is the average of the two fruits in each test. In total, there were eight tests of each fruit.
Pear
In this chart, pears had the highest resistance values, ranging from around 150 to 225. There was a greater change between different pears due to some being older and having lost moisture compared to the others. But pears have a higher resistance value compared to the other fruits.
Lemon
In this chart, lemon was the second lowest due to the amount of water in them, and acidic juice since lemon juice is a good conductor of electricity, letting energy through easier, because it contains dissolved ions( citric acid and mineral electrolytes). . resistance values ranged from 50-80
Orange
In this chart, orange had the least resistance values since all of the water in it, like lemon, have dissolve ions which are good electrical conductors. Tests 1 and 2 were similar, but tests 3 and 4 had lower resistance values. Resistance values ranged from 25 to 50
Onion
Onions in the chart were in the middle. The resistance value ranged from 80 to 100, not varying a lot.
Pepper
Peppers had varying values since many were of very different sizes. They had lower resistance values than pears but more than lemon which contain much more water.
Overall, you can clearly see that fruits have different values, and you could be able to tell them apart from each other.

Apple Testing
Since I had so many apples, I made a separate chart with each bar symbolizing one fruit.
Apple 1-10 (Gala)
The first 10 apples were all Gala apples and had similar ranges. You can see the apples have a much higher resistance values then the fruit chat above due to the different types of fruit matter and skin also come into play with apples and other fruits.
Apple 11-12 (Honey Crisp)
These have much higher resistance values than the galas since they are different types nd have less water content.
Overalll you can see my EIT machine can tell the difference between some types of apples.

Test of the Pepper with Salt
For the testing of fruit with salt, I filled them up with water and added 1tsp each, recording which I symbolize by each shape.
Pepper 1
Pepper one started with no salt at 82-ish. After the first tea spoon it made a drop in resistance. The third tsp did not do much, but the fourth one, and with one, where the end of the resistance value was going down since they stayed in one spot after more tsp's.
Pepper 2
Pepper 2 started normally, but at the third teaspoon, it had a large drop, unlike the others, which slowly went down. It was also the lower ending point at 40ish.
Pepper 3
pepper three went down the steadiest, slowly dropping values till it stopped dropping resistance at around 57
Pepper 4
Pepper 4 started with the highest resistance and ended like the others on the same point as pepper three, so it's hidden by the pink circle. It had a bit more of a dip then other, though.

Test of the Pepper with Salt
For the testing of fruit with lime juice, I filled them up with water and added 1tsp each, recording which I symbolize by each shape.
Pepper 1
Pepper 1 started high, then the salt peppers, but after two tsp, it dropped a lot more than the salt peppers since lime juice is very conductive (more than lemon). At tsp 2, it steadied out and only went down slowly.
Pepper 2
Pepper 2 started weirdly high but drop similar to pepper one. It also followed the same tread line and even out, but tsp 2.

Conclusion
The goal of the project was to create a homemade EIT machine that could detect differences in internal structures in fruits without using radiation or damaging them. From my results, my hypothesis was correct, and I was able to detect differences in different fruits with different internal structures or filled with different things (water, salt).
The results showed that fruit with higher amounts of water and dissolved ions (orange/lemon) had lower resistance values. While fruits with less water or thicker tissue had a higher resistance. This proves that resistance values and impedance change with different internal structures, and this machine can detect them, which is the main idea of EIT. Even some smaller changes, like a tsp of salt, can be detected with a drop in resistance. It shows the EIT can detect small and subtle changes.
Even though my EIT machine is on a smaller scale, it successfully demonstrates the main idea of EIT. This supports the idea that EIT can be a low-cost, portable, and radiation-free imaging technique that's non-invasive. This project also showed some limitations, such as electrode contact with the fruit or how old the fruit is. EIT is also a lower resolution than MRI and CT scans, but these limitations are expected with non-invasive techniques, and have a large future to improve.
In the end, this project shows EIT has a strong future in the world of imaging, since a small, very low-cost version was able to detect different fruits and internal structures, and in the field of medicine, it can be used for lung imaging, stroke detection, brain edema tracking, and epilepsy research.
Application
EIT effect on our medical world and will continue evolving the way we use it. It's great because it's portable, low cost, non-radiation and its non-evasive. It can be used in many different ways, as explained in the research section and in different fields of medicine. EIT could be used in places with low amounts of big medical devices by doctors or for people who can't be exposed to radiation. EIT is constantly evolving and being used in new ways. My experiments show that a simple, low-cost and smaller version can still produce results by detecting different fruits, which could later be evolved into a bigger version that's still inexpensive, which could be used reliably in the medicine field.
Sources Of Error
Electrode Contact and Placement
The gel elections I used did not always stick onto different flirts in the same way. There could be small air bubbles, or the elections could be in slightly different spots each time. Also, as the electrodes dried out over time, they changed the results, which is why I had to buy new ones for each test.
Fruit size, Ripeness, and Age
Frits of the same type were not all identical. They could be different sizes, ages, ripeness, thickness of skin, or whether they were rotten or not. All these things affect how the electricity flows through the fruits.
Liquid distribution inside peppers
When liquids like water, salt, or lime juice were added to peppers, the liquid may not have filled the entire fruit. Air pockets, uneven mixing, or the salt filling into one spot could cause different impedance measurements
Citations
“EIT-Kit: An Electrical Impedance Tomography Toolkit for Health and Motion Sensing.” Mit.edu, 2017, hcie.csail.mit.edu/research/eit-kit/eit-kit.html. Accessed 11 Feb. 2026.
“Electrical Impedance Tomography (EIT) | Scalable Imaging – Sciospec.” Sciospec, 5 Jan. 2026, sciospec.com/eit/. Accessed 11 Feb. 2026.
Ke, Xi-Yang, et al. “Advances in Electrical Impedance Tomography-Based Brain Imaging.” Military Medical Research, vol. 9, no. 1, Feb. 2022, https://doi.org/10.1186/s40779-022-00370-7. Accessed 30 Mar. 2023.
Mansouri, Sofiene, et al. “Electrical Impedance Tomography – Recent Applications and Developments.” Journal of Electrical Bioimpedance, vol. 12, no. 1, Jan. 2021, pp. 50–62, https://doi.org/10.2478/joeb-2021-0007.
Mirhoseini, Mehri, et al. “Applications of Electrical Impedance Tomography in Neurology.” Basic and Clinical Neuroscience Journal, vol. 13, no. 5, Negah Scientific Publisher, Sept. 2022, pp. 595–608, https://doi.org/10.32598/bcn.2021.3087.1. Accessed 6 Apr. 2025.
Respiratory Associates - Non CE Credit Channel. “Electrical Impedance Technology (EIT): Research & Clinical Applications.” YouTube, 10 Feb. 2025, www.youtube.com/watch?v=mM379Ubdx3c. Accessed 11 Feb. 2026.
Timpel Medical. “Monitoring Lung Function with TIMPEL EIT in the ICU.” YouTube, 19 Feb. 2025, www.youtube.com/watch?v=YpF0xVJ9clM. Accessed 11 Feb. 2026.
(Also, the front page banner was created with Canva and the AI photo generator in Canva)
Acknowledgement
I want to acknowledge my parents, who provided me with the resources I needed. My science teacher, Naomi Cohen, got me signed up for the science fair and provided her classroom so I could use it. Also, Steven Boyd, PhD, PEng, Professor, University of Calgary, and his son Duncan, who gave me feedback on my project and answered questions I had. Also, my robotics team mentor, Matt, who also answered questions.