The Robotic Arm of Endurance
Grade 9
Presentation
Hypothesis
If I program a homemade robot arm using an Arduino to run at 6 volts instead of 5 volts, then it will be able to lift more weight, because the increased voltage will provide more power to the servo motors resulting in better lifting capacity and higher torque.
Research
- George Devol is the one who invented the first robot arm, he introduced the first robotic arm in 1962. The first industrial arm was installed at the General Motors plant.
-Robot arms are made of metal, screws, servo motors, gears and circuits.
-Robots are used in the world to do various tasks:
- dangerous tasks such as handling hot pieces of metal
- manufacturing, the automotive industry and electronic circuits
- to make people’s jobs easier such as Canadarm which retrieved and sent objects to and from space like parts from the international Space Station.
- to help disabled people, such as people missing an arm, grab or lift things
Different kinds of robots are able to lift different amounts of weights depending on the size of the servo motor used, and its torque.
Arduino
Arduino is an open-source electronics platform consisting of both hardware and software which users can use, modify and share under an open-source license. Arduino can be used with operating systems such as Mac, Windows, and Linux. Arduino boards can read information transmitted to them by a sensor being activated, a button being pushed, or a switch being turned on. This information that the Arduino is reading will be transformed into an action. For example, a light being turned on or a servo motor being activated. Arduino is easy to use for different projects and applications. Schools use Arduino to build instruments, demonstrate concepts in physics and chemistry, and to explore programming and robotics. There are two programs that can be used for programming Arduino: Arduino Integrated Development Environment, also named Arduino Software (IDE), and Arduino Command Line Interface (CLI).
The advantage of using Arduino over other platforms is because it is inexpensive and it runs on multiple operation systems like Mac, Windows, and Linux, while other platforms only work on Windows. Arduino Software IDE is easy to use and is an open source, available for extension by experienced users.
Arduino uses a programing language called C++, which is easy to learn. There are also other programing languages like Python, MicroPython and Scratch.
Servo motor
A servo motor is a device that spins or rotates parts of a machine with great precision.
Servo motors have 3 wires: power, ground, and signal. The power wire is connected to the positive pole and is usually red, the ground wire is connected to the negative pole and is usually black or brown. The signal wire is connected to the input.
PCA9685 PWM servo motor driver module is an electrical component that can house up to 16 servo motors and control them all separately. This electrical component controls speed, torque, and the position of the servo motor and it operates at maximum 6V.
Voltage
Voltage is pressure from a circuit’s power source pushing charged electrons through a series of wires creating a loop which allows the electrons to complete an action such as turning on a lightbulb.
Torque
Torque is the rotational force of a component.
Joystick module
A joystick module is a device that can measure the movement of a knob in two directions, horizontal (X axis) and vertical (Y axis). Joystick modules can be used to control games, cameras and robots.
Robotic arms controlled by Arduino have been widely studied for various applications, ranging from educational purposes to handling hazardous materials. For example, a study was made on a robotic arm using Arduino to lift lightweight objects and to place them down . In another study, a robot arm meant to perform a pick and place operation was designed using Arduino Uno R3 board to control the movement of the servo motors for educational purposes. In a third study, a robotic arm was designed to pick up and place down hazardous objects smoothly and precisely by using an Arduino. While these studies focus on different usages of the robotic arm, I want to explore further the arm’s load capacity, power consumption, and servo motor temperature.
Variables
|
Manipulated (what I changed)
|
I used 5V and 6V. |
|
Responding (what I watched for)
|
I observed how voltage is affecting the robot arm’s lifting capacity. I observed how the temperature of the servo motors affected the robot arm’s lifting capacity. |
|
Constant (what stayed the same)
|
I used the same type and size of servo motors: DC servo motors |
Procedure
Procedure for building the robotic arm
1. I attached a multi-function bracket on the wood base 2. I attached the servo motor one on the bracket with the horn facing up 3. I put the servo motor two inside the bracket facing sideways 4. I screwed a u-shaped bracket onto the horn of the second servo motor 5. I screwed another u-shaped bracket onto the the first u-shaped bracket 6. I screwed another u-shaped bracket onto the second u-shaped bracket 7. I screwed another bracket onto u-shaped bracket number three 8. I put a servo motor on the third bracket with a horn on it facing sideways 9. I put u-shaped bracket number four onto the horn of servo-motor number three 10. I put bracket number four onto u-shaped bracket number four 11. I put the servo motor number four and attached the claw on it 12. I attached 7 zip ties on the robot arm to hold the cables 13. On u-shaped bracket number one and number four I put one ball bearing for each to help with the movement 14. I attached the cables from the servo motors to the PCA9685 15. I attached the PCA9685 to the Arduino r4 wifi
Procedure for building the joystick controller
In order to be able to control the robot arm, I built a joystick controller by following these steps:
- Drill eight holes into the wooden base, four for each joystick.
- Attach a nut to each of the eight screws, then insert the screws into the joystick modules.
- Secure the joystick modules to the pre-drilled wooden base using the eight screws.
Procedure for connecting the robot arm, servo motor driver module, Arduino, power supply, and joystick controller
Wiring
- Wiring the Joysticks to the Arduino
SW from joystick 1 will go to 3 on the Arduino DIGITAL SW from joystick 2 will go to 2 on the Arduino DIGITAL VRy from joystick 1 will go to A2 on the Arduino ANALOG IN VRy from joystick 2 will go to A3 on the Arduino ANALOG IN VRx from joystick 1 will go to A0 on the Arduino ANALOG IN VRx from joystick 2 will go to A1 on the Arduino ANALOG IN +5V from joystick 1 will go to GND on the Arduino POWER +5V from joystick 2 will go to GND on the Arduino POWER GND from joystick 1 will go to 5V on the Arduino POWER GND from joystick 2 will go to 5V on the Arduino POWER
- Wiring the PCA9685 to the Arduino, the servo motors, and the power supply
VCC from the PCA9685 will go to 5V on the Arduino POWER SDA from the PCA9685 will go to A4 on the Arduino ANALOG IN SCL from the PCA9685 will go to A5 on the Arduino ANALOG IN GND from the PCA9685 will go to GND on the Arduino POWER Connect the power supply to the GND on the Arduino POWER Connect servos 1-4 to the PCA9685 accordingly: Servo 1 will go to 0 on the PCA9685 Servo 2 will go to 1 on the PCA9685 Servo 3 will go to 2 on the PCA9685 Servo 4 will go to 3 on the PCA9685 Connect the PCA9685 to the power supply
3. Wiring the Arduino to the computer
Connect the computer to the Arduino and upload the code to the Arduino.
Experiment procedure
- Prepare a small ziplock bag
- Prepare a pipe cleaner
- Prepare the log book to record the weight lifted, the temperature of the servo motor and if successful or unsuccessful
- Create a results table with the following fields:trial number, voltage used, maximum weight lifted, maximum temperature
- Prepare a digital scale for accurate weight measurement
- Prepare an infrared thermometer for temperature readings
First trial
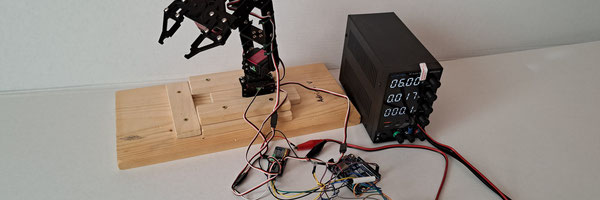
- Set the power supply to 6 volts
- Choose a consistent point on the robot arm’s claw where the weight will be attached
- Attach 100g of weight to the robot arm’s claw using the ziplock bag and the pipe cleaner and attempt to lift it with the robot arm
- Record the weight lifted, the temperature of the servo motor and if successful or unsuccessful in the log book
- If successful, increase weight by 100 grams and record the results in the log book until the maximum weight the robot arm can lift is reached
- Record the maximum values in the results table including the trial number, voltage used, maximum weight lifted and maximum temperature
Second trial
- Set the power supply to 5 volts
- Repeat steps 2 to 6
Repeat the first and second trial two more times to achieve reliable results.
Compare and analyse your results.
Materials
- 56 screws
- 28 nuts
- 5 servo horns
- 1 Robotic claw gripper
- 4 u shaped and 4 multi-function brackets
- 8 servo extension cables
- 4 positional servo motors
- 4 servo testers for control
- 2 ball bearings
- 7 zip ties
- 1 screwdriver
- 2 wood base
- an Arduino r4 wifi (with IDE software installed)
- pca9685
- 16 solderless wires
- power supply
- fishing weights
- two joysticks
- one pipe cleaner
- one small ziplock bag
- digital scale
- infrared thermometer
Observations
- The solderless wires that I used to connect the joysticks to the Arduino where not connecting properly to the joysticks causing the arm to start shaking or power off.
- The robot arm would be able to lift more weight closer to the robot arm’s axis rather than farther away because of the center of gravity. A consistent point of the arm’s claw must be chosen.
- I used 5 volts and 6 volts because when I tried using 4 volts or less, the arm did not work due to the low voltage. I chose 6 volts because it is the maximum voltage supported by PCA9685.
Analysis
Trial # |
Voltage |
Max weight lifted (grams) |
Max temp (C) |
#1 |
6V |
1500 |
26.3°C |
#2 |
5V |
1400 |
30.5°C |
#3 |
6V |
1500 |
30.9°C |
#4 |
5V |
1400 |
29.4°C |
#5 |
6V |
1400 |
28.7°C |
#6 |
5V |
1300 |
31.3°C |
#7 |
6V |
1700 |
32.1°C |
#8 |
5V |
1400 |
32.6°C |
#9 |
6V |
1600 |
29.7°C |
#10 |
5V |
1400 |
30.8°C |
Observations
- In trials at 6V, the servo-motors’ lifting capacity was generally higher, between 1500g and 1700g, while in trials at 5V, the lifting capacity was lower, between 1300g and 1400g. However, the third trial at 6V showed some variation as it lifted 1400g, the same as at 5V.
- The highest lifting capacity at 6V was 1700g, while the lowest lifting capacity at 5V was 1300g.
- The second trial at 6V showed a slightly higher temperature than the first trial at 5V. Although the third trial at 6V showed a lower lifting capacity, it still showed a lower temperature than all the trials at 5V.
- Overall, the 6V trials had lower temperatures, between 26.3°C and 32.1°C, while the 5V trials had generally higher temperatures, between 29.4°C and 32.6°C.
Interpretation of results
- Operating the servo motors at 6V instead of 5V resulted in higher lifting capacity and generally lower temperatures compared to 5V.
- Lower temperatures at 6V suggests that the servo motors worked more efficiently and they were less overworked at higher voltage.
- Lower voltage led to less weight lifted and higher temperatures.
- Having to wait for the servo-motors to cool down to room temperature suggests overheating of the motors during consecutive trials.
Future improvements
- For my robot arm to lift more weight, I might need to install more powerful servo motors with higher torque and better heat dissipation.
- My robot arm might need some adjustments such as a sturdier base for more stability to be able to lift heavier weights.
- I can improve the cooling system of the servo motors, such as adding cooling fans, to extend the efficiency of the servo motors.
- I can investigate the weight distribution of the robot arm by checking different attachment points and balance to reduce the stress on the servo motors.
Conclusion
My hypothesis was correct as my robot arm was able to lift more weight with 6 volts than with 5 volts because the increased voltage provided more power to the servo motors, which resulted in better lifting capacity and higher torque.
Application
Nowadays, robotic arms have numerous applications in different fields and industries to replace human work in:
Manufacturing, warehousing and logistics
-to assemble small pieces into bigger ones
Example: in the automobile industry, to assembly microscopic parts, to apply adhesives and sealants to the parts in the automobile sector
-to handle and pick objects
Example: forklifts in a warehouse to pick, sort, arrange, pack, label, stuck and place objects in a box or to load and unload items, to lift heavy loads
-to paint and to weld
Example: industrial painting and welding in automotive
Aerospace
-to assemble components of an aircraft
Example: to align and fasten parts of an aircraft
-to send and retrieve objects to and from space
Example: to send and retrieve parts from the International Space Station
Healthcare
-in laboratories and medicine
Example: to perform repetitive pipetting for medical samples and to conduct experiments, to perform surgeries that need precision, to help patients regain mobility after an injury or surgery
-to clean and disinfect surfaces
Example: to scrub the floor, to remove dust and debris from objects
-to handle hazardous materials
Example: to move chemicals, vaccines, needles and surgical instruments from one place to another
Metalworking and construction
-to cut hard materials
Example: to cut metal, stone, or glass
-to handle hot pieces of metal
Example:
-to retrieve hot metal from a mold
Agriculture
-to plant and harvest crops and to remove weeds
Example: to plant and harvest fruits, vegetables, or grains
Using robotic arms in all the industries mentioned above help increase:
-efficiency and productivity
-accuracy and precision
-cost savings
-workers’ safety
-innovation in robotics
-labour force
Sources Of Error
- The fact that the robot arm was homemade could have influenced the decreased lifting capacity in the third trial at 6V due to inconsistencies in its construction and potential wear on the components. The repeated use of the servo motors may have led to overheating and lower performance.
- Fluctuations in room temperature might have affected the servo motors’ performance. Higher temperatures could have caused the motors to overheat more quickly, leading to decreased lifting capacity especially in 5V trials.
- The duration of each trial could have influenced the lifting capacity and the temperature as longer trials might have led to overheating, affecting the results.
Citations
Advanced Motion Controls. (2024, August 29). What is a servo motor: Definition, origins, components, types & applications. https://www.a-m-c.com/servomotor/ Arduino. (n.d.). What is Arduino? https://www.arduino.cc/en/Guide/Introduction Arduino Project Hub. (n.d.). How to make a robotic arm. https://create.arduino.cc/projecthub/MisterBotBreak/how-to-make-a-robotic-arm-783525 Augmentus. (n.d.). The history of robotic arms. https://www.augmentus.tech/blog/the-history-of-robotic-arms/ Brainy-Bits. (2021, March 14). Control a ‘LOT’ of servo motors using a joystick, Arduino and PCA9685 PWM module. Brainy-Bits Editor. https://www.brainy-bits.com/post/control-a-lot-of-servo-motors-using-a-joystick-arduino-and-pca9685-pwm-module Canadian Space Agency. (2024, January 23). Canadarm. https://www.asc-csa.gc.ca/eng/canadarm/default.asp Fluke Corporation. (n.d.). What is voltage? https://www.fluke.com/en-ca/learn/blog/electrical/what-is-voltage Frontiers in Robotics and AI. (2017). The making of a 3D-printed, cable-driven, single-model, lightweight humanoid robotic hand. https://doi.org/10.3389/frobt.2017.00065 IEEE Spectrum. (n.d.). Unimation robot. https://spectrum.ieee.org/unimation-robot Instructables. (2017, September 21). How to make a robotic arm. https://www.instructables.com/How-to-Make-a-Robotic-Arm/ Instructables. (2019, March 12). How to make a robotic arm at home. https://www.instructables.com/How-to-Make-Robotic-Arm-at-Home/ International Journal of Creative Research Thoughts. (2023). Application of robotics. https://ijcrt.org/papers/IJCRT2306929.pdf National Inventors Hall of Fame. (2025). NIHF inductee George Devol invented the industrial robot. https://www.invent.org/inductees/george-devol NCBI. (n.d.). The history of robotic arms. https://pmc.ncbi.nlm.nih.gov/articles/PMC4247431/ Progressive Automations Canada. (2021, February 22). How to automate robot’s arm. https://www.progressiveautomations.ca/blogs/how-to/how-to-automate-robot-s-arm Robotic Products. (n.d.). The history of robotic arms. https://roboticproducts.co.uk/the-history-of-robotic-arms/ Robotnik. (n.d.). History of robots and robotics. https://robotnik.eu/history-of-robots-and-robotics/ Robots.com. (n.d.). Industrial robot history. https://www.robots.com/articles/industrial-robot-history Science Buddies. (n.d.). Introduction to servo motors. https://www.sciencebuddies.org/science-fair-projects/references/introduction-to-servo-motors Tedium. (2018, April 19). Robotic arm history: Unimate & Versatran. https://tedium.co/2018/04/19/robotic-arm-history-unimate-versatran/ Universal Robots. (n.d.). Applications of robotic arms. https://www.universal-robots.com/in/blog/applications-of-robotic-arms/ Universal Robots. (n.d.). Inventor of the robot arm and its continued development. https://www.universal-robots.com/blog/inventor-of-the-robot-arm-and-its-continued-development/ Universal Technical Institute. (n.d.). Application of robotics. https://www.uti.edu/blog/robotics-and-automation/application-of-robotics
Acknowledgement
- Ms. Burkell
My teacher, Ms. Burkell, helped me with getting set up on the platform, kept me informed about the science fair process, and gave me feedback and suggestions on what parts of the project I should improve.
- My parents and my sister
The three of them supported me and encouraged me during my project. I thank my parents for providing me with the supplies I needed for the project and their suggestions for improvement.