Life-Band
Navneeth Vasan
Fairview School
Grade 9
Presentation
Problem
1.1 - Abstract
In Canada, 1 in 100 people live with the life-threatening brain disease known as Epilepsy, one of the leading causes for seizures worldwide, with 63% of those diagnosed falling within the age range of 20–64. In addition to seizure activity, up to 15% of individuals with this disorder and its various subsets also experience sleepwalking. Both of these conditions are incredibly detrimental in their own ways and require caregiver attention. As a whole, Life-Band aims to develop a wearable, home-accessible device designed to detect early signs of sleepwalking-related incidents and nocturnal seizures, allowing alerts to be sent before a medical emergency/injury occurs.
First of all, sleepwalking is a condition that can result in uncontrolled nighttime movement, falls, or wandering, leading to serious and preventable injuries during sleep in patients, particularly during hours when caregivers are not present to monitor or assist them. Meanwhile, seizures are characterized by sudden coma-like occurrences caused by abrupt changes in electrical activity in the brain. Common symptoms include rhythmic convulsions, brief loss of neurological function or activity, sudden muscle stiffness, and potential arrhythmia (rapid increases in heart rate). Many individuals affected by the disorder of Epilepsy experience these episodes on a seemingly daily basis, happening in random bursts or routinely every few hours.
With the disorder commonly developing in younger children or older adults, Epilepsy can make many seemingly menial tasks such as driving, watching television shows with flashing lights, and even sleeping alone extreme hazards for those affected worldwide, increasing the fear of never knowing when the next seizure or sleepwalking episode may occur. Given the fact that Epilepsy, seizures as a whole, and sleepwalking do not have a simple or easily mass-produced cure barring more holistic approaches, this project attempts to step in the right direction through prevention. By utilizing home-accessible technology capable of filtering gyroscopic movement signals from MPU 6050 accelerometers to detect early seizure onset and abnormal nocturnal movement, Life-Band can send alerts through multiple different manners. This allows individuals affected by any of these conditions during the night to live more independently and safely, with the time and awareness they all need for a safe night's sleep.
How is Life-Band different?
The idea behind Life-Band is unique because of the following:
- It provides alerts for both sleepwalking & seizure detection.
- The utilization of a loud buzzer has the potential to wake up a sleepwalking person by themselves, without the assistance of a caregiver.
- It produces strong accuracy and minimal levels of false alarms due to the usage of two accelerometers and a Heart Rate and a SpO2 (Blood Oxygen) sensor.
- The usage of more than one accelerometer ensures better accuracy and independent threshold detection for each of my sensors, providing efficiency given the fact that it's looking for seizures and sleepwalking at the same time.
- Using heart rate and blood oxygen alongside movement tracking significantly improves seizure detection as it provides a multi-dimensional view of the body’s physiological response to such events.
- Relying on movement alone often misses seizures with less physical shifts or triggers false alarms during normal sleeping activity if improper thresholds are used, so medical studies have been used to determine what the "best" values for these thresholds are.
- The overall durable structure prevents damage to the device from the wearer moving in sleep.
1.2 – Problem
How can a prevention device be created to detect nocturnal epileptic attacks and seizure-related sleepwalking?
1.3 – Background Research
Why does sleepwalking happen?
- Sleepwalking, otherwise known as somnambulism, generally occurs in the first few hours of the night when those afflicted are generally in the deepest type of non-rapid eye movement sleep (NREM Stage 3).
- Generally, some base-level symptoms can include people sitting up in bed with a "glazed-over" look on their eyes before actually standing up and starting to walk.
- It's generally difficult to wake people up when they're in this state and sleepwalking, and after waking up they are generally quite disgruntled/confused, not at all remembering the event.
- As sleepwalking is classified as a parasomnia (undesirable / unwanted movement during sleep), the sleep disruptions caused may also affect the person's mood during the day, potentially leading to high levels of tiredness for extended periods of time.
- Outside of genetic conditions, sleepwalking can have various different causes of origin, such as:
- Consistent lack of sleep/disruptions in nighttime routines.
- High levels of stress/paranoia.
- Fevers/Illnesses.
- Generally, "random" occurrences of sleepwalking are more prominent in youth. In the US alone, 15% of all children sleepwalk compared to just 3.6% of adults.
- However, it's important to understand that, as ever, most of these triggers are interconnected. For example, an illness/generalized stress may end up indirectly leading to sleep disruptions, which can then lead to less restful sleep and an increased chance of sleepwalking as a whole.
- Alongside this, seizures and sleepwalking are interconnected, as mentioned in my abstract, due to the fact that published studies have demonstrated that approximately 15.3% of those with gentic generalized Epilepsy have some form of sleepwalking disorder as well.
- This is likely because of the many "byproducts" that Epilepsy can produce in the form of more specialized disorders. As sleepwalking can also be caused due to focal seizures within the frontal lobe of the brain, disorders such as Nocturnal Frontal Lobe Epilepsy, as I'll mention later, make patients far more susceptible.
- I chose to use the MPU 6050 accelerometers for this purpose, as their 3-axis (x, y, and z) movement detection methods help in linear acceleration.
- This is beneficial, as if someone were to walk but their arms didn't move at all, the device would still detect sleepwalking after 5 seconds as they moved forward in space.
What is a seizure/What are the different types?
- As previously stated, a seizure occurs due to an abnormal/sudden change in electrical activity in the brain.
- However, to be specific, this “electrical activity” is that of the neurons, otherwise known as the “brain cells”.
- When these neurons misfire, they cause seizures, though different parts of the brain lead to different symptoms/types of effects.
- This may also lead to an imbalance of neurotransmitters, in which the neurological balance of excitatory and inhibitory cells which control the firing & activation of neurons is lost/uncontrolled as a result.
- The two main types of seizures are generalized and focal onset seizures.
- While generalized seizures generally affect all the different lobes of the brain simultaneously, focal seizures are typically directed at only one or two of them. Thus, there is higher potential for awareness of some sort during those of focal over generalized typing.
- Some types of generalized seizures include Tonic-Clonic, with sudden stiffening of muscles and convulsions, and Atonic/Drop, with sudden total loss of muscle control, leading patients to suddenly fall. These types of seizures are particularly dangerous if the surroundings aren’t cushioned properly, as this loss of muscle control could lead to particularly dangerous falls + physical trauma.
- In my project this year, the 2 types of seizures that I aim to detect are Myoclonic and Tonic-Clonic, both of the generalized typing and characterized by their sudden "jerk-like" movements and convulsions, along with a sudden rise in heart rate known as arrythmia.
- However, the most common types of focal seizures are focal onset awareness & focal onset impaired awareness seizures simultaneously, with their key difference being that in focal onset awareness seizures, patients can remember what occurred during the seizure and are able to recall this information, while in focal onset impaired awareness seizures, patients have no recollection of anything that occurred within the event itself.
- Some other common symptoms of such seizures include tachycardia (increased Heart Rate) due to a phenomenon known as a cardiac arrythmia, in which during the middle of a seizure or the time immediately after one, Heart Rate suddenly spikes to over 100 bpm.
- Alongside this, another potential symptom, especially in more "quiet" seizures during which less movement occurs could be hypoxemia, in which there's a sudden reduction in Blood Oxygen (SpO2) levels to dangerous levels, less than 90-95%.
- This is why the addition of the Max 30102 sensor is so beneficial, as it provides a "second perspective" of sorts for caregivers to gain the wider picture on how the entire body may have been affected.
Why do seizures happen?
- Overall, the most common cause of seizures in the world is being affected by a neurological disorder, but generalized Epilepsy is only the tip of the iceberg.
- For example, people affected by the disorder Nocturnal Frontal Lobe Epilepsy, a condition that causes repeated focal seizures overnight, are typically most susceptible to routine sleepwalking.
- However, being affected by a specific seizure disorder or Epilepsy is not the only potential reason for a seizure, and some other triggers include:
- Unbalanced amounts of stress/Chronic stress disorders over an extended period.
- Usage of illicit drugs/alcohol in overdoses.
- Head trauma (Major fractures, Concussions, etc).
- The condition Alzheimer's, particularly in older adults.
- Of course, just one of these can’t be the only reasons for seizures/seizure disorders to develop, but these are the most proven causes in research.
- Meanwhile, Epilepsy itself is typically formed from either genetic means, or through external factors such as brain trauma, infections, etc, and it is commonly diagnosed in patients with a minimum of 3 seizures in a 1 year period from the first occurrence, though this can vary country to country.
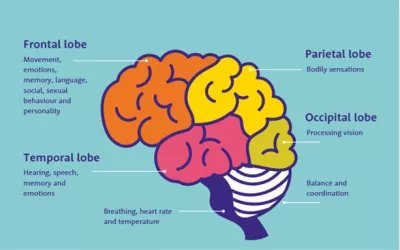 Figure 1: Image of the brain, and purpose of each of the different lobes
- As is shown in the image above, the frontal lobe, in which the disorder Nocturnal Frontal Lobe Epilepsy is developed, processes movement & memory.
- This makes sense, as this disorder causes sleepwalking, during which the patient does move in a certain manner.
- They also generally have no memory of the event (sleepwalking) following its occurrence, indicating the possibility of a focal seizure targeting that lobe in particular.
- However, focal seizures, particularly those involving impaired-awareness of some sort are most common in the temporal lobe, with the frontal lobe typically revolving around more motor-driven symptoms.
1.4 - Disclaimer
Now, ahead of me explaining the design and practicality of Life-Band's final design, I have a quick disclaimer. I have done extensive testing on this prototype, but it’s important to be clear: Life-Band is still in development. It is not a perfect medical - level device yet and there is always a potential for false alarms or missed events. However, for someone who currently has no detection available at all, this provides a vital layer of comfort and a safety net that didn't exist before. Alongside this, the final design is a prevention device, not a medication one. This essentially means that even if there were false alarms detected during the night (which as stated, is quite unlikely) there are no consequences, as unlike similar devices on the market, Life-Band itself doesn't do anything in the "emergency medicine" vein if either of these events were to be detected during the night. Rather, all it does is send the various alerts it uses in order to alert the caregiver, who then uses their own prior medical knowledge for the next steps.
A key part of the reason that I created Life-Band in the first place was to be worn at night, when the wearer & caregivers are asleep. During the day, the wearer should always have a caregiver/guardian looking over them, which addresses most of the concerns of "How may the device impede the wearer's daily life?" Even if a caregiver is not available at all times, the code used in the device itself can always be customized to only try detecting seizures during the day, which is key from a personalization point of view.
Method
2.1 - Cost & Success Criteria
Before I actually start explaining what Life-Band does and how it works, it's important to understand what I truly set out to create in the first place. Written below is the "success criteria" I used to ensure Life-Band was up to standard, and a brief summary of how each factor is accounted for:
Latency: The time it takes for the multiformat alerts (buzzer, app notification) to detect the movement after its occurrence.
Practicality: Maximizing the amount of equipment can be fit onto the device while still being efficient/practical in design choices.
Comfortability: Ensuring that wearer preference and comfort is taken into consideration in Life-Band's design (eg. adjustable tightening), while still maintaining efficiency and stability to counter common nighttime movements.
Affordability: The key differential between Life-Band and more household names in the long term, how could I minimize the amount of excess cost I had to pay for the design while sacrificing minimal levels of processing power?
Now, attached below are the costs for each item I used in the final design. If the item was already owned, the cost was denoted as 0 dollars:
1X IOT Crazy Nano AT mega 328P microprocessor board - $24.99 for a 2-pack, approximately $12.50 for 1 board
2X ELEGOO 170 Tie-Point Mini Breadboards - $10.99 for a 6-pack, approximately $3.66 for 2 breadboards
2X MPU 6050 Accelerometers (Not Pre-Soldered) - $15.90 for a 3-pack, $10.60 for 2 accelerometers
1X HC-05 Bluetooth Module (Pre-Soldered) - $22.06 for a 2-pack, $11.03 for 1 module
1X Max 30102 Heart Rate & Blood Oxygen sensor (Not Pre-Soldered) - $13.99 for a 2-pack, approximately $7.00 for one sensor
1X Duracell 9V Battery - $19.96 for a 4-pack, approximately $5.00 for one battery
1X Piezoelectric Buzzer (Compatible w/ Arduino) - $6.53 for one buzzer
2X Adjustable Velcro Straps (w/ Buckle for adjustment) - $13.99 for a 20ft roll, approximately $0.70 for 2 bands totaling a length of 1ft
2X Tupperware Boxes - Already owned
1X Repurposed Vacuum Hose - Already owned
1X Repurposed Toy on/off switch - Already owned
Jumper Wires (Male - Male & Male - Female) - Already owned
Total Production Cost: $57.02 (Excluding tax)
Overall, the price of about $57 is significantly lower than that of a lot of alternatives currently on the market (eg. digital watches), while still completing its job as a nighttime-worn prevention device for both seizures and sleepwalking effectively!
2.2 - Key Materials
Next, I'll be discussing why I chose some of the specific materials I used in Life-Band's final design and how they compare to alternatives on the market for such a prototype:
MPU 6050 Accelerometers
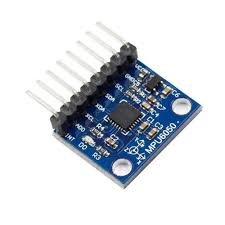 Figure 2: MPU 6050 Accelerometer
The "backbone" of my final prototypes, I chose to use the MPU 6050 accelerometers for Life-Band due to their decent affordability, coupled with their stronger ability of movement detection compared to other, similar products on the market. Given the fact that Life-Band is to be worn at nighttime, it needs to find a way to differentiate between normal sleeping movements and genuine tremors/jerks in the events I aim to detect (seizures & sleepwalking). Thus, the combination of the standard, accelerometer-based interface alongside with the gyroscopic motion sensors ensure that amount of false positives detected are minimized when refined code is used and calibration is done correctly. Another factor is the fact that, as I state later, the addition of the ADO pin on the accelerometer allows the utilization of 2 of them with the same microprocessor, which allowed me to detect seizures and sleepwalking separately.
While some negatives may include the excess power usage compared to more novel, solely motion-detecting sensors that are currently available, and the slightly increased overall cost, its important to understand that, from a medical standpoint, effectiveness and proof of functionality are key. Yes, using a gyroscope and accelerometer separately may have reduced cost and increased longevity from a purely power-based standpoint, but the MPU 6050 is proven on the market as a reliable, well-rounded component that's already been tested for effectiveness in a variety of DIY medical wearables, which, in my opinion, negates these downsides as a whole for such a project.
Max 30102 Heart Rate/Blood Oxygen Sensor
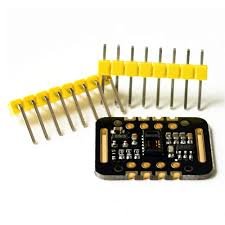 Figure 3: Max 30102 Heart Rate/Blood Oxygen sensor
Meanwhile, the Max 30102 Heart Rate/Blood Oxygen sensor was chosen due to my specific needs in sensor placement & accuracy in measurements. Utilizing something known as optical pulse oximetry, the sensor uses a red, infrared light to measure pulse. However, this method of measurement can be subject to the issue of ambient light interference, in which outside light could potentially interfere with accuracy in reporting, but an advantage of the Max 30102 is that it, crucially, is able to "cancel out" this external light when making calculations, unlike its predecessors (eg. Max 30100). Alongside this, having an accurate temperature sensor on the module to account for sudden shifts helps in making sure blood oxygen (Spo2) calculations are measured sensibly. As this sensor is placed on the bottom of the device on the wearer's forearm, not finger, this level of accuracy is key to ensure that measured values are generally practical as a whole!
HC-05 Bluetooth Module
 Figure 4: HC-05 Bluetooth Module
Finally, the HC-05 Bluetooth module was used because of its evident simplicity for more beginner-level usage, efficiency in cost, and long-term success in Arduino-based designs. Renowned for being the "standard" Bluetooth module to send and receive data from connected devices for years, I chose this module due to its simple software interfacing compared to newer models while still satisfying what I needed from it. Given the fact that this Bluetooth module was only really needed to receive the data which my sensors sent to my microprocessor and send it in the form of readable values to the companion app which I created on MIT App Inventor, I decided that there was no point spending extra on more refined, newer modules (eg. HM-10, ESP32). While changes may be made in the future if I aim to increase practicality and complexity, the HC-05 is more than fine for now.
While I have used a lot of other components in Life-Band's final design, I chose to primarily discuss these 3 given their potential "debatability" compared to alternatives that could have been used. While other components had reasoning proving while they were the best, such as the Nano microprocessor being used for practicality or the Piezoelectric buzzer's ability to manipulate tone, these sensors & modules have reasons that they could be manipulated/changed in future prototypes, which I've addressed.
2.3 - Formulas & Coding
To understand the thresholds I utilized in my code, we need to understand the calculations and formulas that took me there in the first place!
*Note: Throughout these formulas, linear acceleration is discussed alongside gravitational acceleration at times, given the fact that, due to the gyroscopic nature of the accelerometers being used, they also have the capability to act as "tilt sensors" of sorts to detect acceleration in all directions.
First of all, the MPU 6050 accelerometers I've used measure raw data in the unit of LSB (Least Significant Bit), a dimensionless unit with a range of -32,768 to 32,768. In standard form, this accelerometer has a LSB/g sensitivity of 16,384, meaning it has has a range of measurement of -2 to +2 gs of force.
Raw Data/16,384 = g-force (between 2 & -2)
g-force * 9.8m/s² = Acceleration for 1 axis - x y or z (between 19.6 & -19.6)
When at rest, the sensor should read a value of approximately 9.8 m/s² for total magnitude. This is due to the fact that, while the x & y axes are detecting an acceleration of approximately 0 (barring minor vibrations), the z axis has a consistent value of about 1g or 9.8 m/s², which is the standard for gravitational/vertical acceleration on Earth.
For Total Magnitude
√x²+y² +z² = M total (between 33.95 & -33.95)
Overall, based on the research I've done with medical research documents from published studies on a similar topic (reference citations for exact links), the average "low" threshold for acceleration in these sharp movements from seizures is about 22-23 m/s², so the baseline I put in my code to detect a seizure is 8 jerks at 22 m/s² or more to trigger a seizure alert.
Meanwhile, for the "walking" threshold I've been using to detect sleepwalking, the typical acceleration for a hard step is about 12 m/s². Thus, my code demonstrates a baseline of 5 seconds (5000 ms) of walking at 12 m/s² or more to cause a sleepwalking alert.
Another key portion of my code is the fact that I have maximum and minimum values that are actually possible to be "detected" for heart rate & blood oxygen levels & sent to the Serial Monitor & app. While blood oxygen (Spo2 in the code) has a minimum detected value of 93% and a maximum of 100, heart rate has a maximum of 110bpm and a low of 50. I chose to put these thresholds in place as, while they might seem relatively harsh, Life-Band is technically only supposed to be worn at night. The "normal" resting heart rate for any wearers shouldn't go below 50 and above 110 when they're sleeping, and technically all Spo2 levels below 93 are considered in the range of hypoxemia (low blood oxygen levels). If either of these values were to actually go below or above these levels, signs of a potential issue would be physically evident & immediate medical intervention would be needed.
Alongside this, given the "report interval" where the data is collected is every 200 ms, this ensures that most "garbage" data is filtered out regardless. However, at a clinical level, if this device were to be tested on actual patients with variances in medical conditions (eg. asthma, diabetes) in which Heart rate and/or Spo2 levels are naturally high or low, these limits can be modified to accommodate for values that may suit their individual circumstances/needs. This could also open up the possibility of removing these thresholds entirely if I believe that measurements are accurate, and instead making it so that if either one of these values were in the "danger zone", an alert would be sounded.
As another note, at the time of me writing this I've also incorporated fall detection into detecting seizures, through looking for a sudden "weightlessness" in magnitude transitioning into an impact within a certain window of time (600 ms). While nothing relating to this has been demonstrated in my following code, as pasted below, it will be brought in-person to the fair.
Now, attached below are some key portions of the code I used on the Arduino platform and sent to my microprocessor, each with a brief description regarding what its purpose is:
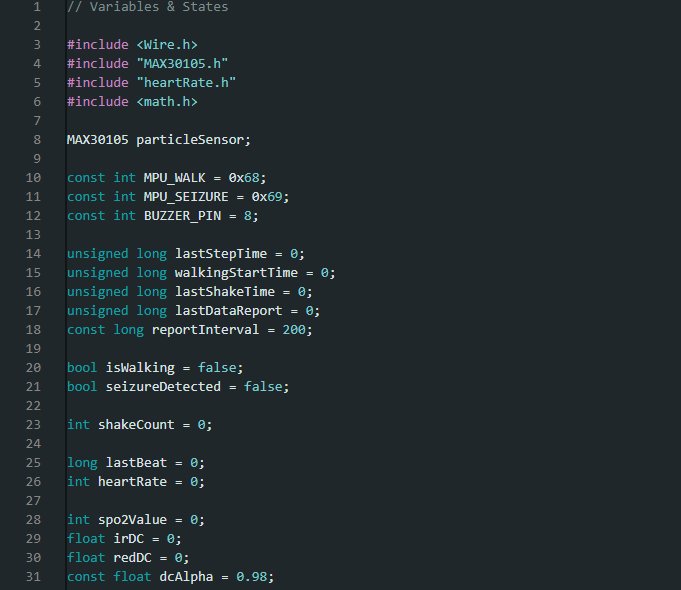 Figure 5: Variables and States used in Arduino Code
As stated in the comment at the top, this portion of code demonstrates the requisite variables and states that I have been using upon Life-Band's initialization. Crucially, the include wire definition at the top ensures that the microprocessor can communicate with the accelerometers and Max 30102 sensor (which is defined as the Max 30105) through wired connection, the math variable makes it so the code can handle calculations with varying mathematical symbols, and the heart rate variable aids in accurate beat detection. Alongside this, the buzzer pin is defined as 8 because, of course, it's plugged in to digital pin 8. The 2 accelerometers (MPU_WALK & MPU_SEIZURE) are each defined with different addresses of 0x68 and 0x69 respectively, as one of them has their "ADO" pin connected to the 3V3 pin on the microprocessor, while the other one's ADO pin isn't connected to anything! The only other 2 constants with predetermined values are the report interval (200 ms) for how much time is between updates for detecting all values (eg. heart rate, blood oxygen, acceleration), while the value for dcAlpha (0.98) remains relatively high as it controls the baseline for light levels output by the Max 30102, ensuring that all applicable values (Heart Rate, Blood Oxygen) used are relatively smooth/consistent when sent to the serial monitor.
Meanwhile, all the variables/states at "0" or "false" (eg. lastStepTime, lastShakeTime) are set at these values upon initialization as they're referenced again later in the code. For example, if a seizure is detected, then "seizureDetected" is set to true, not false.
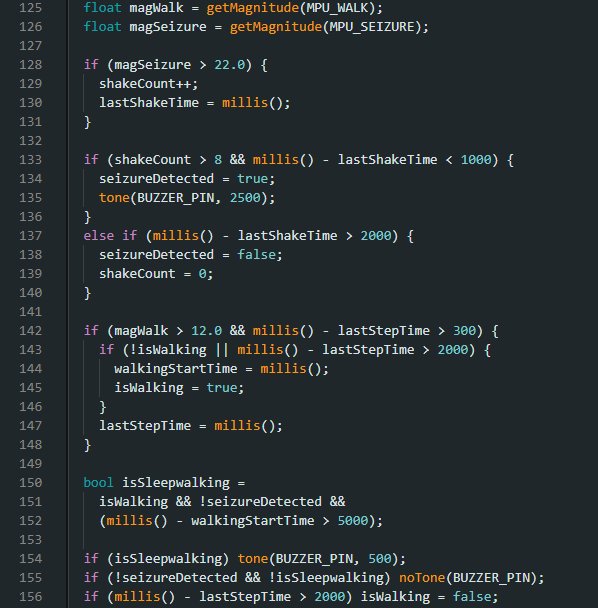 Figure 6: In-code logic for Sleepwalking and Seizure detection
Next, this portion of code contains the bulk of the logic behind how seizures and sleepwalking are actually detected. The "getMagnitude" function on the top of the code is how the total magnitude is actually received from the boards, and it's received using the word "float" to ensure that decimal values can be detected as well. If the magnitude detected by the seizure MPU is over 22, then the "shakeCount" variable's value increases by 1. If 8 shakes are detected, each within at most 1000 ms (1 second) of each other, then seizureDetected becomes true and the piezoelectric buzzer is sounded at a high tone (2500). This detection can only be cleared if no shakes are detected for 2000 ms (2 seconds).
The sleepwalking detection utilizes similar logic, detecting walking if the magnitude on the sleepwalking MPU is over 12 and the time between steps doesn't exceed 300 ms. However, sleepwalking is only detected if there has been concurrent waling for at least 5000 ms (5 seconds) and no seizure is detected. Thus, if both seizures and sleepwalking are detected simultaneously, the seizure alert always takes precedence.
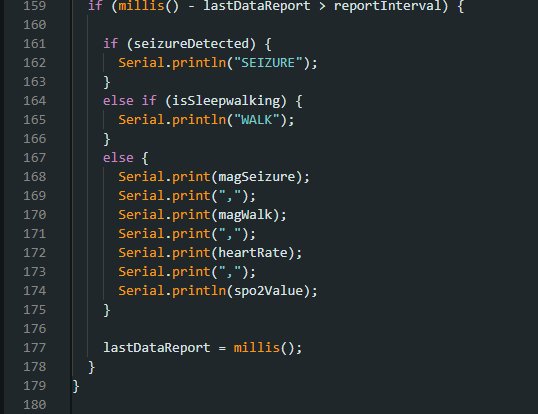 Figure 7: Code to display output values and alerts on the Serial Monitor
Finally, to round off my code I have the logic that actually prints the collected data to the serial monitor. The if statement at the top ensures that each "report" is only sent after 200 ms, to prevent potential overcrowding/lag in the received values. if a seizure is detected the serial monitor prints the single word of "SEIZURE", and if sleepwalking is detected the serial monitor prints "WALK" instead. This proves beneficial to the logic of my Life-Band companion app, as I mention later. Alongside this, all 4 values (magSeizure, magWalk, heartRate, and spo2Value) are printed in the serial monitor when a seizure/sleepwalking is not detected to ensure that all of these are always visible in an evidently tangible manner.
To summarize, my code is the driving force behind actually telling Life-Band and its various components what to do and what thresholds are required, while also ensuring that my received data from all of my sensors is displayed in a fully readable fashion.
2.4 - App Interface & Creation
As I mentioned earlier, I also created a Life-Band "companion app" of sorts as a secondary alert method for caregivers to know if a seizure/sleepwalking is happening. This app works in tandem with the device itself and the Arduino code that was used to create it, using a "detection label" to display alerts for either one of these events. This app was created on the platform MIT App Inventor, a popular piece of software for new app designers to learn useful skills.
Firstly, attached below is an image of the app interface itself and all the key physical components that were built into it:
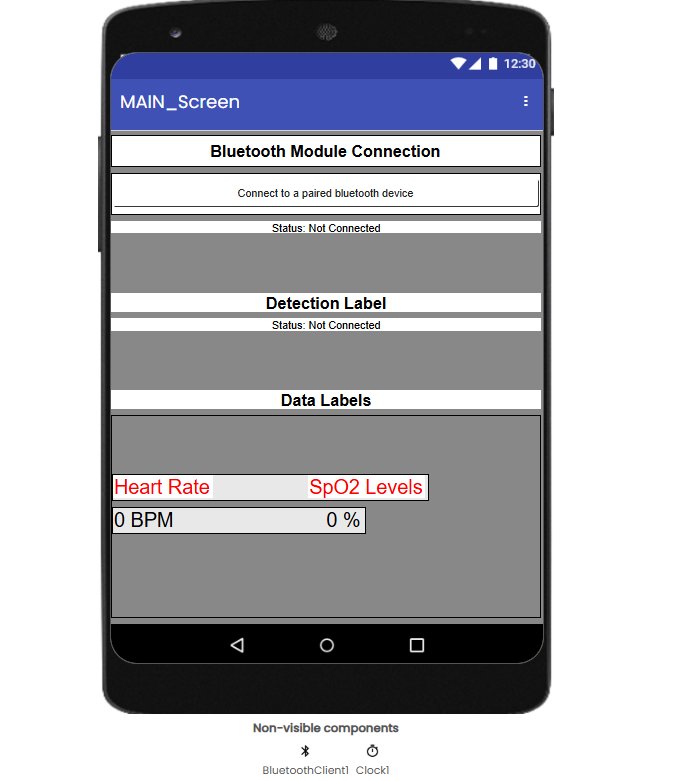 Figure 8: UI Interface for the Life-Band Companion app
While the design itself may seem relatively simplistic, it contains all of the key components necessary for such an app. For instance, the List Picker reading "Connect to a paired Bluetooth device" close to the top of the app allows a caregiver to connect to the HC-05 Bluetooth Module used on Life-Band to constantly receive the data gained from the 3 sensors (MPUs, Max 30102). When connected to the Bluetooth module, the Detection label constantly checks the text sent to the Serial Monitor and searches for the words "SEIZURE" and "WALK", changing its text and color if either of these words are detected in the received data.
Meanwhile, the Heart Rate and SpO2 levels labels constantly update whenever a seizure/sleepwalking is not detected, based on the values received in the string in the "data report" in the Arduino code. While these values do take some time to update (as I mention in my Sources of Error), the key is that they're quite accurate and help caregivers understand whether these values were spiking immediately after such a medical emergency. Alongside this, the non-visible components (the Bluetooth Client & Clock) function in the background, with the Bluetooth Client allowing the pairing of Bluetooth devices within the app itself, while the clock controls the amount of time where the app refers back to the received data in the Serial Monitor (every 200 ms).
Next, here's the code (in block-form) that the app itself runs on:
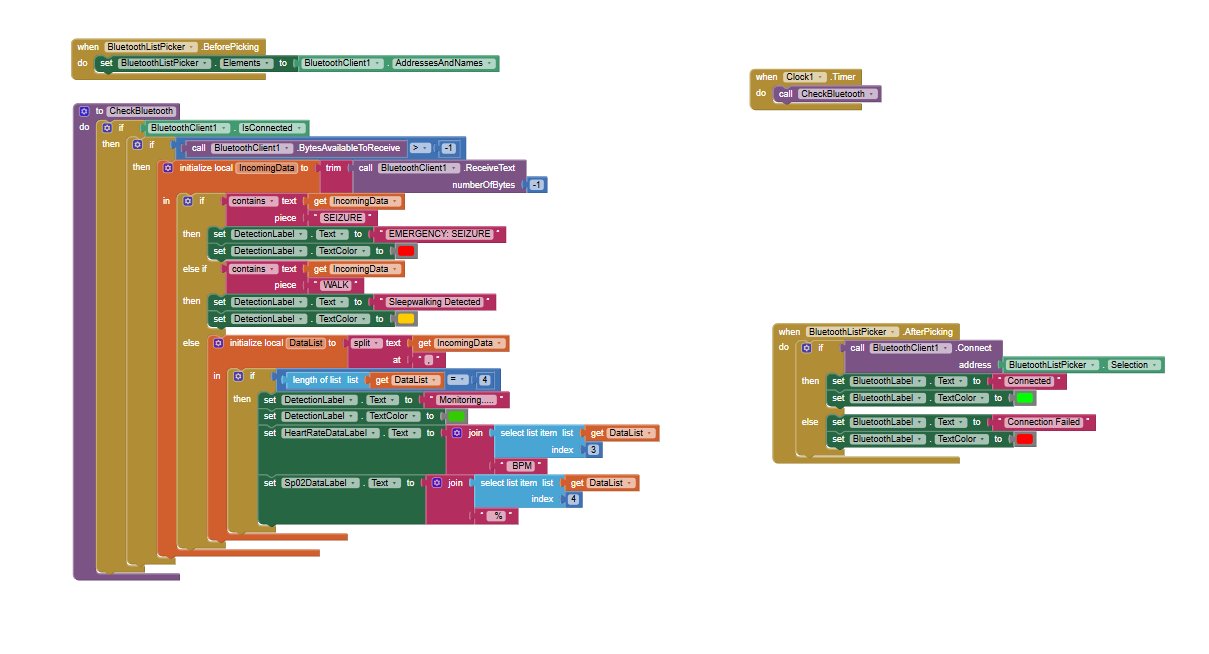 Figure 9: Block-form code used within Life-Band Companion app
Some of the key portions in this code include the statement in the top left ("When BluetoothListPicker.Before Picking") that allows the list picker itself to use the Bluetooth devices paired to the phone in its "menu" of sorts. The main loop on the left of the image features the bulk of the actual alerts & displaying of data through checking if the IncomingData variable (which stores the text received in the Arduino's Serial Monitor) has the words that denote detection of a seizure or sleepwalking, and changing the text featured within the detection label if so.
Alongside this, the DataList variable helps in collecting data when no emergency event is detected, through separating the values from the data report (values from accelerometers, heart rate, and blood oxygen) with commas and swapping out the text in the Heart Rate and SpO2 labels with the numerical values found in index 3 & 4 of the string.
While I do hope to improve Life-Band's marketability through making this an app on the Play Store one day, all of my testing has been through using it as a downloaded APK file with a QR code.
2.5 - Wiring Diagram
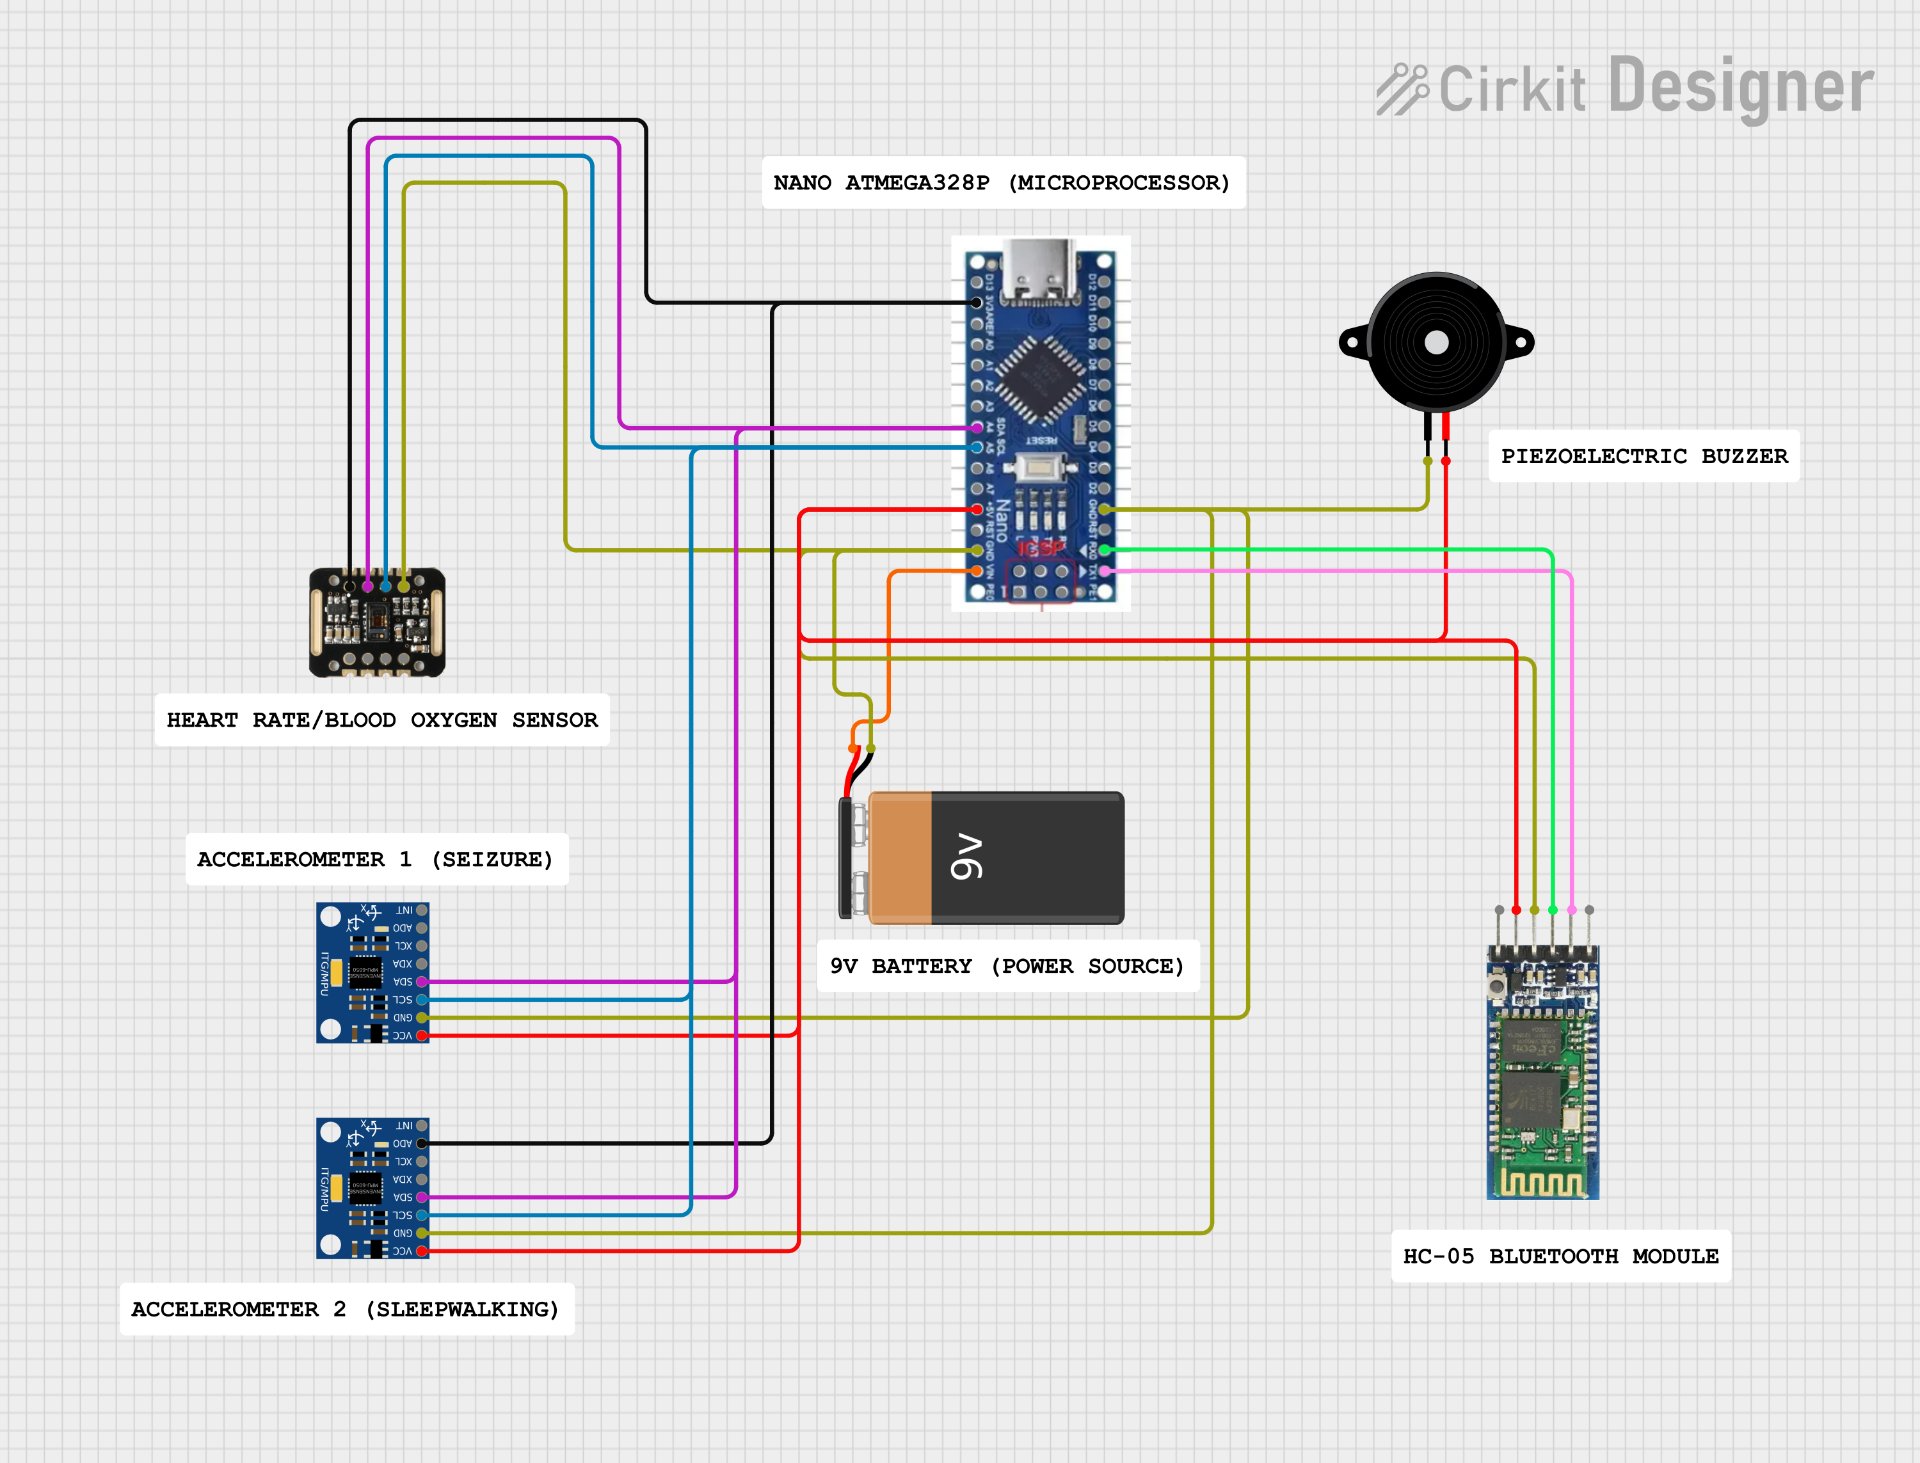 Figure 10: Wiring diagram of all key components used in Life-Band's final design
*Note: All of the following information can also be found in the "Wiring" document, found on the bottom, next to my logbook in the Attachments section
First of all, as you may see, most of the pins on the microprocessor have multiple wires from external parts connected to them simultaneously. This is possible through the usage of a mini breadboard, upon which the board itself is placed on. If wires go on the same "row" on this breadboard as the necessary pin on this microprocessor, they are still able to use the function of that pin.
In the following legend, all colors are the same for wires going to the same pin on the microprocessor, but not necessarily the "original" pin on the sensor/external pin itself.
Legend
Red - 5V
Murky Green - GND
Purple - A4 (SDA)
Light Blue - A5 (SCL)
Black - 3V3
Pink - TX
Light Green - RX
Orange - VIN
Next, written below are the connections for each separate device depicted in the image, written in the format of "Pin on External Part - Pin on Microprocessor".
Accelerometer 1 (Seizure)
VCC - 5V
GND - GND
SDA - A4 (SDA)
SCL - A5 (SCL)
ADO - 3V3
Accelerometer 2 (Sleepwalking)
VCC - 5V
GND - GND
SDA - A4 (SDA)
SCL - A5 (SCL)
Heart Rate/Blood Oxygen Sensor
VIN - 3V3
GND - GND
SDA - A4 (SDA)
SCL - A5 (SCL)
HC-05 Bluetooth Module
VCC - 5V
GND - GND
RX - TX
TX - RX
Piezoelectric Buzzer
VCC - 5V
GND - GND
9V Duracell Battery
VCC - VIN
GND - GND
One common trend with most of my sensors/modules used is that there are 2 pins for "communication" whether it be to gain data from the microprocessor (input) or to give the data gained locally to the microprocessor (output). Some of these pins include SDA, SCL, TX, RX, etc.
Another interesting feature is the fact that the SDA & SCL pins, featured on both my MPU 6050 accelerometers and the Max 30102 Heart Rate/Blood Oxygen sensor which I have been using are connected to the A4 and A5 pins respectively on the Nano microprocessor I've been using. This is due to the fact that even though these pins are used most commonly used for analog input, the board I'm using doesn't come with dedicated SDA & SCL pins. Thus, as A4 & A5 are connected to the chip's I2C bus, which controls the function of "listening" to and transferring data to/from outside sensors, they essentially completed the same function that was required anyway. When I defined "include Wire" along with all the other variables and states within the code, this made it so that the Wire library will constantly be looking for data sent to any pins connected to the I2C bus mentioned above (in this case, A4 and A5).
Analysis
3.1 - Previous Prototypes
Throughout the creation of Life-Band, most of my "testing" came in the form of prototyping. In this process, I constantly created new, more refined prototypes in a variety of ways, aiming to improve on all of the success criteria I mentioned earlier. In my design, I had 4 main prototypes, which I'll be describing down below, including each of their pros/cons:
Prototype 1
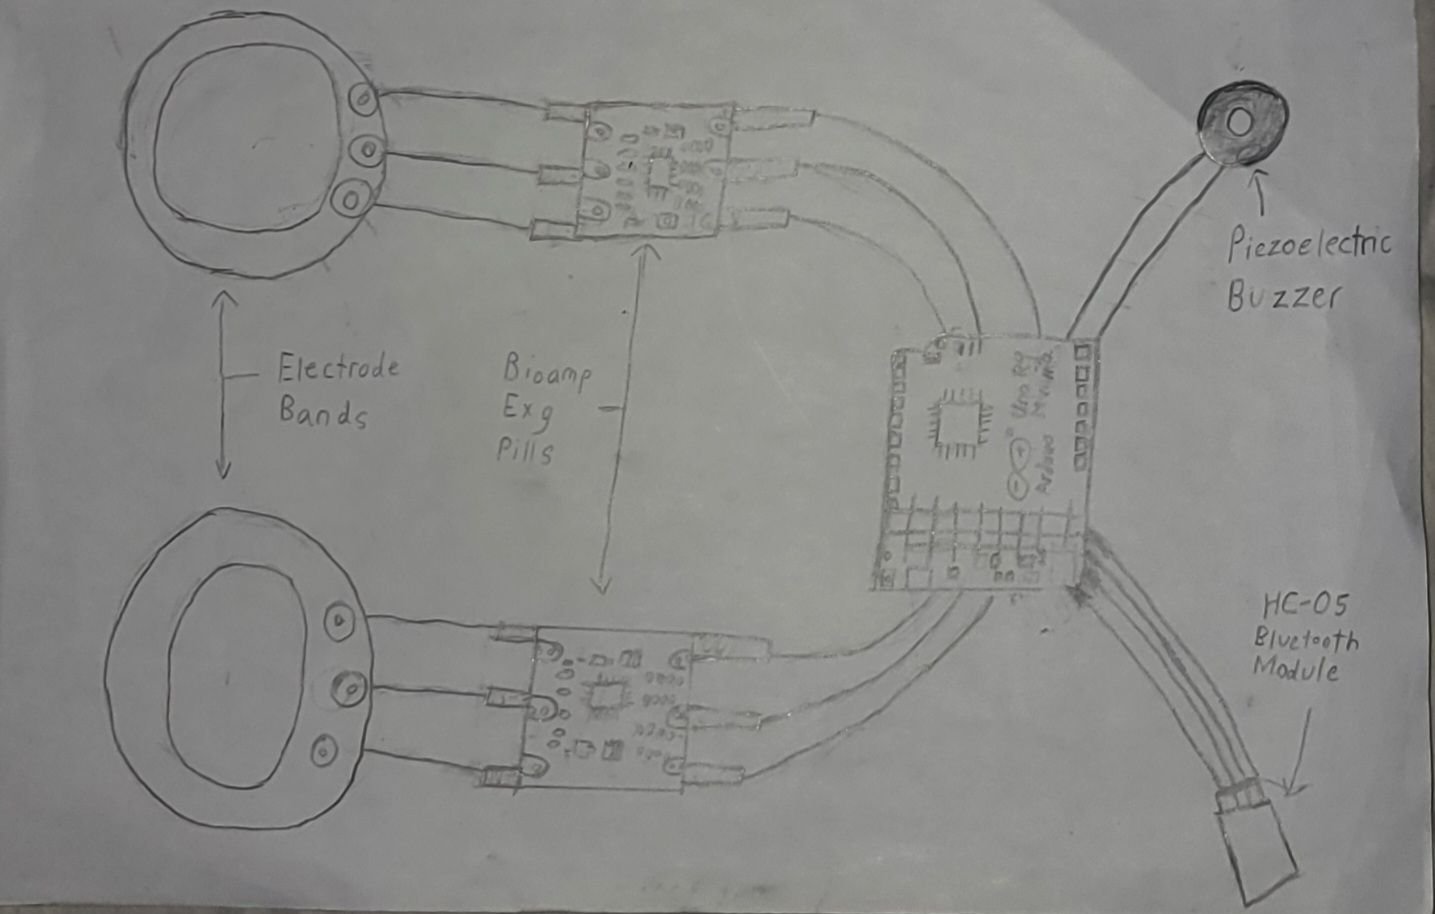 Figure 11: Original Prototype/Design for Life-Band
For my very first prototype for the project, I actually don't have an image of the physical components as I never came around to fully building it. In this design, I aimed to utilize Bioamp EXG pills alongside dry electrode wires to detect EMG (electromyogram) and ECG (echocardiogram) signals simultaneously. Many components and ideas proposed were taken forward into previous prototypes, such as making the device wrist-worn, along with using a HC-05 Bluetooth module and a Piezoelectric Buzzer to send alerts in some form if a seizure was to be detected.
However, I notably struggled with actually getting readable data on the Arduino's "Serial Plotter" that could be used for testing with these Bioamp pills, and I had concerns with creating code for sensors I barely knew anything about. These concerns were echoed by my school's science fair coordinator, Mr. DeGelder (as mentioned in my logbook). Thus, I decided to scrap this original concept entirely.
Pros
- Good foundation for a project of such scope
- Rather clear indication of materials/creation methods I wanted to utilize
- Helped in gaining understanding of the effects of both muscular movements and heart rate in seizure detection
Cons
- More based on how it looked on paper vs actual functionality
- Utilization of EMG & ECG signals impractical outside of a clinical setting
- While I did set out to create a prevention device, how I planned to incorporate "alert methods" was unclear/not fully fleshed out
- Large size of components made storage on wearer impractical
- Failure to account for external power source to actually make device wireless.
Prototype 2
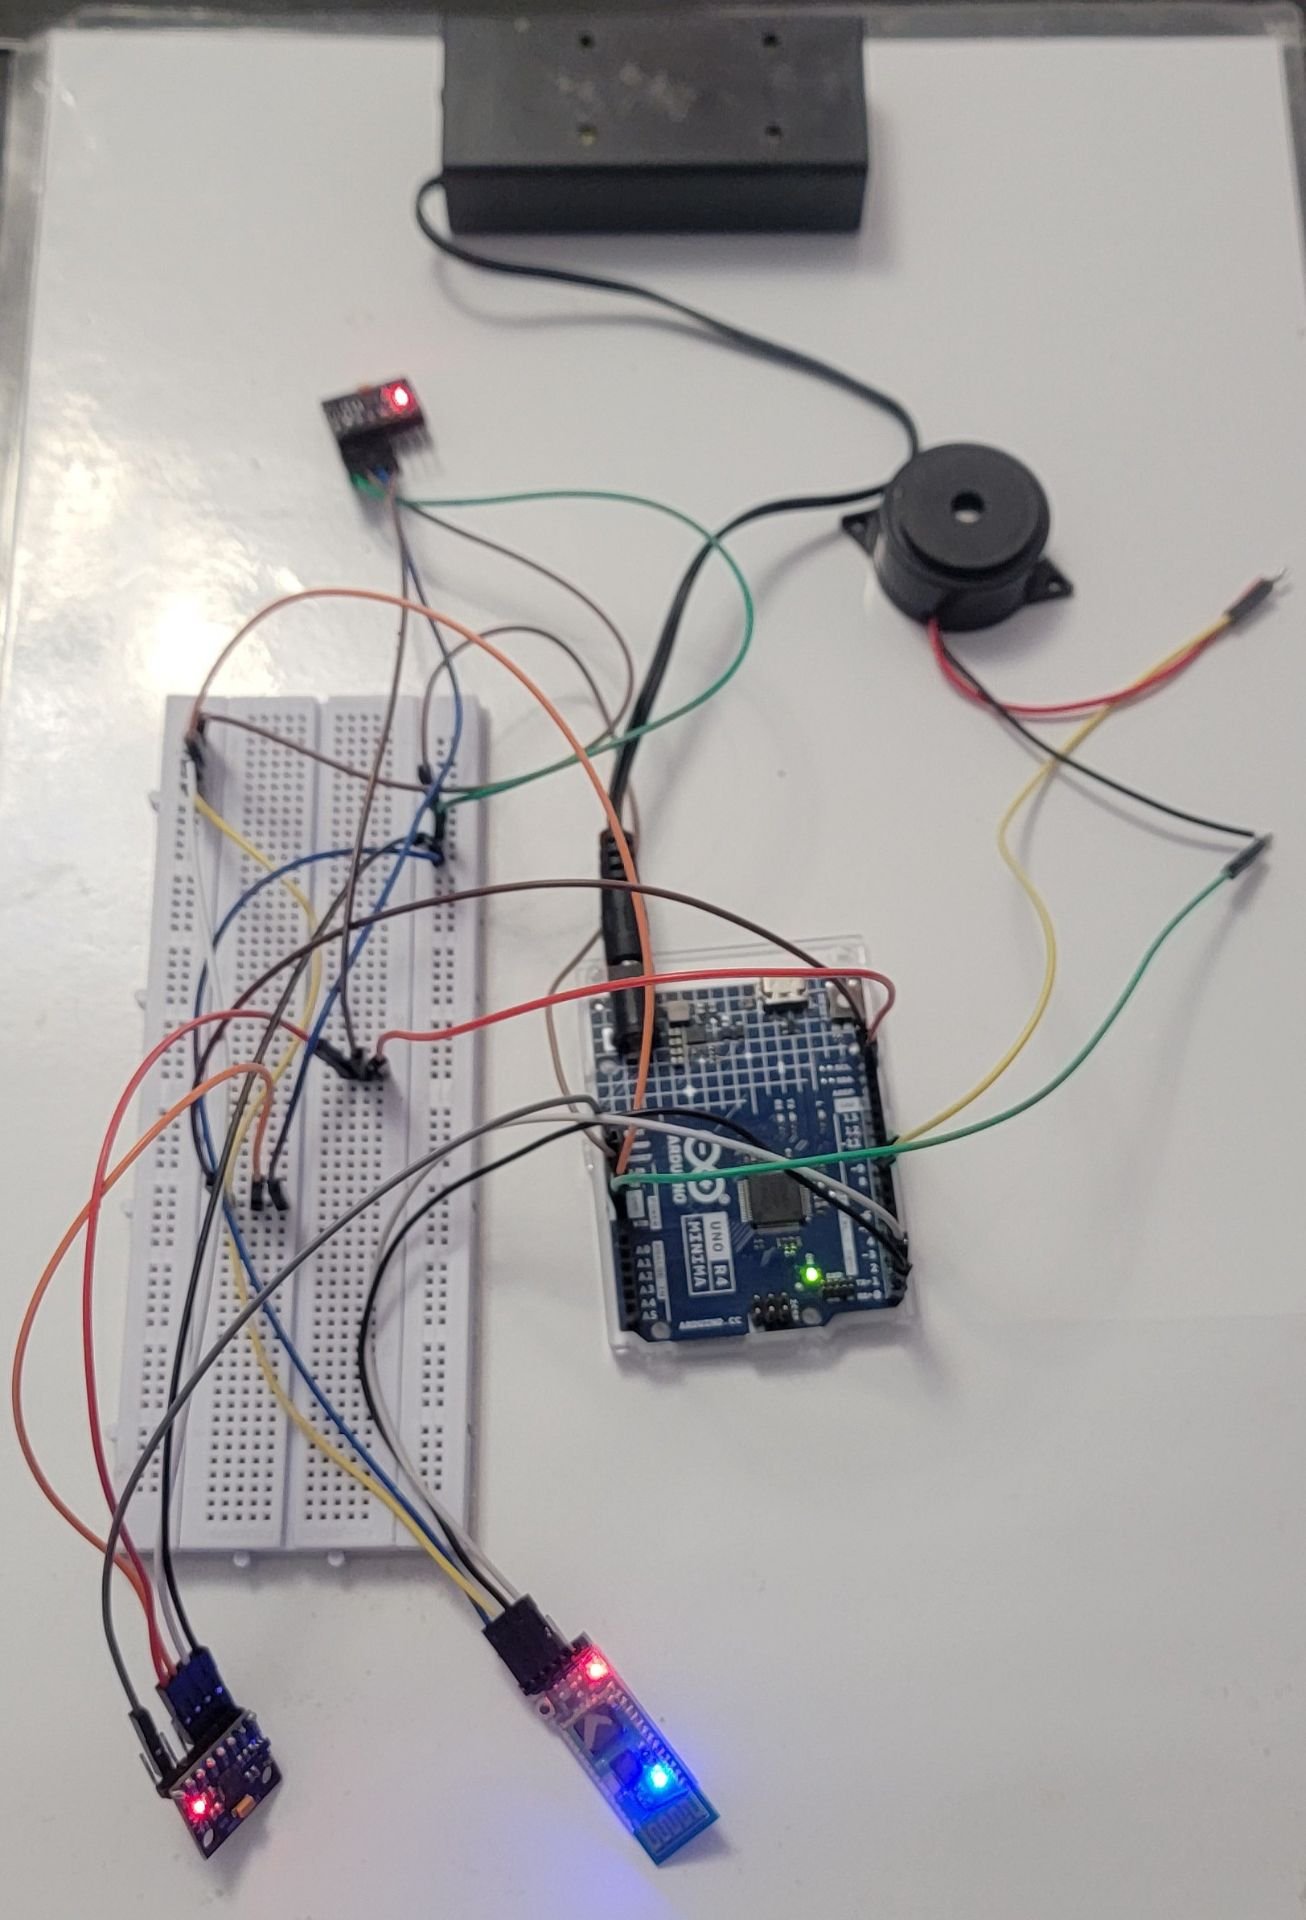 Figure 12: First Accelerometer-Based Prototype
Arguably the biggest change in Life-Band's prototyping process as a whole, I swapped out the EMG and ECG sensors for 2 MPU 6050 accelerometers instead, also incorporating sleepwalking as well as seizure detection. Each of these MPUs detected seizures and sleepwalking respectively, based on the requisite thresholds I used in my code, and a breadboard was used for wiring as well. I also chose to use these accelerometers over anything else currently available on the market, as they have the added capability of using Linear Acceleration. This essentially means that if someone were to be walking in the night but their arms weren't moving at all, the device would still detect sleepwalking after 5 seconds!
This design also opted to use the text-based Serial Monitor instead of the graphs formed in a Serial Plotter to ensure more practicality in a household setting, while still using the HC-05 Bluetooth Module for wireless signal transmission, the local Piezoelectric buzzer as an alert method, and the name-brand Arduino R4 Minima as the microprocessor. Alongside this, I also incorporated an external power source in the form of a battery pack to ensure consistent power supply to the whole setup.
Pros
- Includes functional components that can actually detect seizures/sleepwalking-like movements.
- Able to work wirelessly through usage of a Bluetooth Module and sending data to Serial Monitor.
- Utilization of multiple accelerometers ensures independent threshold detection, making it so seizures/sleepwalking are both detected efficiently.
- Multi-tone alert methods on buzzer aid in practicality in a more real-word environment to differentiate between sleepwalking & seizures.
Cons
- Bulky parts and exposed wiring reduce general practicality.
- Only one actual alert method for caregivers to realize if an emergency is occurring, potentially not enough given the fact that this device is aimed to be worn at night when people are sleeping.
- Haven't figured out how to actually make it wearable for patients.
Prototype 3
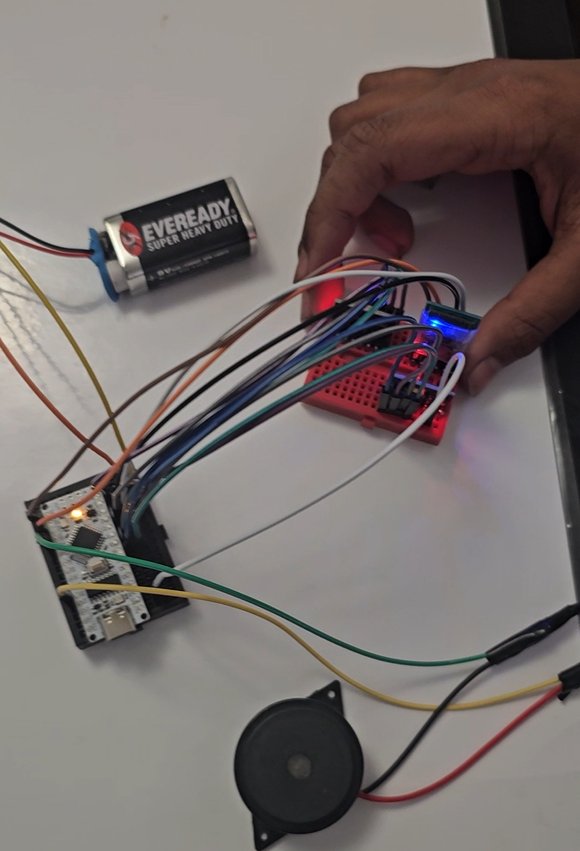 Figure 13: Refined Accelerometer-Based Prototype
This prototype heavily focused on refinement of my device, be it hardware or software, rather than more large scale and whole-device modifications. I chose to invest in smaller components as I felt more confident in Life-Band's design, such as the mini breadboards and Nano microprocessor, which improved both the device's overall practicality and its affordability as a result. Another minor change I ended up being forced to make was to switch out the battery pack which I used to power my previous design with a standard 9V Duracell battery, as the new microprocessor I'd been using didn't have a circular port to plug it in.
In this step, I also created the first version of the Life-Band companion app to act as a "secondary alert method" of sorts, containing the List Picker to connect to the device's Bluetooth Module alongside the "detection label" to display if a seizure/sleepwalking was detected. However, the device itself was still not wearable, so I had to manually move the components through lifting them up and down or just shaking them vigorously to test if everything worked.
Pros
- Retains functionality, even after size was reduced in scale.
- More miniature components makes it more streamlined and generally affordable.
- Creation of app allows for potential of multi-channel alert methods.
Cons
- 9V battery instead of battery pack minorly reduces total power supplied to device.
- The device itself is still not actually wearable, and wires remain exposed.
Prototype 4 (FINAL)
 Figure 14: Life-Band's Final Design & Prototype
In Life-Band's final prototype, I included multiple changes to make it wearable, while still being practical. These changes included housing the key components into 2 separate, durable, Tupperware boxes to ensure that nothing was to get "knocked loose" in the case of the wearer vigorously moving during the night, with a hose from a vacuum cleaner acting as a conduit for wires to travel through both boxes as well. An adjustable strap has been added to the bottom of these 2 boxes to ensure that the wearer can put it on comfortably, while a switch, connecting to the battery's wiring was added to make it so that the entire device could be turned on or off.
Alongside this, I also added a Max 30102 Heart Rate & Blood Oxygen sensor to the bottom of the box containing all of my sensors, to be worn on the arm on an area close to the wrist. While the placement on the arm may cause it to be less effective than if it were to be placed on the person's finger, with proper calculations in the code it actually calculates these values quite well! With the addition of this sensor, I've also added 2 new labels to the Companion app to constantly display these Heart Rate/Blood Oxygen levels in a tangible manner.
Pros
- Actually wearable and straps ensure that tightness can be adjusted.
- The new addition of the Max 30102 sensor helps to understand the "bigger picture" behind the physiological impact of these events.
- Adding the switch to turn it on and off manually helps to conserve power.
- Storing components within the new containers keeps the device durable, even in the occurrence of routine movements during sleep.
Cons
- While I have intentionally minimized size of components to make the device compact, it's still relatively large compared to other ones available on the market.
- Heart Rate and SpO2 levels do take some time to calibrate to accurate values after the device is turned on.
3.2 - Heart Rate & Blood Oxygen Calibration
Below are some tables/graphs to demonstrate the deviation in values between Life-Band's Max 30102 sensor & a traditional, finger-worn, Pulse Oximeter in Heart Rate & Blood Oxygen levels. As the Heart Rate detection on Life-Band is still being modified, calibration does take a long time. Thus, data was only recorded for these factors after both values came up on both sensors.
Trials were completed in a "resting" state, in which I recorded values simultaneously for both sensors. Following each trial, a minute's break was taken during which I ensured all my components were positioned properly and making it so that values had to be detected/searched for again, producing variances in values between each trial.
Alongside this, whenever I refer to "deviation", it's demonstrating what percent higher or lower that the Pulse Oximeter's values are compared to Life-Band (eg. 1% deviation means that the Pulse Oximeter is 1% higher). This was calculated through subtracting Life-Band's values from the Pulse Oximeter's and dividing my answer from the Pulse Oximeter's value for the given trial.
SpO2/Blood Oxygen Levels (%)
| Pulse Oximeter | Life-Band | Deviation of Values |
|---|---|---|
| 98 | 98 | 0% |
| 95 | 97 | -2.1% |
| 98 | 94 | 4.1% |
| 98 | 96 | 2% |
| 98 | 95 | 3.1% |
Figure 15: Chart comparing SpO2 levels for a standard Pulse Oximeter vs. Life-Band
First of all, the average deviation is taken from finding the sum of those from all 5 trials (7.1%) and dividing it by 5 to get an answer of just 1.42%. This signifies that the standard Pulse Oximeter is detecting SpO2 levels/values about 1.42% higher than those from Life-Band. Another interesting fact regarding this is that there's a bit more variation among Life-Band's values, implying that the high sampling rate is leading to minimal inaccuracies across trials.
However, the one good thing is that, while there is a certain "randomness" associated with how Life-Band measures SpO2 (and Heart Rate, as I'll mention later), its detected values are constantly remaining within the given thresholds while still changing across trials and not remaining at a single value for the whole time.
Before I move on to Heart Rate, below is a visual bar graph demonstrating the difference in average values of SpO2 (not deviation):
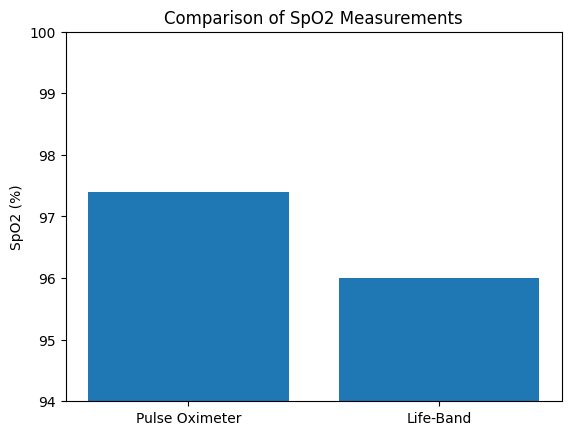 Figure 16: Bar Graph comparing SpO2 levels for a standard Pulse Oximeter vs. Life-Band
Heart Rate (BPM)
| Pulse Oximeter | Life-Band | Deviation of Values |
|---|---|---|
| 92 | 85 | 7.6% |
| 84 | 83 | 1.2% |
| 83 | 93 | -12% |
| 82 | 93 | -13.4% |
| 79 | 76 | 3.8% |
Figure 17: Chart comparing Heart Rate for a standard Pulse Oximeter vs. Life-Band
First of all, the total deviation from all of my trials is -12.8%, giving me an average of -2.6%. This signifies that, on average, Life-Band actually detects Heart Rate values 2.6% higher than the Pulse Oximeter. While this difference might not seem like a lot, it took far longer for Heart Rate to calibrate on Life-Band than Blood Oxygen, and once calibrated, the high sampling rate caused for sudden examples of uneven fluctuation of values following the original consistency.
I now know that this was a byproduct of me placing the sensor on my wrist, not finger, as when I placed the sensor module on my finger, Heart Rate appeared almost instantaneously and values were far more consistently reasonable rather than just for early "bursts" of sorts. Thus, some of the values recorded in my trials were only actually demonstrated for a brief period of time before suddenly going down or up. This is a factor that must be addressed before both Heart Rate & SpO2 can actually be added into my code's logic to detect these events, and the thresholds that I've set in place can be removed.
Next, similar to what was done for Blood Oxygen levels, below is a visual bar graph comparing the average Heart Rate values of both sensors used, across all 5 trials:
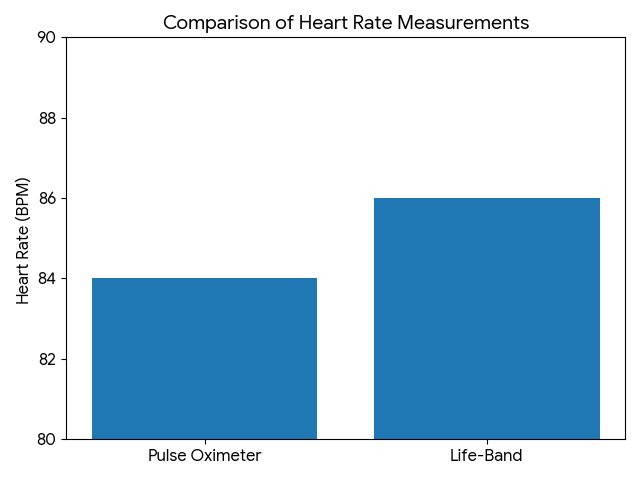 Figure 18: Bar Graph comparing Heart Rate for a standard Pulse Oximeter vs. Life-Band
3.3 - Fulfillment of Success Criteria & Applications
Now that the final design for Life-Band has been created, it's important to assess how well we've met the various pieces of success criteria that we set out to achieve at the very start. Attached below is a table in which I mark each piece of criteria and provide potential improvements that can be done to work on them:
| Type of Criteria | Overall Rating of Achievement | Notes/Future Improvements |
|---|---|---|
| Latency | Success | With a near-zero time between the actual event occurring and the multiformat alerts triggering, I have no complaints with the overall latency of my final design. |
| Practicality | Success | Given the limited amount of space in which I had to fit all the requisite components of the project (eg. sensors, microprocessor), the placement of each of the various components I used was overall quite practical. In future prototypes, potentially moving the Max 30102 Heart Rate & Blood Oxygen sensor to the finger instead of the top of the arm could improve speed of effective calibration and accuracy (particularly for Heart Rate). |
| Comfortability | Partial Success | While the addition of adjustable straps and miniature components does help in this aspect, the size of the whole device is still quite large and noticeable when wearing it. A potential long-term solution for this could be microchip fabrication, in which I utilize even smaller, malleable parts that I can combine together to dramatically reduce total space used, potentially at the expense of excess cost. For example, Apple Watches use SiP (System in Package) type, handcrafted microprocessors which combine the processor, memory, and all wireless modules used into one package. |
| Affordability | Success | As I state in my "Cost" section, the total production cost of Life-Band at around $57 is excellent compared to competitors currently on the market, especially given the overall scope of the various different sensors and alert methods used. |
Figure 19: Chart assessing Life-Band's fulfillment of success criteria
In general, the key takeaways that can be used to improve Life-Band include repositioning the sensor that I've been using to measure Heart Rate and Blood Oxygen levels, and finding a potential alternative method of microchip fabrication that still maintains relatively low production costs. If this device were to be used at a higher, clinical level, this would certainly be a great step to ensuring more practicality & comfortability for wearers. Alongside this, though not mentioned in the table above, a second 9V battery could also be added to the setup in the shorter term to increase longevity and ensure that not just a single night of Life-Band being on can completely drain the power used.
Alongside this, some other potential advancements that can be made include incorporating Life-Band into a "hospital gown" of some sort for patients who struggle with nocturnal events and testing the practicality of sensors/modules of different types and their effectiveness in comparison to those being used currently. Machine Learning is another, quite interesting factor that I could add by running this device through various programs that simulate muscular movements similar to those in seizures and sleepwalking, and refinements could be added to the Arduino code I've utilized to also account for falls/drops in other types of generalized & focal seizures. While quantifiable trials to actually detect these events were impractical due to the ethical concerns that could arise, my testing has proved that factors such as latency and efficiency in detection function excellently at a near-100% success rate. This is only Life-Band's first year and I'm confident that future advancements can keep being made to make it better.
Conclusion
4 - Conclusion
Overall, I would say that as a whole, Life-Band was a success based on how well I solved my earlier problem and fulfilled the success criteria that I set for myself at the start by measuring true validity in qualitative and quantitative measures. As demonstrated in my analysis section, some of the only real things I could do to improve the final design could be making it more compact by using methods such microchip fabrication and improving accuracy of my heart rate/blood oxygen values by repositioning the sensor I've been using to measure them. However, in my opinion, these are very arbitrary concerns that can be easily improved in future interpretations.
As a whole, one major benefit of my final design is the key fact that it's different from all the similar products currently being marketed. While not sacrificing any of the features in "typical" devices like digital watches that use similar gyroscopic accelerometers and Heart Rate/Blood Oxygen sensors, Life-Band is not only cheaper but also much more accessible in a household setting, utilizing readily available components. As I head to the CYSF for judging, I hope to address some more specific methods on how Life-Band can be improved in the future and solutions to limitations in practicality & comfortability that were discussed, which I plan to add to my in-person trifold.
After my prototyping to improve overall functionality alongside all of the other minor modifications, whether they be within the actual physical design or part of the software, I'm also quite personally assured that Life-Band can capably detect both seizure-like movements & sleepwalking to a high level, which was, of course, the main goal I had set out to achieve from all the way back to my earlier prototypes. My multi-format prevention methods (app & buzzer) function with extremely quick latency, and the final design's affordability is honestly quite remarkable. Now that I'm rounding off Life-Band for this year, I feel confident about my finished product and my overall knowledge on the topics discussed, and the general growth of the device has been strong in the context of the short time period I had to complete it. I started this project with the aim of creating a device that could give wearers a safe night's sleep, and now I know that Life-Band can do just that.
Citations
*Note: All sources cited in MLA 8th Edition
1. Government of Canada. “Epilepsy in Canada.” Canada.ca\, 29 May 2024\, https://www.canada.ca/en/public-health/services/publications/diseases-conditions/epilepsy.html. Accessed 7 February 2026.
2. Brandt\, Michelle. “Sleepwalking more prevalent among U.S. adults than previously suspected\, researcher says.” Stanford Medicine\, 14 May 2012\, https://med.stanford.edu/news/all-news/2012/05/sleepwalking-more-prevalent-among-u-s-adults-than-previously-suspected-researcher-says.html . Accessed 2 February 2026.
3. Centers for Disease Control and Prevention. “Types of Seizures | Epilepsy.” CDC\, 15 May 2024\, https://www.cdc.gov/epilepsy/about/types-of-seizures.html. Accessed 1 February 2026.
4. Cleveland Clinic. “Seizure: What It Is\, Causes\, Symptoms\, Treatment & Types.” Cleveland Clinic\, 15 July 2024\, https://my.clevelandclinic.org/health/diseases/22789-seizure. Accessed 30 January 2026.
6. Mayo Clinic. “Sleepwalking - Symptoms and causes.” Mayo Clinic\, 4 June 2024\, https://www.mayoclinic.org/diseases-conditions/sleepwalking/symptoms-causes/syc-20353506. Accessed 2 February 2026.
7. National Institute of Neurological Disorders and Stroke. “Epilepsy and Seizures | National Institute of Neurological Disorders and Stroke.” National Institute of Neurological Disorders and Stroke\, 7 April 2025\, https://www.ninds.nih.gov/health-information/disorders/epilepsy-and-seizures. Accessed 30 January 2026.
8. Peng\, Weifeng\, et al. “The Management and Alternative Therapies for Comorbid Sleep Disorders in Epilepsy.” PMC\, 11 August 2021\, https://pmc.ncbi.nlm.nih.gov/articles/PMC8719297/. Accessed 2 February 2026.
9. Yahya\, Roshayati\, and Siti Aishah Zamry. “Development of Epileptic Seizure Symptoms Detection Device.” Penerbit UTHM\, 2 May 2024\, https://penerbit.uthm.edu.my/ojs/index.php/jeva/article/download/18116/7159/91439. Accessed 27 January 2026.
10. Wei\, Ruilai\, et al. “Revolutionizing wearable technology: advanced fabrication techniques for body-conformable electronics.” NPJ - Flexible Electronics\, 4 December 2024\, https://www.nature.com/articles/s41528-024-00370-8. Accessed 7 February 2026.
11. Joseph\, Jobit. “Arduino MPU6050 Tutorial - How MPU6050 Module Works and Interfacing it with Arduino.” Circuit Digest\, 16 May 2022\, https://circuitdigest.com/microcontroller-projects/interfacing-mpu6050-module-with-arduino. Accessed 10 February 2026.
12. Das\, Debashis. “How MAX30102 Pulse Oximeter and Heart Rate Sensor Works and how to Interface it with Arduino?” Circuit Digest\, 5 August 2022\, https://circuitdigest.com/microcontroller-projects/how-max30102-pulse-oximeter-and-heart-rate-sensor-works-and-how-to-interface-with-arduino. Accessed 10 February 2026.
13. Robocraze. “Understanding the HC-05 Bluetooth Module.” Robocraze\, 28 March 2024\, https://robocraze.com/blogs/post/understanding-the-hc-05-bluetooth-module?srsltid=AfmBOorqxpAtjzmg9KGLOzVl-OT-beTg9IQ1bafixIMEGdpwIPqUcID1. Accessed 10 February 2026.
14. Kiriakopoulos\, Elaine. “Focal Impaired Awareness Seizures.” Epilepsy Foundation\, 6 January 2024\, https://www.epilepsy.com/what-is-epilepsy/seizure-types/focal-onset-impaired-awareness-seizures. Accessed 8 February 2026.
Most, if not all of these sources were primarily used for my background research on the more general topics of seizures & sleepwalking in particular. Thus, a lot of my outside knowledge regarding the actual development of Life-Band and its prototypes was either prior knowledge, or the result of me asking more knowledgeable individuals directly if I found that I was struggling.
Acknowledgement
Life-Band could have never gotten to where it was today without the help of the following people, so a huge thanks goes to:
-
Mr DeGelder, my math teacher & school's Science Fair coordinator, for providing valuable insight and feedback for how to make my project better, ensuring that my process all the way up to the city level was smooth and streamlined.
-
The creators of the various sources I used in my research, helping me understand the key concepts discussed in my project to a higher level than I'd known before.
-
The CYSF committee, for giving me and so many other competitors the opportunity to showcase our work on the "big stage".
-
And last but definitely not least, my parents for helping me every step of the way, and pushing me to go harder when I felt like giving up. I wouldn't be here today without their support!
All of the contributions provided by these individuals, be them big or small, proved utterly invaluable to Life-Band's evident success, giving me so many unforgettable moments. Thank you!