Investigating How Different Voltage Inputs Affect the Amount of Hydrogen Gas Produced During the Electrolysis of Water.
Divjot Batra
Khalsa School Calgary Educational Foundation
Grade 9
Presentation
No video provided
Hypothesis
If we test and compare the hydrogen gas production from water using different voltage inputs (3v, 6v, and 9v), then 9v will produce the most hydrogen, 6v will give the second highest hydrogen, and 3v will provide the least amount. A power input of 9 volts will provide the most hydrogen gas in the electrolysis of water since more electricity would pass through the electrodes increasing the current and the speed of the ions in the solution. This would hence speed up the separation of the water solution into its origins and increase its trapping capacity. Additionally, there would be a faster rate of electrons gained at the cathode which would provide quicker rate of gas production.
Research
Electrochemistry is the science where there is a relationship between energy and chemical reactions. Electrochemistry is used in a wide range of things such as batteries and fuel cells. In electrochemistry, chemical energy is converted into electrical energy which is then used in other applications. Electrolysis is a process where electricity is used to drive a chemical change that wouldn’t happen by itself otherwise. Electrolysis is used in a wide range of aspects including energy production like hydrogen gas. This hydrogen gas can then be stored or used as energy. Electrolysis uses electricity to separate a compound into its individual parts. For example, in the electrolysis of water, electrical charge is passed through the water to split the H2O into hydrogen and oxygen atoms. Electricity is the flow of electrons from atom to atom. Electrochemistry uses the principles of electricity and chemistry and works off on the basis of electron movement.
In electrolysis of water, a power or electrical charge is used to split a compound into its components. In order for electrolysis to be conducted, it requires two electrodes. Electrodes are conductors - usually metals that help electricity to flow through the water. These two electrodes are connected to the power source. There is a positive and negative electrode. The positive electrode known as the anode attracts negative ions. When the power flows through the water, Oxygen as would start to form at the anode. The negative electrode which is also called the cathode, attracts positive ions. At this electrode, hydrogen gas forms. Electrolysis is the relation of gaining and losing electrons. In electrolysis, the electrons go through half reactions more particularly known as oxidation and reduction. Pure water alone cannot carry the charge necessary since it lacks electrically charged atoms. The electrolyte dissolved in the electrolytic solution ensures that electricity can flow through the solution, throughout the circuit, and to the electrodes. Most common compounds are key to make the water conductive since they contain ions. Some examples include salt - Nacl, baking soda - NaHCO3, and sulfuric acid - H2SO4. In this experiment, we are going to use sodium bicarbonate- more particularly known as baking soda, to help ions discharge into the solution and allow the half reactions to take place.
In an electrochemical cell, electrons flow from the anode to the cathode. The electrons are pulled by the anode and pushed by the cathode. During electrolysis, when electricity passes through the circuit, there is a loss of electrons at the positive electrode or the anode. This is known as The oxidation process. At this anode there is oxygen gas production. At the negative electrode or cathode, there is a gain of electrons. This is the site of the reduction process and hydrogen gas forms here.
In the electrolysis of water, voltage plays an important role since it concludes how fast the electrons are flowing through the circuit. Voltage is a measure of how much electrical energy each charged particle carries. It’s named, “potential difference” because it’s a measure of how much potential the voltage has to push those electrons through the solution and to the electrodes. A higher voltage produces more energy to speed up the movement of the electrons. This hence increases the rate of the half reactions that take place at the anode and cathode. Therefore with a higher voltage, more hydrogen gas is produced quickly. Now if the time is kept constant, then it is observable that there is more hydrogen gas production with a higher potential difference.
Gas production
At the negative electrode or cathode, water molecules and positive sodium ions are attracted. Despite both of them being reduced, water is reduced faster. The water molecules gain electrons by forcing themselves into the water molecules ensuring that H2 forms at the cathode. This causes the water to split forming into hydrogen gas.
At the positive electrode or anode, both water molecules and negative bicarbonate ions are attracted. However, the water molecules donate their electrons to the anode, forcing the water to oxidize into oxygen. The electrons donated move through the circuit to the cathode where reduction takes place. Oxygen gas is produced at the anode because the electrons exit the water molecules, causing it to break into oxygen gas.
Variables
Controlled variables
- The Device - Including the alligator clamps, both electrodes, container
- Temperature of water
- Pureness of water - Always Distilled
- Amount of Water
- Amount of electrolyte added to the solution
- The amount of time the device is on (20min)
- Distance between two electrodes.
Uncontrolled Variables
- Temperature of Surrounding Environment/ Conditions
Manipulated Variable
- The Different voltage Inputs(3v), (6v), (9v) into the Device
Responding Variable
- The amount of hydrogen gas production from separation
Procedure
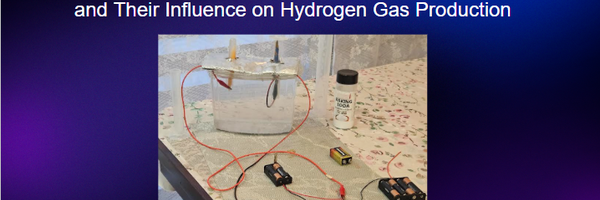
Procedure - Creating the Device In this experiment, we are going to use the split electrolysis technique. The procedure to build the device is in the following:
- Make two holes of the same size in the cardboard that are equally spaced apart (in this case they are 10 cm apart but still away from the edges
- Place the cardboard over the container.
- Push the inverted graduated cylinder down one hole until it sticks in place
- Push the test tube down the other hole until it sticks in place.
Picture for completed device
 Procedure - Setting up Device
Procedure for setting up the device is down below:
Procedure - Setting up Device
Procedure for setting up the device is down below:
- Fill the container with 1500 ml of room temp distilled water
- Add 2 tablespoons Of baking soda and dissolve it with the spoon
- Connect the alligator clips to one end of the graphite pencils.
- Fill the graduated cylinder and the test tube with water and place a finger on the end as you place it through the cardboard piece in the container. Make sure that the cylinder and the test tube are completely filled with water and are submerged below the water line.
- Place the pencils (which are connected to the alligator clips) inside the cylinders (making sure that water does not come out of the cylinder. Also ensure that the circuit is open. (to do this, just keep one alligator clip disconnected to the battery before doing the experiment.
- Have your logbook and timer set to 20min
Note: One of the graphite pencils should be connected to the negative alligator clip and be placed in the graduated cylinder. This ensures that we are measuring hydrogen gas at the cathode. The test tube is kept there to collect oxygen gas separately and to help guarantee there is no mix.
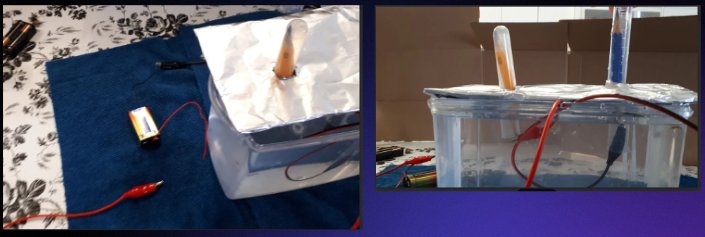
Picture of set-up experiment
Procedure- How to Conduct Experiment
- Connect the alligator clip to the battery and simultaneously turn on the timer set to 20 min
- Record observation over the duration of the timer
- Immediately turn off the device after the timer comes to zero. Wait for around 5 to 10 seconds to fully allow the gas bubbles to rise to the top of the cylinder. record how much water displacement there is and how much gas production there is. The volume of hydrogen = volume of water displaced
- Repeat this step for each trial for each type of voltage
- For the different voltages, remove the alligator clips from the old battery and connect them to the new battery or battery holder. Also replace the water and add the baking soda to conduct a fresh experiment with different voltages.
Note: For this experiment, we are only going to look at the graduated cylinder since it is where hydrogen gas will be produced.
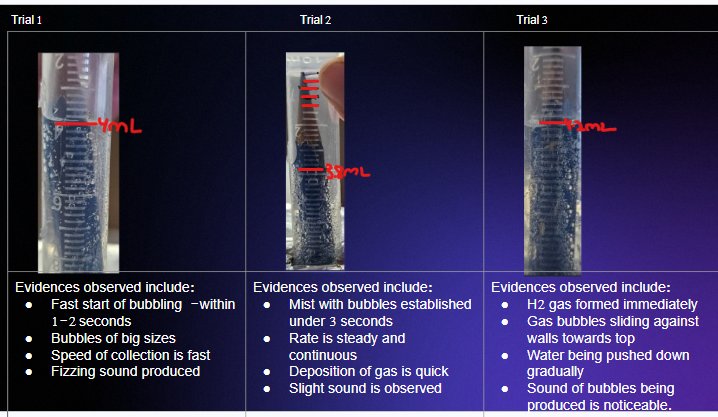
Observations
Observations - 3v - Qualitative
- After 3 volts was applied, the gas bubble formation did not begin suddenly
- The bubbles formed after around 15 to 20 seconds
- The gas bubbles moved slowly towards the top of the cylinder and along the walls
- The bubbles produced were small in size but larger in quantity.
- No audible sound was produced
- There was visible gas production in the cylinder
- The tiny bubbles were large in number
Quantitative
- Applied potential difference - 3 volts
- Time before visible gas production - around 15 to 20 seconds
- Resting time before accurate measurement - 10 seconds
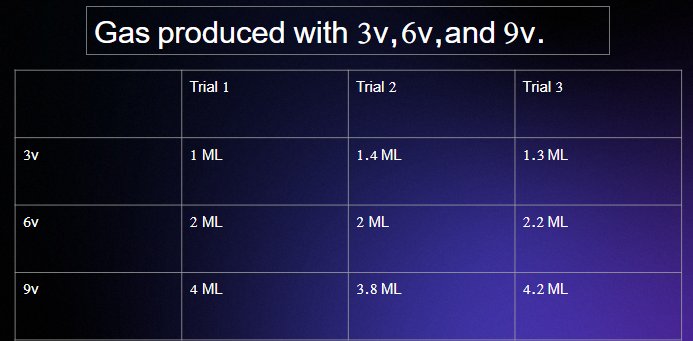
- Volume of hydrogen gas produce:
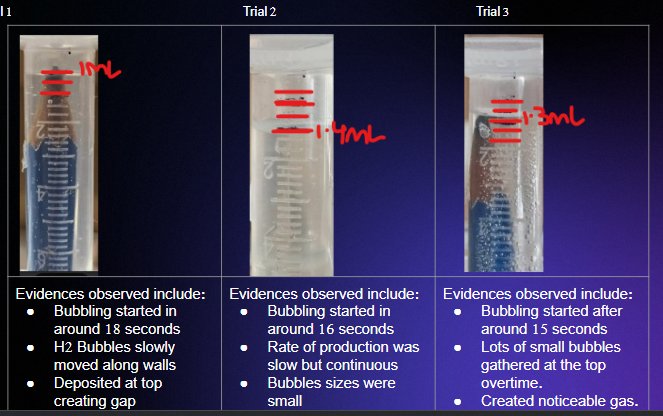
- Trial 1 - 1ml
- Trial 2 - 1.3ml
- Trial 3 - 1.4ml
- Average volume produced - 1.23ml
Observations - 6v -
Qualitative
- With 6 volts, the reaction started faster than the last one in just 6-8 seconds
- Once bubbling began, it continued as a steady rate
- Gas bubbles slowly accumulated towards the top of the cylinder
- No sound was able to be heard
- It was observable that due to the hydrogen gasses low density, it was flowing greatly along the walls and to the ends of the cylinder
- After 20 minutes and a 10 second rest you could remark that there was an approximate ratio of 2:1 hydrogen gas production
Quantitative
- Applied potential difference - 6 Volts
- Time before visible gas production was 6-8 seconds
- Resting time after electrolysis time of 20 minutes - 10 seconds
- Volume of gas produced
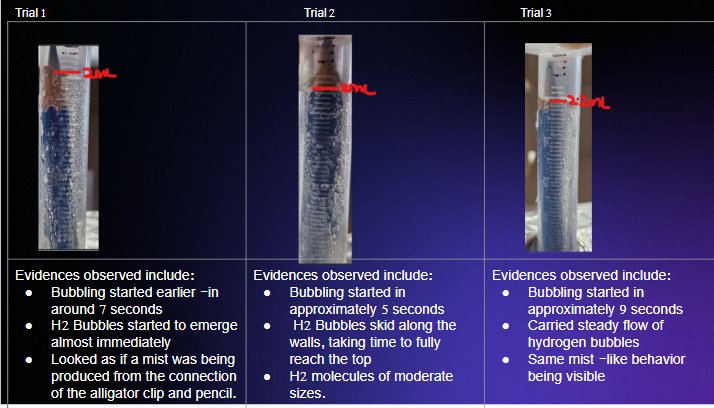
- Trial 1 - 2 ml
- Trial 2 - 2 ml
- Trial 3 - 2.2 ml
- Average gas collected - 2.1ml
 Observations - 9v -
Qualitative
- With 9 volts, gas production began immediately
- Bubbling was at a fast and consistent rate - clearly evident by the mist - like bubbles to be formed
- Slight fizzing sound was heard - indicating formulation of hydrogen gas
- Bubbles were of moderate sizes
- Overtime bubbles were produced and it was clear that there was a gap between the water and the top of the cylinder.
- In the end you could identify gas produced
Quantitative
- Applied potential difference - 9 volts
- Time before production - almost immediately according to the human eye
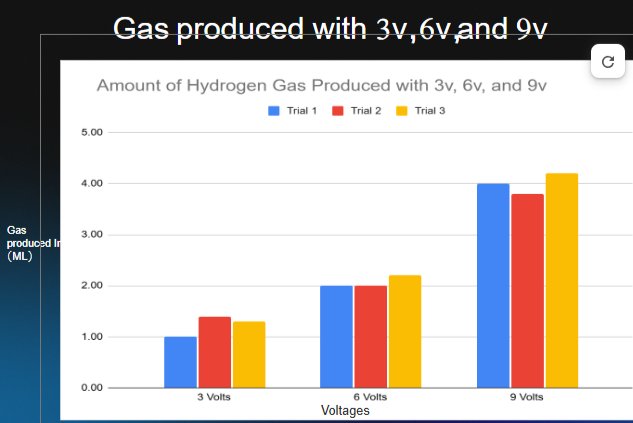
- Volumes of H2 gas produced
- Trial 1 - 4 ml
- Trial 2 - 3.8 ml
- Trial 3 - 4.2ml
- Average amount of gas collected - 4 ml
The differences in the volume of gas production between the trials may have been due to excessive or moderate rate of bubbling, electrode stationing inside the cylinder, or slight miscalculations in measurement
Analysis
3 Volts At the start of each trial with application of 3 volts to the device, the formation of bubbles started very late around 15-20 seconds after the circuit was closed. The formulation of gas bubbles started but where advancing at a low pace towards the top and along the walls of the cylinder. Since the potential difference was fairly low, no possible sound was produced but there was sufficient evidence of gas production. The small of gas was produced in the end which was measured after a 10 second rest. The size of the bubbles where very tiny but where being produced in larger quantity.
The first trial managed to produce 1 ml of hydrogen.
The second trial managed to produce 1.3 ml of hydrogen.
The third trial managed to produce 1.4 ml hydrogen.
The limited amount of hydrogen gas production was clearly evident because of the amount of potential difference applied.
6 Volts
With the experimentation of an input of 6 volts, I noticed quantitative and qualitative evidence across all three trials. With the addition of 6 volts this time, The start of the reaction was fairly slow - establishing foundations of bubbles in around 6-8 seconds. When the bubbling started, it was at a steady flow and kept being deposited at the top. There was no sort of sound produced but it was clearly visible that hydrogen molecules were being pushed towards the top with there density but attaching to the surrounding walls. Eventually after the 20 min and providing a 10 second rest you could see a deposition of gas in the top. You could estimate that there was a 2:1 ratio of H2 to O2.
The first trial managed to produce 2 ml of hydrogen
The second trial managed to produce 2 ml of hydrogen
The third trial managed to produce 2.2 ml of hydrogen
The same amount of hydrogen gas production in first two trials may have been due to same rate of bubbling and collection at the top of the cylinder. The slight change in the last trial may have occurred because of an excess of bubbles pushed upwards at the top. The collections ranged from 2 to 2.2 ml, with an average of 2.1ml of hydrogen.
9 Volts
During all three trials at 9 volts, I observed that bubbles started to form almost immediately at the cathode. The bubbles were forming at a rapid and consistent rate. A slight fizzing sound was heard indicating the production of hydrogen gas. In addition, bubbles formed along the walls of the cylinder and on the tips of the electrodes. The bubbles were of moderate sizes - some being smaller than others. Overtime, the bubbles/h2 gas started to collect at the top creating gap between the water and the top of the cylinder.
The first trial managed to produce 4 ml of hydrogen.
The second trial managed to produce 3.8 ml of hydrogen.
The third trial managed to produce 4.2 ml of hydrogen.
The differences in the volume of gas production between the trials may have been due to excessive or moderate rate of bubbling, electrode stationing inside the cylinder, or slight miscalculations in measurement. Although the visual observations were similar, it all comes to the volumes. They ranged from 3.8 to 4.2, with an average of 4ml.
Conclusion
The purpose of this experiment was to investigate which potential difference would provide the most amount of hydrogen during the electrolysis of water. It was hypothesized that a potential difference of 9 volts would provide the most hydrogen. This was proved to be correct since with a voltage of 9 volts, there was an average of 4 ml of hydrogen exceeding the amounts in the other sets of trials. As we saw from all three trials, 9 volts demonstrated producing more gas than the trials from the other voltages. The starting time, rate of bubbling, and size of the gas bubbles all contributed to upbring that potential. The completed circuit provided quantitative measurements that were recorded and saved. Since the charge provided more voltage, hence the electrons could move faster- moving away from the anode and towards the cathode which sped up the reduction of hydrogen. The higher charge also caused the ions in the electrolytic solution to move towards their opposing electrode which completed the circuit allowing those half reactions to take place. Furthermore, The other voltages also had measurable production but wasn’t enough to compete with potential difference of 9 volts. The evidences of the trials with 3 volts and 6 volts including rate of bubbling and size of the bubbles supported their capability. What occurred was that the other charges did not allow the electrons to pass through at a faster rate , forcing tiny amounts of gas to be produced. The amount of gas particles created with the other voltages was significant and measurable to the extent where it could be compared.
Application
The principles mentioned in this experiment can be used in a wide stretch of productions. In this scenario, the electrolysis of water can be used to produce fuel cells which contain hydrogen. This hydrogen can be stored and used in daily necessities such as transportation. There are cars in existence such as the Hyundai Nexo and the Toyota Mirai that use hydrogen as fuel to power their motors. Moreover, hydrogen and oxygen are two main ingredients used in rocket fuel. The gases produced from electrolysis can be converted into liquid form and then used as power when mixed. Furthermore, electrolysis can be used in electroplating where the current is used to coat a metal with another lighter metal. Therefore with the fundamentals learned from this project, many aspects can be established and developed both efficiently and effectively. People can use higher power to speed up there reactions as they know the science behind it. In order to design a hydrogen fuel cell, the basis of an electrochemical cell would stay constant using electrolysis to produce hydrogen and oxygen and then combine them to produce electricity and water as a byproduct.
Sources Of Error
Some sources of errors were faced in this experiment including:
- The alligator clip slipped off the graphite pencil a few times after it was submerged in the water so it had to be set again.
- The surface area in which the electrode reacts with the water could have changed the recordings
- The water started to get cloudy after each set of trials so that is why it had to be replaced so reading would not have been affected.
- The electrode placement inside the cylinder could have affected the water level - giving a higher or lower reading after the 20 minutes were over
- The electrodes were tilted that could’ve influenced the ending measurements.
Citations
National Council of Educational Research and Training. (2024). Electrochemistry. In Chemistry: Part I: Textbook for Class XII (pp. 31–64). https://ncert.nic.in/textbook/pdf/lech102.pdf
DeWitt, T. (2015). Electrolysis. In YouTube. https://www.youtube.com/watch?v=dRtSjJCKkIo
Chemistry 30 Electrochemistry - The Electrolysis of Water. (n.d.). Sites.prairiesouth.ca. https://sites.prairiesouth.ca/legacy/chemistry/chem30/6_redox/redox3_3.htm
LibreTexts. (2016, June 27). 23.9: Electrolysis of Water. Chemistry LibreTexts. https://chem.libretexts.org/Bookshelves/Introductory_Chemistry/Introductory_Chemistry_(CK-12)/23%3A_Electrochemistry/23.09%3A_Electrolysis_of_Water
Electrolysis of Water | Sustainable Fuel for the Future» SFC Energy AG. (2025). Sfc.com; SFC Energy. https://www.sfc.com/glossary/electrolysis-of-water/
Ecology, P. (n.d.). Hydrogen Production through Electrolysis. Processecology.com. https://processecology.com/articles/hydrogen-production-through-electrolysis
X840: Electrolysis of Water. (2015, December 23). Lecture Demonstration Manual General Chemistry. https://www.colorado.edu/lab/lecture-demo-manual/x840-electrolysis-water
GeeksforGeeks. (2024, February 20). Electrolysis of Water. GeeksforGeeks. https://www.geeksforgeeks.org/chemistry/electrolysis-of-water/?utm_source=
The Electrolysis of Water. (2026). Digipac.ca. https://www.digipac.ca/chemical/mtom/contents/chapter3/electrolysis.htm?utm_source=
Chemical Reaction of Baking Soda during electrolysis. (2007, January 13). Physics Forums: Science Discussion, Homework Help, Articles. https://www.physicsforums.com/threads/chemical-reaction-of-baking-soda-during-electrolysis.151036/
Acknowledgement
I formally express my gratitude to my parents, who have been supportive in the gathering of materials and other associated pieces of my experiment. They assisted me during the procedures and arrangements that were followed. I am extremely privileged to have my science teacher, Mrs. Aulakh, who gave her guidance and excellence to recommend me better alternatives for my mistakes. I recognize my thinking ability when it came to the design and production of the device used to collect and measure the hydrogen gas. I greatly thank the resources that aided in my research which included educational videos and websites. Moreover, I significantly appreciate my curiosity to explore further into the science of electrochemistry that compelled the formulation of this experiment.