Improving solar panel efficiency
Archer Pederson
Louis Riel School
Grade 6
Presentation
Hypothesis
Based on the background information, solar panels that track the sun should generate approximately 25-30% more energy in January in Calgary. Most of this extra energy would be generated in the morning and evening when the sun is not shining directly on the fixed solar panel that is pointed south.
Research
Main Research Question: How much more energy can a solar panel generate if it tracks the sun compared to if it is stationary?
Background Research Question #1: How Do Solar Panels Work?
Solar panels make electricity by taking in photons, which are little packets of energy that are released from the sun. If those photons hit a solar panel they will then hit solar cells (or photovoltaic cells) inside the solar panel. These solar cells have electrons in them, and if a photon hits them the energy in the photons will excite the electrons in the solar cells, knocking them loose. These loose electrons can then be collected in an attached conductive wire and connected to a circuit where they can flow as an electrical current, or electricity.
Background Research Question #2: Will the angle at which sunlight hits a solar panel affect the amount of energy made and why?
Based on the information given by multiple sources, the angle at which sunlight hits a solar panel does matter. Suninone.com says “Solar panels work by converting sunlight into electricity using photovoltaic cells. The more sunlight that hits the surface of these cells, the more energy they generate. The angle at which your solar panels are installed directly impacts how much sunlight they are exposed to throughout the day.” Stating that less sunlight will hit the solar cells if the angle of the solar panel is not perpendicular to the sun’s rays. Then if solar panels make energy by taking in photons, then the more photons (sun’s rays) that hit the panels, the more energy that will be generated. Since photons can only travel in a straight line from the sun, the optimal angle for a solar panel to intercept the most photons is if it is perpendicular to the sun’s rays. If the panel is pointed in any other angle, fewer photons will be intercepted, making it generate less electricity than it would if it was aimed perfectly. This means that the angle that a solar panel is angled in proportion to the sun, does matter.
Background Research Question #3: How Can I Make a Module That Can Track the Sun and Move a Solar Panel to Face it?
Multiple websites show different ideas on how a moving solar panel that tracks the sun can be made. One component that is necessary in a project like this is a method of sensing where the sun is and deciding where to move the solar panel to match the sun’s position. To do small tasks like reading input sensors and controlling small electronic devices, many people choose to use a microcontroller called an Arduino microcontroller. An Arduino is ideal as they have multiple pins to control and track different inputs and outputs and they are very common so it is easy to find parts that work to build matching circuits. To track the sun, you can use a component called a photoresistor to measure how much sunlight is hitting different areas. A photoresistor is a resistor that changes its resistance depending on the light level that it senses. This principle can be used as if a plus shaped divider is made and a photoresistor goes in each quadrant, then it is possible if each photoresistor is equally aimed at the sun. This can be done by measuring the voltage across each photoresistor and comparing the results to each other. To move a solar panel to face the sun according to the resistance of the photoresistors, a servomotor can be used. A servomotor is a type of motor that takes continuous inputs to re-adjust the servomotor to constantly move it to the selected angle. With a servomotor, photoresistors and an Arduino, it is possible to move a solar panel to face the sun throughout the day to track the sun and move a solar panel to face it.
Glossary: Photons: a particle representing a quantum of light or other electromagnetic radiation. A photon carries energy proportional to the radiation frequency but has zero rest mass.
Solar cells: A photovoltaic (PV) cell, commonly called a solar cell, is a nonmechanical device that converts sunlight directly into electricity.
Electrons: A stable subatomic particle with a charge of negative electricity, found in all atoms and acting as the primary carrier of electricity in solids.
Conductive: Having the property of conducting something (especially heat or electricity).
Perpendicular: at an angle of 90° to a given line, plane, or surface.
Microcontroller: A microcontroller unit (MCU) is essentially a small computer on a single chip. It is designed to manage specific tasks within an embedded system without requiring a complex operating system.
Photoresistor: A photoresistor is defined as a sensor that changes its resistance in response to light intensity, with higher light levels resulting in lower resistance and lower light levels leading to higher resistance.
Servomotor: A servo motor (servomotor) is a highly specialized motor designed for precise control of rotary or linear motion. It’s a rotational or translational motor that employs a feedback mechanism to ensure exact positioning, typically using a control signal that dictates the motor’s movement to a desired position. This mechanism allows for precise control of various components, making servo motors crucial in applications where precise positioning and smooth motion are required.
Bibliography: These are the websites that I checked to answer each question. Question 1 websites: https://www.nationalgrid.com/stories/energy-explained/how-does-solar-power-work https://suninone.com/how-does-the-angle-of-your-solar-panel-increase-your-power-generated https://www.maxeon.com/maxeon-blog/solar-basics-how-do-solar-panels-work Question 2 websites: https://www.maxeon.com/maxeon-blog/solar-basics-how-do-solar-panels-work https://luminasolar.com/angle-of-incidence-optics/ https://freyrenergy.com/impact-of-solar-elevation-angle-on-solar-panel-efficiency/ Question 3 websites: https://www.sciencebuddies.org/science-fair-projects/project-ideas/Energy_p045/energy-power/solar-tracker https://www.instructables.com/DIY-Miniature-Solar-Tracker/ https://www.youtube.com/watch?v=_6QIutZfsFs
Definitions: Solar cells: https://www.eia.gov/energyexplained/solar/photovoltaics-and-electricity.php#:~:text=A%20photovoltaic%20(PV)%20cell%2C,converts%20sunlight%20directly%20into%20electricity. Electron: oxford languages Conductive: oxford languages Perpendicular: oxford languages Microcontroller: https://www.ibm.com/think/topics/microcontroller Photoresistors: https://www.sciencedirect.com/topics/engineering/photoresistors servomotors://www.a-m-c.com/servomotor/?_gl=19asxbh_up*MQ..&gclid=CjwKCAjwuMC2BhA7EiwAmJKRrEuONe1UZ6u5ai8bQ_FBhMWT75E92dziz72wl-CJ-Za73ZkiZtLoGhoCDfMQAvD_BwE#What_is_a_Servo_Motor
Variables
Controlled variables: -Amount of sunlight (testing both panels at the same time) -Solar panel efficiency (two identical panels)
Manipulated variable: -One panel is fixed, the other panel tracks the sun
Responding variable : -Amount of energy generated by each solar panel
Procedure
- Gather all materials listed in the materials list
- Assemble the servos into the pan/tilt stand with hot glue and screws
- Drill holes and install the photo resisters in the solar divider with hot glue
- Create the photoresistor circuit (appendix)
- Create the power measurement load circuit (appendix)
- Upload the tracker control code to the Arduino (appendix)
- Create a solar panel mount from cardboard at 30 degrees (fixed mount)
- Attach one solar panel to the fixed mount and the other to the tracking mount
- Connect the control circuit to the batteries and servos
- Connect the power meters and loads to the solar panel outputs
- Place both panels in a sunny location before sunrise
- Record power generated on the power meter each hour until sunset
- Compare results between the two panels
Materials list: -2 x Solar panels (5V 10W) -Uno R3 Arduino kit -4 x Breadboards -2 x USB Multimeter -6 x 150 Ohm resistors -4 x Photoresistors -2 x MG90 Servos -3d Printed solar divider -3d Printed pan/tilt stand -1’x1’ wood project base -Small cardboard box -Lengths of 22 AWG wire -USB cords -6 x D batteries/holder -Soldering iron -Solder and flux -Knife -Wire strippers -Phillips screwdriver -Notepad and pencil -Hot glue
Observations
To measure the power output by each solar panel, a 37.5 Ohm load circuit was connected to the output of each solar panel along with a energy tracking multimeter to track the current from each solar panel in amps. The table below is the data collected by the hour of amps from each solar panel throughout the observation period. The test was conducted until sun up until sun down in January in Calgary, Alberta. The output from the fixed and tracking solar panels was observed at the same time to make results directly comparable to each other.

Analysis
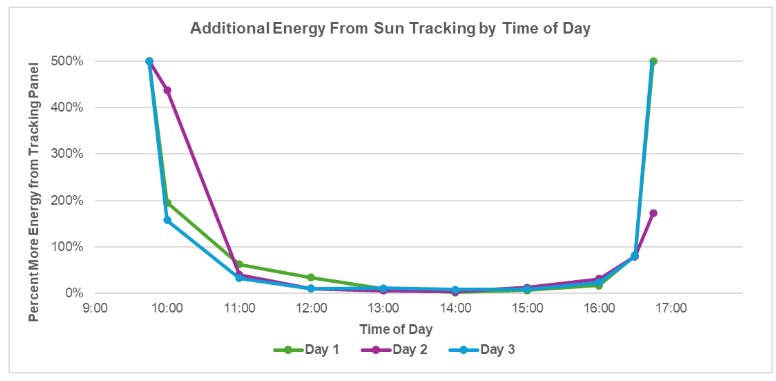
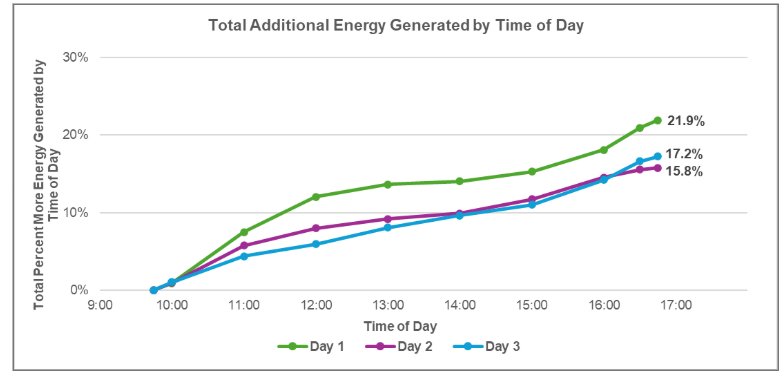
After analyzing the data, the average percent more energy gained over the 3 days was 18.3% percent more energy made by the tracking solar panel. With the stationary solar panel facing south, the most gains in energy generation were observed during the morning and evening, when the sun is in the east or west.
- During the middle of the day, the stationary panel and the tracking panel almost match each other exactly.
- Most of the time chosen for the experiment was sunny with clear skies. Clouds would impact these results depending on the time of day that clouds were blocking the sun.
-
Most of the time chosen for the experiment was sunny with clear skies. Clouds would impact these results depending on the time of day that clouds were blocking the sun.
These are the graphs showing additional energy made throughout the day.
Conclusion
For the three days of the experiment, the average amount of energy gained by the tracking solar panel was 18.3%. This amount should be the same for a larger experiment or large solar array because a large solar array is just a bunch of smaller solar panels connected together.
Application
This experiment's results can apply to solar panel energy production to help make solar energy more efficient. This experiment also proves that a solar panel that tracks the sun can be made. A solar tracker could be helpful in a large solar farm or a large flat rooftop because there could be enough room to install solar panels on a solar tracking mechanism.
Sources Of Error
My experiment was designed to mitigate as many sources of error as I could think of. Most importantly I used 2 identical solar panels at the same time to make results comparable. Because I conducted the experiment over 3 days, the changing cloud conditions may have impacted the comparable results depending on the time the clouds could have covered the sun. The experiment ran unobserved for periods of time and could have been affected by wildlife, wind, humans or other factors.
Citations
Resources Used: -https://pmc.ncbi.nlm.nih.gov/articles/PMC9478504/ -https://pvcase.com/blog/fixed-tilt-vs-tracker-system-comparison-for-ground-mounted-pv-systems -https://texassolargroup.com/solar-tracking-vs-fixed-panel-2/ -https://solarmathlab.com/content/solar-panels/solar-panel-fixed-tilt-vs-tracking-output-calculator.html -https://cedco-op.com/2016/07/27/solar-power-fixed-arrays-vs-trackers/ https://www.nationalgrid.com/stories/energy-explained/how-does-solar-power-work https://suninone.com/how-does-the-angle-of-your-solar-panel-increase-your-power-generated https://www.maxeon.com/maxeon-blog/solar-basics-how-do-solar-panels-work https://www.maxeon.com/maxeon-blog/solar-basics-how-do-solar-panels-work https://luminasolar.com/angle-of-incidence-optics/ https://freyrenergy.com/impact-of-solar-elevation-angle-on-solar-panel-efficiency/ https://www.sciencebuddies.org/science-fair-projects/project-ideas/Energy_p045/energy-power/solar-tracker https://www.instructables.com/DIY-Miniature-Solar-Tracker/ https://www.youtube.com/watch?v=_6QIutZfsFs
Acknowledgement
I would like to thank my teacher for their assistance. Thank you Ms. Metcalfe, Ms. Murphy and Mr. Kubitz!
I was introduced to Arduino programming, circuitry and servos at summer camp at Steamoji and I used all of those skills here.