
Are Drones the Future of Agriculture?
Jogeshwor Mundi Prabhuansh Sadana
Grade 8
Presentation
Problem
In modern society, many countries around the world have limited access to advanced farming equipment. This is mainly due to the cost of these equipment. In fact, agricultural drones can cost around 1,000 to 10,000 dollars if someone is looking for a drone with better sensors, cameras, and an increased payload. So, in order to find a solution to this problem, we wanted to see how we could make a budget friendly drone with an increased payload, quality cameras, and sensors so that people around the world who have limited access to this technology can have a better opportunity towards farming. However, once these technologies are accessed throughout the world, it may not be as sustainable and productive as compared to traditional farming practices. Farmers need to prepare their crops in a short period of time to ensure that the farmer can make more profits. In order to find a solution to this problem, however, we need to experiment and observe how long the drone takes to do a specific task (measure the soil moisture of plants) in order to conclude its efficiency. So, these 2 solutions not only allow farmers to have access to advanced farming technology but also make informed decisions about the efficiency of these technologies. With this information, we can conclude if drones are the future of agriculture.
With this in mind, we decided to form two questions that we would find a solution to with our prototypes:
- Is it possible to create a budget friendly, cost effective drone with similar functions as to those in current society?
- Is a drone able to perform better in terms of speed compared to traditional farming practices?
Preliminary Research
Modern Farming Techniques in Current Society
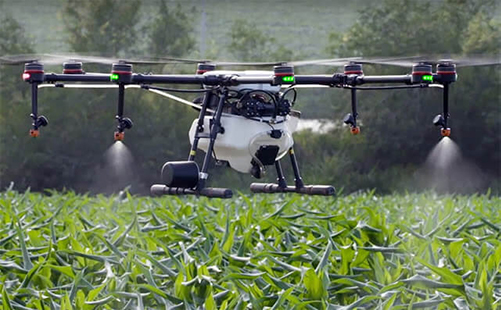
Many experts believe that, by 2050, food production will need to double to meet the world's growing demand. Without updating the current agricultural practices, doubling the world's food production would be very difficult. In fact, it would require the clearing of approximately one billion hectares of land. This would have a significant impact on climate change. However, drones can change that. There are many advantages towards using drones in agriculture. For one, drones are able to cover large areas of farmland in a short period of time, which allows farmers to monitor crops more efficiently and accurately. This allows farmers to gather accurate information about crops and helps to identify potential issues. Second, farmers are able to save on labor costs as drones can perform tasks such as spraying pesticides, mapping, and crop monitoring, meaning that drones can reduce the need for expensive equipment.
Drones enable precision agriculture practices by providing real-time data and imagery. This allows farmers to decide how much fertilizer, pesticides, and water is needed with precision to reduce wasted chemicals and minimizes the environmental impact a drone has. Finally, drones equipped with specialized sensors and imaging technology have the ability to detect crops with disease, nutrient deficiencies, or other issues. This early detection allows farmers to take timely action, preventing the spread of diseases and minimizing crop losses.
Comparison Between Traditional and Modern Farming Techniques
|
|
Traditional Farming Practices |
Modern Farming Practices |
Approach |
Traditional farming is mainly based on old practices that emphasize the use of manual labor. Traditional farming also relies on organic practices and the use of natural seeds. | Modern farming uses advanced technology to produce crops. Modern farming generally focuses on large-scale production to make more profits. Modern farming also implements precision agriculture to optimize the resources used. Finally, modern farming aims to be more productive and efficient than traditional farming. |
Enviromental Impact |
Traditional farming has a generally low environmental impact due to the use of organic practices. Traditional farming also uses traditional methods, meaning there is limited use of chemicals and advanced technology. | Modern farming has a large environmental impact due to the chemical inputs that are released from modern farming practices. Modern farming mainly incorporates synthetic pesticides and fertilizers for pest management. |
Productivity |
Traditional farming has a generally lower productivity than modern farming. This is because traditional farming is commonly practiced for supplying local goods, and it is much more difficult to supply goods to a large population due to the lack of resources. | Modern farming has a high productivity due to many technological advancements. AI, drones, etc. all are astonishing technologies that have had a huge impact on the agricultural industry. Modern farming generally meets the needs of a large population. |
Sustainability |
Traditional farming promotes sustainability through organic practices and is well-suited for maintaining traditional practices and local ecosystems. | Modern farming does not promote sustainability due to the amount of resources that are used. Modern farming requires much more management than traditional farming to ensure that modern farming can have a lesser environmental impact. |
Method
Prototype 1
Design and Programming

Design
Our first prototype was our very first attempt at creating the agricultural drone. The prototype consisted of 2 motor chips, known as the L289N motor drivers, and 4 DC Motors. We also used an Arduino Uno and a Raspberry Pi Zero W to control 2 of the motors individually, and an additional Arduino Uno to control the soil moisture sensor. This prototype unfortunately had no video capabilities and was lacking a very crucial component that many agricultural drones have that are currently in the agricultural industry. So, most of the footage shown from this prototype were from the ground and were not integrated into the model itself.
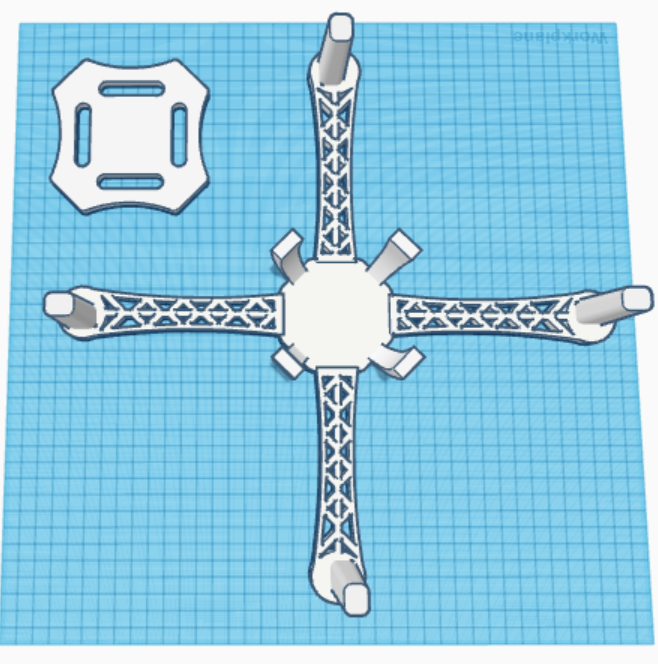
The chassis was created on a simple modeling software, Tinkercad, as we lacked the experience for any industrial modeling softwares. The model, though designed on Tinkercad, proved to be lightweight, durable, and efficient for our project. The quadcopter design did have many qualities and was used throughout the 3 prototypes that we created.
Programming
The drone was using 2 main coding languages, C++ (Arduino variation) and Python which was used in the Raspberry Pi. The Raspberry Pi in this project controlled two of the motors, while the Arduino Uno controlled the other two. The code was organized as follows:
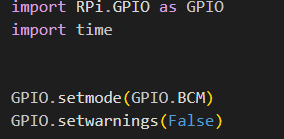
Raspberry Pi Code (Python)
- Define all wires and where they are at the microcontroller.
- Create four sections for different code.
- 1. GPIOSTART
- This function is very important. This initializes the microcontroller and makes it ready to listen to commands.
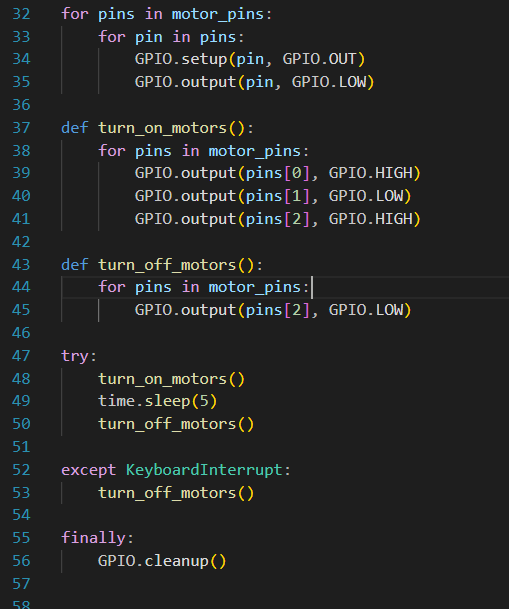
- 2. DRONECONTROL
- This function is also very important. This function controls the drone and tells it when the motors are supposed to be on and also when to turn them off.
- 3. SUBMITDATA
- This function sends sensor data to the ground where the operators will be and will receive data about the weather, gyroscope, and air pressure that is around the microcontroller.
- The microcontroller is at the bottom of the motors to make sure there is no interference from the motors blowing air into the sensor, therefore changing the result. Furthermore, the drone will try to stay in stable positions with the help of the built in gyroscope.
Arduino Code (from the Arduino IDE)

Building and Functionality

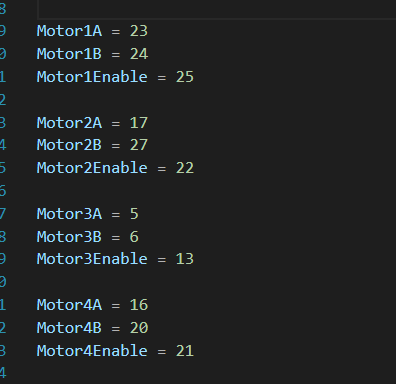
The construction of the agricultural drone consisted of the flight controllers at the bottom of the drone, the motor drivers at the top of the drone, and the 4 DC motors on each arm of the drone. A soil moisture sensor was also integrated near the bottom of the drone to allow the drone to obtain the soil moisture of the soil samples. Most of the pieces were connected using super glue, and the batteries and such were connected using zip-ties. To connect each of the components to each other, a system of wires was integrated. The wires connecting to the motors was not very strong, which was a strong source of error for this prototype.
Upon further testing of the drone, we did not previously anticipate the amount of load the DC motors would be able to carry. As a result, the drone was not able to achieve very much lift, and was not able to fly very well. The DC Motors that we bought for this project were unable to produce heavy amounts of lift for the drone to stay up from the ground for extended periods of time. Due to this issue, the drone could only reach low altitudes. The drone was able to hover for a few seconds and then would lose altitude relatively quickly. This iteration of the project proved to be budget friendly and had already passed the first part of our problem statement. However, due to the limited functionality of the drone, the drone was very slow and could not fly very well.
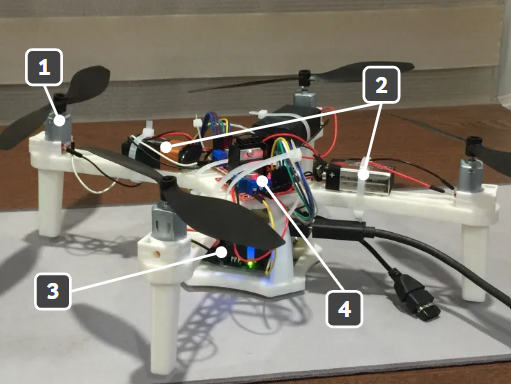
2) Batteries
3) Arduino and Raspberry Pi
4) Motor Drivers
To conclude this section, Although this prototype did in fact function properly, there were major flaws in the wiring and maneuvering components of the drone. For one, the drone was not able to achieve much lift, as mentioned previously. This was mainly due to the inefficient motors that we had purchased for the prototype. Secondly, the drone was not able to hover in a single position, and was not very stable. In the future, we would like to add things such as gyroscopes to aid in the steady maneuvering of the drone, so that the drone could steadily obtain the soil moisture of plants. Finally, it was very difficult to keep the whole machine compact as the wires made it difficult for the propellers to spin without disturbing the connection.
Prototype 2
Design and Programming
Design
For this prototype, the design remained the same, however this iteration was a minor improvement as compared to our previous prototype. Our major flaw in our previous prototype was the lack of video footage. The new prototype was equipped with the Pi Camera so that the drone would be able to record footage from a far distance. Although the Pi Camera did work, it was useless as the drone could not reach high altitudes so that the camera could obtain footage.
Programming
With the addition of the Pi Camera, the programming had to be minorly changed:
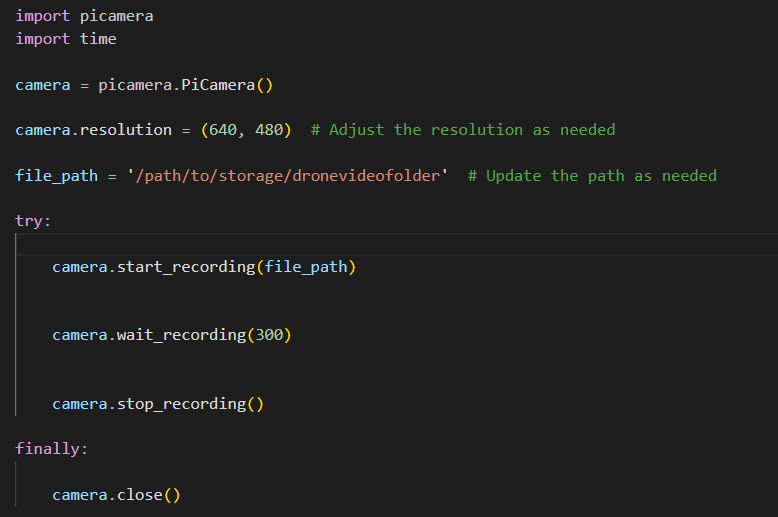
PICAMERA
- This function allows the onboard camera to record for 5 minutes. We will check the footage recorded after the flight is concluded.
Building, Testing, and Functionality
The functionality and results of the drone remained the same, the only difference obviously being the addition of the Pi Camera. The Pi Camera allowed us to receive video footage that we previously could not receive, and was overall very useful for our future prototypes. This prototype surpassed the first section of our problem once again, but still lacked the speed for the drone to be able to surpass human capabilities at a large scale.
Overall, although this iteration was successful in some areas, it did have many flaws that did affect the performance and accuracy of the drone itself. The code, design, etc. of this prototype remained the same, however, the only difference was the addition of the camera. We planned for our next prototype, aiming to make the flight performance and accuracy of the drone different in many aspects.
Prototype 3
Design and Programming
Design

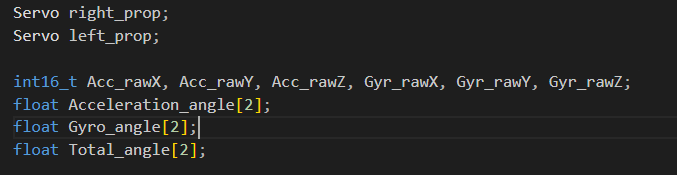
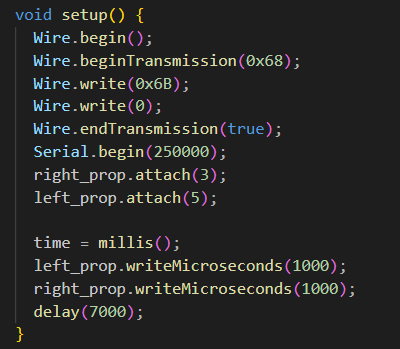
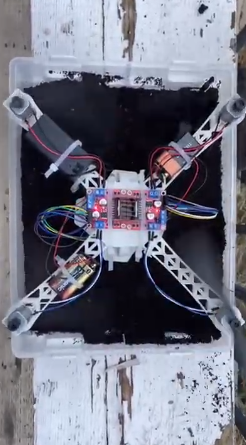
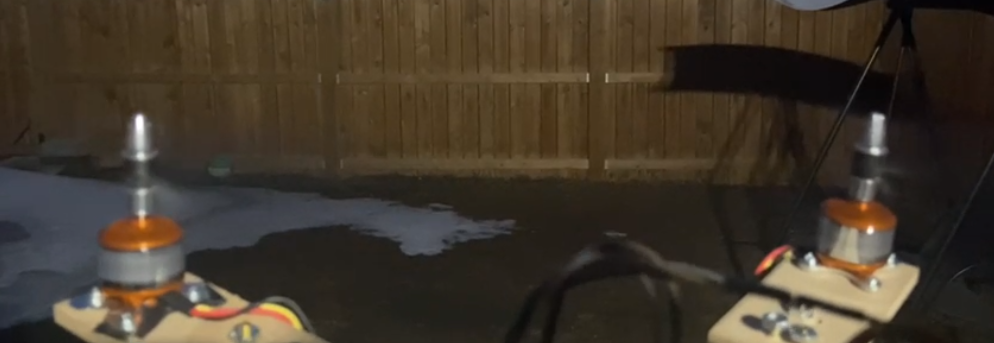
For our last and current prototype, we decided to change many factors of the drone to allow the prototype to achieve lift effectively, remain stable throughout flight, and overall ease the wiring and other processes. For one, we decided to completely replace the DC motors with brushless motors, which allowed the propellers to reach staggering RPM's (revolutions per minute). Along with the brushless motors, we also needed to purchase ESC's which allow the motors to have a stable connection with our flight controllers. Furthermore, the Raspberry Pi, once used for the motors, was now changed to be used for the soil moisture sensor, and having the 2 Arduino Uno’s control the motors. Finally, we decided to integrate a gyroscope (MPU 6050) into this prototype to allow the drone to be stable, and to connect 2 motors to the Arduino at one time. The soil moisture sensor and camera were in the same positions of the last 2 prototypes, however the programming for the soil moisture sensor had to be adjusted to accommodate for the changes we made in this prototype.
The chassis remained the same for this prototype as well. However, in order to connect the motors to the drone, adjustments would have to have been made. We had to use a wood piece to screw the motors on, and then connect that piece onto the drone, as the motors were quite bigger as compared to the drone's motor areas. The new design proved to be successful, as the new motors were powerful enough to generate the lift needed for the drone to hover in the air, and easily obtain the soil moisture.
Programming
Due to the change in the motors, new programming would have to be added to make the motors function. Furthermore, we also had to recode the soil moisture sensor with the Raspberry Pi now taking control of it. We also had to do many calculations to get the gyroscope correct and allow the drone to remain stable throughout flight. The code needed for the motors was now all Arduino C++.
Arduino Code (Motors)

- Define all libraries needed for our project (there are red lines because my Visual Studio Code was not updated).
- Define all the variables needed for the MPU-6050 to function.
- This is the setup function that is required, and it initializes the drone for flight.
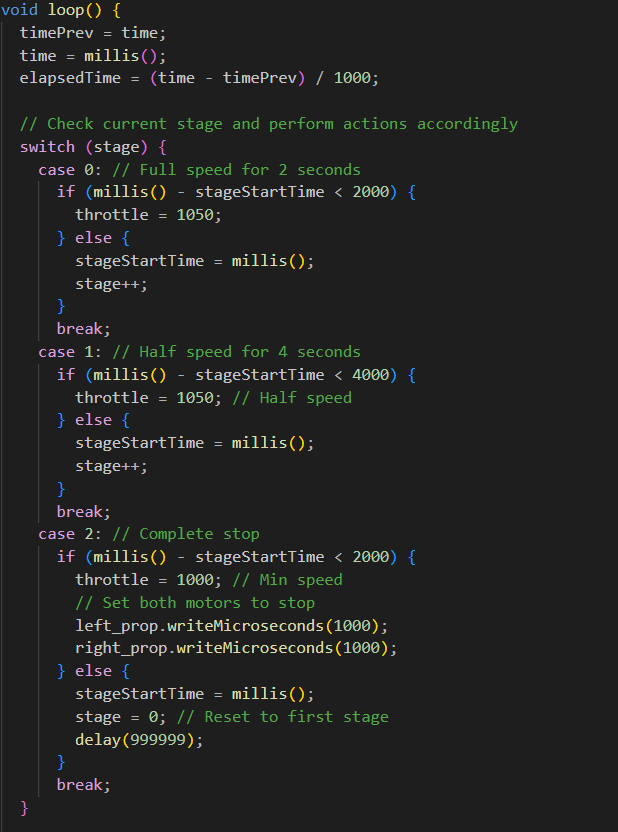
- The void function tells commands for all ESCs to follow. The code later performs the PID control for the remainder of the flight (will be explained later in this section).

- Perform PID control (stabilizes drone during flight with the MPU-6050 chip).
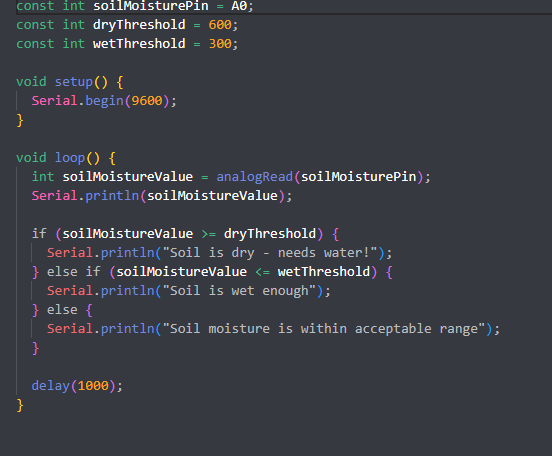
Soil Moisture Code![]()
- Import the proper Python libraries that are needed.
- Find the correct threshold for the project and the soil moisture pin.


- Setup the Raspberry Pi to receive soil moisture values from the sensor.

- Read the analog input sent from the soil moisture sensor to the Raspberry Pi.
- Run both functions at the end of the code.
Building, Testing, and Functionality
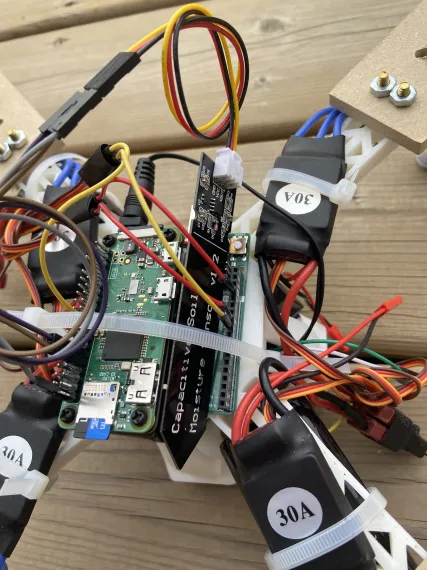
The organization of the new drone had to be majorly altered, as new components such as the LiPo batteries and the ESC's had to be stored. The LiPo batteries were on the bottom of 2 of the drone's arms, while the ESC's were located on the top of each arm. One Arduino was stored at the bottom of the drone, alongside the Arduino batteries, and one Arduino and the Raspberry Pi were stored on the top of the drone. Overall, this design proved to be successful in our testing and overall stability.
The functionality of the drone had completely changed. With the new additions of the brushless motors and the gyroscope, the flying process was much smoother, and allowed the drone to make more precise movements that once couldn't be performed. Our new drone, although somewhat heavy, could achieve lift and could easily hover in the air, allowing us to accurately obtain the soil moisture of plants without any interruptions. However, the testing phase of the drone was somewhat different. The ESC's had to be calibrated every now and then or the motors would malfunction. The calibration was a huge part of the drone, as without calibrating the ESC's, the drone would not have been able to fly.
Overall, this prototype proved to be the most successful out of the 3, and we have surpassed both of our problem statements with the new prototype. The agricultural drone is not only easy to automate, but also easy to maneuver, as the gyroscope is able to control the drone and maintain its balance.
Analysis
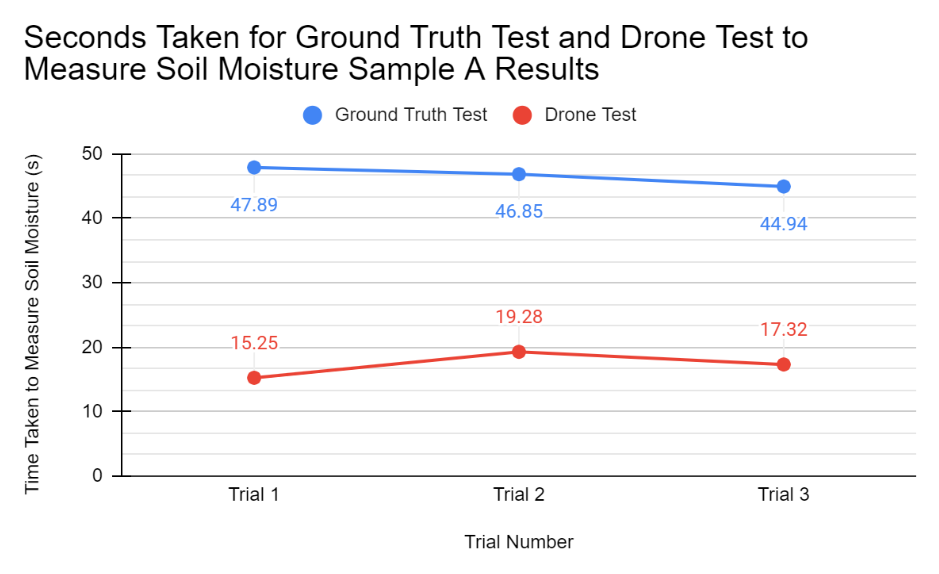
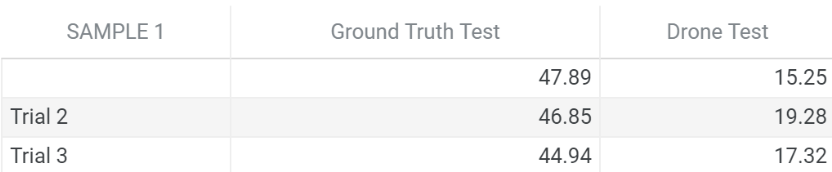
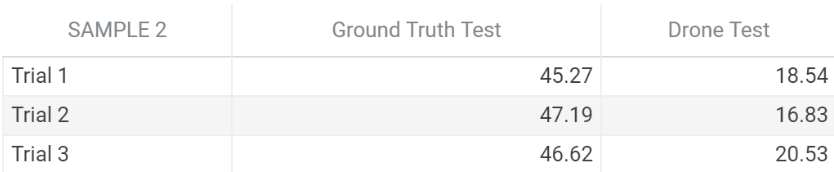
The testing phase of the drone will consist of the drone flying in the air, hovering, obtaining the soil moisture of the plant via the soil moisture sensor near the bottom of the drone, and then landing. We will also be taking a 'ground truth test', which is when the soil moisture sensor is tested without the drone to ensure that the drone provides accurate and informative data. We will be using this test to represent our traditional farming method, or the method used by humans. We will be timing both processes to see how long the drone takes to measure the soil moisture of the plants, compare it to our ground truth tests taken previously, and to conclude if the drone was more efficient than without the drone so that we can conclude if the drone is able to perform better in terms of speed compared to traditional methods. Finally, we will be testing the soil moisture for 3 plants and 3 trials for each, each trial testing both dry and wet soil.
Each of the prototypes gave us the same soil moisture values, as shown below:


Soil Moisture
Prototypes 1 and 2
Prototypes 1 and 2 had the same results, as little to no changes were made regarding the motors and overall functionality (other than the camera). Our data from prototypes 1 and 2 showed that the drone was about 50% faster as compared to the ground truth tests. However, the drone did waste time as it took a while to get the drone off the ground and to maintain its hovering position. With this information, we decided to completely transform prototype 3 into something completely new, with many powerful motors that would help us to achieve that lift in a short amount of time.
Despite the drone lacking in generating lift accordingly, the results were still informative and allowed us to come to a solid conclusion - the drone was cost-efficient and was relatively cheaper than industrial agri-drones, however the drone, although faster than human methods, was still quite slow and could be much faster with more enhancements. The results are shown below.


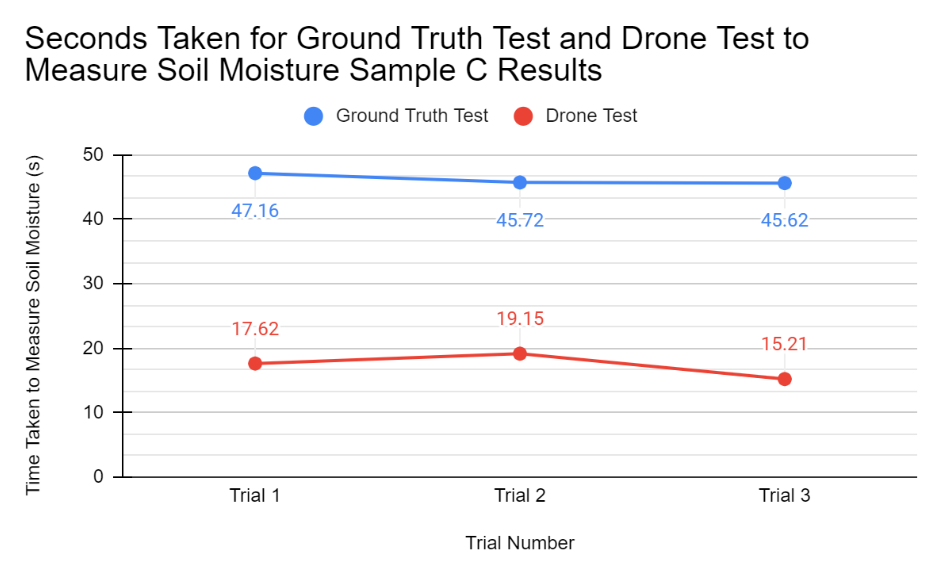
Prototype 3
Prototype 3 took much less time to measure the soil moisture of the soil as compared to the previous prototypes. The drone proved to be approximately 75% faster as compared to the ground truth tests. The drone took much less time to generate lift, and as a result, significantly decreased the time needed to hover in the air. Our new prototype showed that, through the use of drone technology, people can have a chance at accessing budget-friendly, advanced farming equipment so that they can be able to save time and money on expensive farming equipment. To conclude, our prototype successfully passed our initial problem statements, and overall was efficiently able to gather reliable and accurate data that we could use to innovate and expand the world of farming with.
Below is the data collected for prototype 3 (keep in mind that the same ground truth test values were used for these ones as well).


Conclusion
- Yes, it is possible to create a budget friendly drone with similar functions as those in current society, as demonstrated in our experiment. In current society, drones are used to scout plants and monitor health, monitor livestock, release pesticides, etc. Our project showed that it is possible to create budget friendly drones with increased payloads, quality cameras and sensors, and shows that the future of agriculture is rapidly approaching, and that farmers around the world will soon have access to this groundbreaking technology.
- Yes, a drone is able to perform better in terms of speed as compared to traditional farming methods. Traditional farming methods mainly relied on the use of manual labor and organic pesticides, however, our drone shows that using more advanced farming methods will not only have an increased benefit on the crops, but also the farmers themselves. Our drone has the ability to work autonomously, meaning that farmers do not need to control the drone. Also, the drone is able to do all the functions the farmer requires 24/7, as the drone does not need breaks and such. So, with our drone, farming will improve in many aspects and will be incredibly efficient.
Citations
- Advantages of drones. (2021, May 30). COPTER.BG. Retrieved November 10, 2023, from https://www.copter.bg/en/blog/advantages-of-drones-and-drone-technology
- Ahirwar, S. (2019, January 10). Application of Drone in Agriculture. https://www.researchgate.net/profile/Srinivas-4/publication/331017387_Application_of_Drone_in_Agriculture/links/5c6aacb04585156b57036824/Application-of-Drone-in-Agriculture.pdf
- Allain, R. (2017, May 19). The Physics of How Drones Fly. WIRED. https://www.wired.com/2017/05/the-physics-of-drones/
- Design and Development of Drone for Agricultural Applications. (n.d.). IJLEMR. http://ijlemr.com/papers/volume2-issue7/18-IJLEMR-22328.pdf
- Drone Technology In Agriculture. (n.d.). Croptracker. Retrieved November 10, 2023, from https://www.croptracker.com/blog/drone-technology-in-agriculture.html
- Dupuis, A. (2023, June 12). Environmental Impact of Traditional Farming: 5 Effects. Eden Green. https://www.edengreen.com/blog-collection/environmental-impact-of-traditional-and-vertical-farming-2021-report
- Farm With A View: How Drone Technology Is Taking Agriculture To A New Level. (2023, February 23). Forbes. Retrieved November 10, 2023, from https://www.forbes.com/sites/stevensavage/2023/02/23/farm-with-a-view-how-drone-technology-is-taking-agriculture-to-a-new-level/?sh=2f05b3804962
- Jao, E. (2023, July 31). Traditional vs. Modern Farming Techniques: A Comparative Analysis. Milk and Honey Ranch. https://milkandhoneyranch.com/gardening-and-farming/traditional-vs-modern-farming-techniques-a-comparative-analysis/
- Johnston, M. (2023, September 7). Thrust and Newton's Third Law in Aviation - Cal Aero Blog. California Aeronautical University. https://calaero.edu/newtons-third-law-in-aviation/
- Kamprad, D. (n.d.). Urban Farming vs Traditional Farming: What's the Difference? Impactful Ninja. https://impactful.ninja/urban-vs-traditional-farming-differences/
- McSwine, D. (2023, November 7). Implementation of drone technology for farm monitoring & pesticide spraying: A review. https://www.sciencedirect.com/science/article/pii/S2214317322000087
- McSwine, D. (2023, November 7). Traditional Farming Practices and Its Consequences. https://link.springer.com/chapter/10.1007/978-3-030-61010-4_6
- STEM LEARNING: Advanced Air Mobility: The Science Behind Quadcopters Reader—Student Guide. (n.d.). NASA. https://www.nasa.gov/wp-content/uploads/2020/05/aam-science-behind-quadcopters-reader-student-guide_0.pd
- Daly, D. (n.d.). How Farmers Are Using Drones in Agriculture. Consortiq. https://consortiq.com/uas-resources/using-drones-in-agriculture-industry
- DRONES, S. (2023, September 7). Are agriculture drones cheap, the best cost, and where is the location? Medium. https://medium.com/@samlisisi456/are-agriculture-drones-cheap-the-best-cost-ad-where-is-the-location-f253b90cf59d
Acknowledgement
We would like to acknowledge our parents for providing support and guidance for many aspects of our project, as well as our CYSF coordinator Ms. Aukakh and our school Science Fair Comittee for providing feedback and guidance towards our project. These individuals provided their valued feedback in order to help us improve and expand our project.